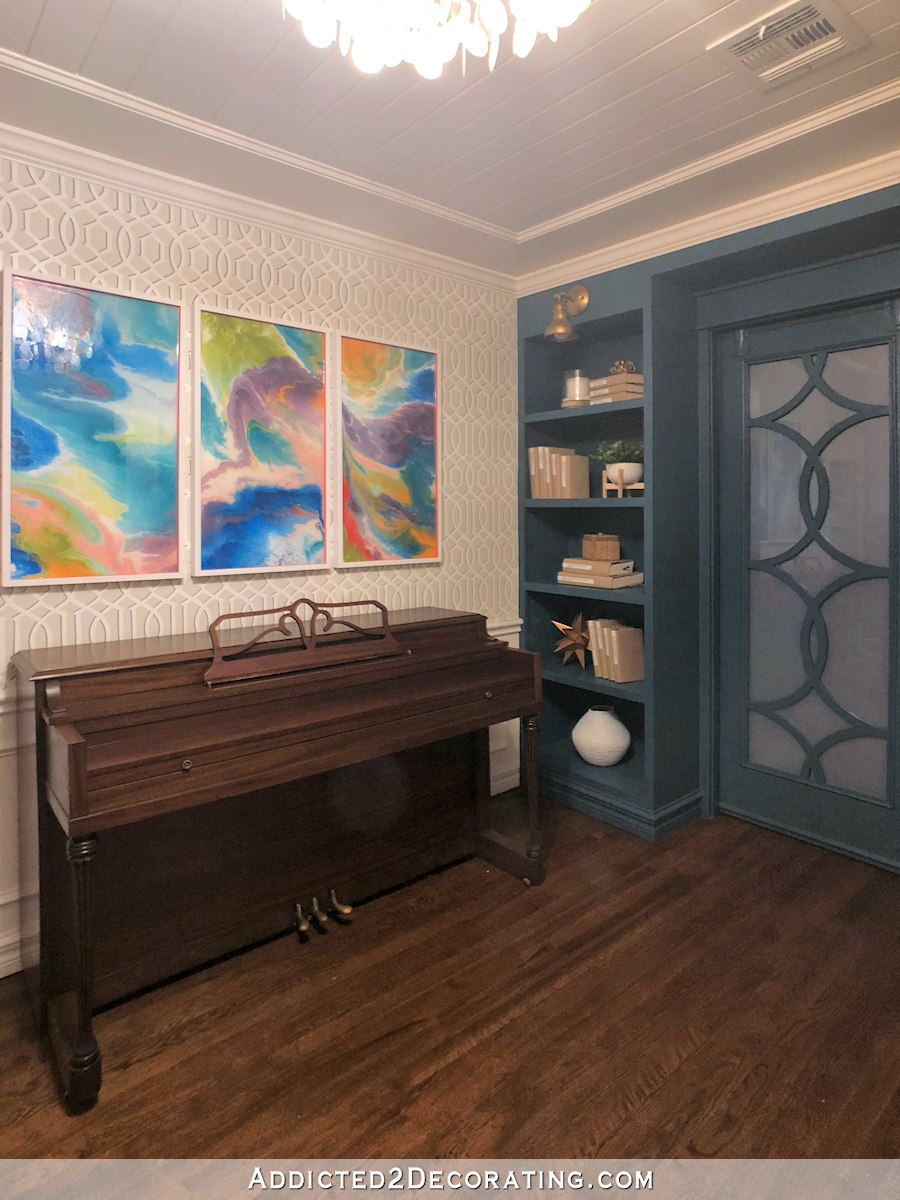
Music Room Ceiling Progress
I’ve finally made a bit of headway on the music room ceiling! As I shared on Monday, I’m doing a planked wood ceiling in the music room, which will tie in with the overmantel I plan to build in the dining room. I haven’t made much progress at all, but I thought I’d share it, along with a few tips I’ve learned along the way since this is my fifth time to do this planked wood look in a room.
On this ceiling, I used a product called 3-ply underlayment. It’s a thin plywood (1/4-inch), and the 4′ x 8′ sheets cost around $12 each. I had Home Depot rip them in half (i.e., cut lengthwise) for me, and then I used my table saw at home to cut them into strips. I got 12 strips out of each piece, and each strip is just under 4 inches wide and 8 feet long.
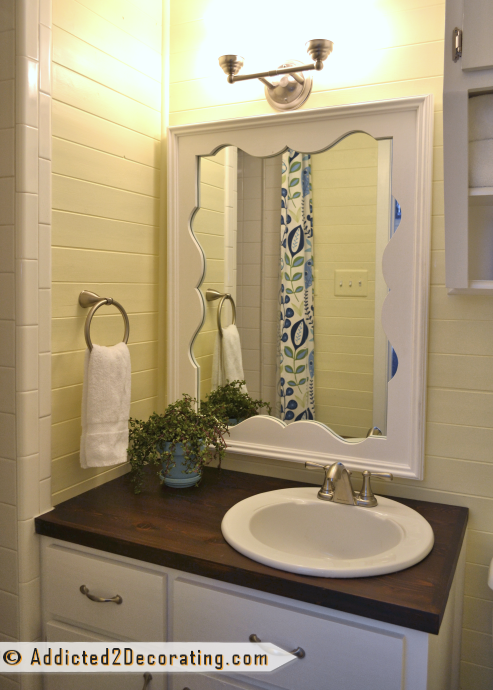
I like to use this underlayment product because it can be painted or stained (I think the wood grain in it is really pretty, and it’s what I used on my bathroom ceiling), and it’s sanded very smooth. The downside to using this product is that it takes quite a bit of time to cut the strips, and then each strip has to be sanded on the cut edges. Sanding has to be done very carefully because if the edge of the sandpaper catches underneath a splintered piece of the wood veneer, it will rip it off very easily, as you can see here…
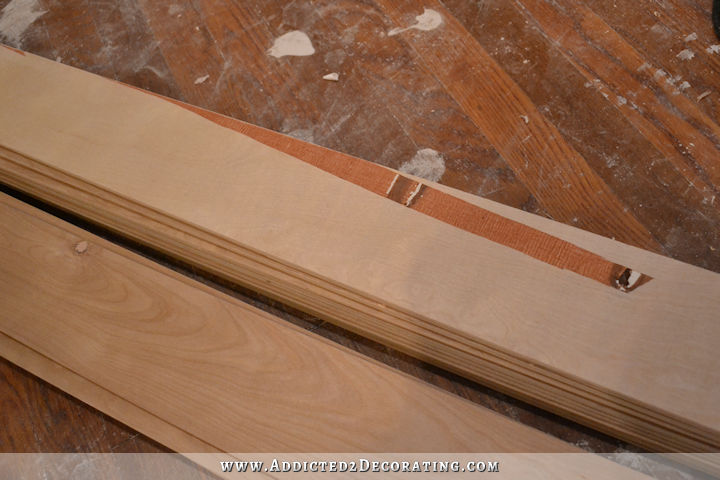
The veneer peels off of the back side much easier than it does from the front side, but you still have to be very careful with both sides because it WILL come off of the front side as well.
I have a design in mind for my music room ceiling that will only use full 8-foot strips so that nothing has to be pieced together end-to-end. The piecing together end-to-end, in my opinion, gives it a much more casual, country, farmhouse look. Using full pieces with nothing pieced together gives it a cleaner and more elegant look. At least that’s how it looks to me. 🙂
Since putting up 8-foot lengths on the ceiling by myself can be quite a challenge (holding it perfectly in place while nailing it up, and then being able to get down and move the ladder without it falling to the ground), I had to come up with a way to brace one end to act as a second set of hands for me. I had already marked where the slats would go by drawing a 14-inch border around the ceiling, which will make more sense later. Then I used a scrap piece of 1″ x 2″ MDF and nailed it to the ceiling along the border that I drew (piece “A” in the picture below). I just used small 18-gauge nails so that I would do too much damage to my ceiling. And then I nailed another scrap 1″ x 2″ (piece “B” in the picture below) into the side of the first piece, dropped down 1/4″ from the ceiling to make room for the wood slats.
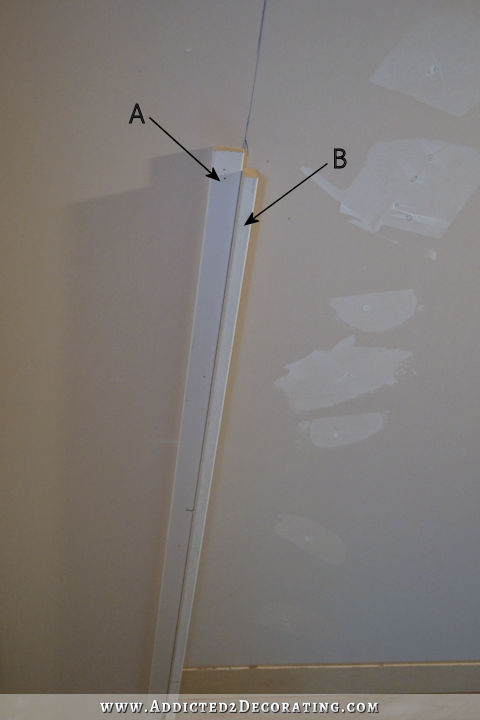
This brace allowed me to start in the middle, which is much easier than starting on one end. I simply slid one end into the brace, and nailed it in the center, locking my nails in by nailing them at opposing angles.

By placing the nails at opposing angles, this holds the slat to the ceiling and allows me to get down and move the ladder without the nails pulling from the ceiling. Had I nailed them straight in, the the weight of the wood slat (even though it’s not very heavy at all) would have pulled the nails out. But you can see here how the angled nails hold the slat and give plenty of time to get down and move the ladder (and take a picture 😀 ) without the slat pulling out.

I also used Loctite construction adhesive on each piece before nailing it up. And to get the pieces perfectly spaced, I used a scrap piece of the underlayment, which gave me 1/4-inch gaps. I’ve found that 1/4-inch gaps give me the perfect spacing that I prefer, but if you like less spacing, you can always use something thinner. I know that some people actually use nickels for the spacing, but I would suggest using something much bigger (not thicker, just bigger, like a scrap piece of thin plywood that is several inches long and much easier to hold in your hand).
One word of advice…if you’re going to use this process to do a ceiling or wall, and you’re going to paint the ceiling or wall, do not install the slats without gaps!! If you’re going to stain the wood, you can install it without gaps, and the different wood grains will give you a beautiful look. But if you’re going to paint, the entire effect will be gone if you install without gaps, and from any distance at all, it will look like a (very poorly) drywalled ceiling or wall. The gaps are what give it that tongue-and-groove/beadboard/nickel-gap planked look.
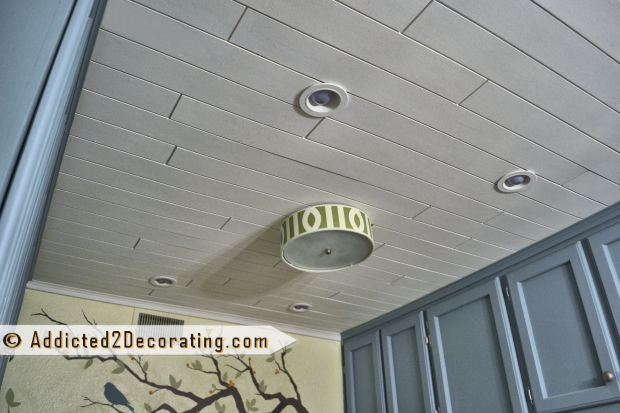
As I mentioned, this is the exact same product I used on my bathroom ceiling, and I stained those pieces rather than painting.

If you’re going to stain, I highly suggest staining the slats before installing them, especially if you’re working on a ceiling. I can’t even imagine the headache of staining and polyurethaning a ceiling after it’s already been installed. I just picture stain running down my arm. And you’ll also want to paint the ceiling before installing the slats. In the bathroom, I primed the ceiling and then painted the ceiling black before installing the wood slats.
I also used this method for the kitchen ceiling at the condo, but for that ceiling, I cut the eight-foot strips in half, and had lots of end-to-end pieces. I think this is a much more causal look.
For the walls in the hallway bathroom at the condo, I used a product called Eucaboard (labeled Hardboard at Home Depot).
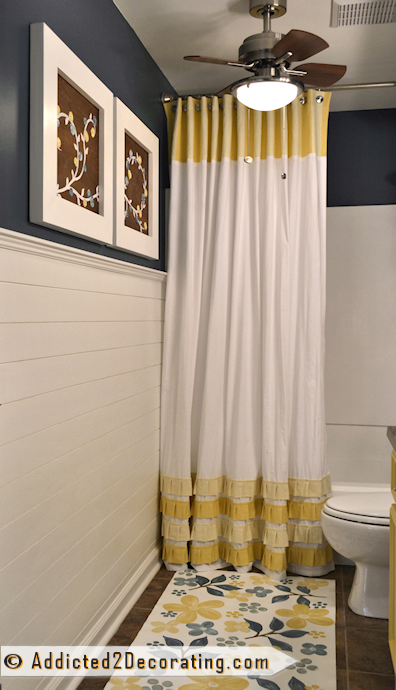
I installed it using the same method (Loctite construction adhesive, 18-gauge nails, and 1/4-inch spacer), and since it was used in a bathroom where it would have to withstand moisture, I also caulked every single gap, and then primed everything really well with two coats of oil-based primer before painting. It held up perfectly to the daily moisture from the shower. Eucaboard (hardboard) is about $15 for a 4′ x 8′ sheet. It cuts very smoothly, and the edges are much easier to sand than the underlayment plywood. But of course, you can’t stain Eucaboard. It’s perfect if you want to paint, though.
In the small bathroom at the condo, I actually used tongue-and-groove pine planks that are made for walls and ceilings. And quite honestly, this is my absolute LEAST favorite method/product out of all that I’ve used. In fact, I’d go so far as to say that I hate this product, and I’ll never use it again.
Not only are these the most expensive of the options I’ve used, but these tongue-and-groove boards were very rough in some places. I mean, they were rough like 50-grit sandpaper, and it was very visible in places (unlike the very smooth plywood or eucaboard). That means that once they’re installed, if you want really smooth walls, you then have to sand the face of the boards. They were also full of knots and knot holes, and since they come in packages with about six boards, you don’t notice the knot holes until you have the packages home and opened. So again, if you want smooth walls/ceilings, those will have to be wood filled and sanded before priming and painting. The tongues and grooves were often broken and cracked, making them very difficult to go together.
And my least favorite thing about this product is that you have to take it home, open the packages, and let it acclimate to your home for something like 72 hours before installing, just like hardwood flooring. And even if you do it right, the boards still might expand and contract, leaving gaps between some of them after a few months or a year, which is exactly what happened in this bathroom. I had to go back and caulk some of the gaps, and touch up the paint. I’ve never had to do that on any ceiling or wall where I used the thin plywood or hardboard.
So those are my experiences with achieving a planked wall/ceiling look. I much prefer the finished look of thin plywood or Eucaboard. However, I would never use a product thinner than 1/4-inch. 1/4-inch product seems to give just enough body and substance to lie flat, and give just enough depth to the grooves to give the impression of nickel-gap planking, tongue-and-groove boards, or shiplap. Deeper grooves will just become dust traps, especially on walls. And with thinner products, you run the risk of them not having enough body or substance to lie flat, and you can end up with a cheap-looking, “wavy” boards that won’t lie flat against the wall.
I think that pretty much sums it up. 🙂 If you’ve used a product that you really like (or didn’t like), I’m sure others would benefit from hearing about it!

Addicted 2 Decorating is where I share my DIY and decorating journey as I remodel and decorate the 1948 fixer upper that my husband, Matt, and I bought in 2013. Matt has M.S. and is unable to do physical work, so I do the majority of the work on the house by myself. You can learn more about me here.

Thank you so much for this advice. I’m getting ready to do one of my bathrooms in this stuff and your tips are greatly appreciated! You’ve changed my direction for the better. I love your bathroom and made my choice on that ceiling, so now I know the ins and outs and I can proceed with confidence.
Kristi,
You mentioned painting or staining before installing this ceiling material, but you didn’t do either what are you going to do?
I think she meant she painted the dry walled ceiling, not the planks. She stained the planks first because doing that overhead would indeed be a mess!
Looks great, Kristi. I love the stained one in the bathroom. I’d like to try this in my upstairs on the knee walls where they break before the roof ( ceiling) slants. It’s roughly 3 ft from floor to the slant. not sure if I can tackle this myself but I’d like to try. It would be white. I’ve never used a circular saw, and my fella will be gone over the holidays, do you think Home Depot would cut them?
Home Depot has rules that they’re supposed to follow regarding the sizes they can cut. It think the smallest they can cut lengthwise is eight inches, and the smallest they can cut going across is twelve inches. So if you want strips narrower than eight inches, you’ll need to cut them yourself. The strips I used were just under four inches.
Kristi, you mentioned painting or staining this product before installing but you didn’t do either, what magic are you doing to it for your home?
It’s really only needs to be done beforehand if you’re staining it. Since stain has such a thin, watery consistency, I just imagine trying to stain a ceiling and it running all down my arm. Yuck! But paint is thicker and easy to use on a ceiling, so if you’re painting, you can wait until after it’s installed. The music room ceiling will just be painted white. No magic, but I hope it will be pretty when it’s finished. 🙂
I used a similar underlayment for my shiplap wall in my living room! It was perfect! http://junquegallery5.blogspot.com/2015/10/shiplap-walls-parade-of-homes.html
Is the music room the next room that you are going to do a complete 100% make over on? If so, this is going to be fun.
I’m working on the music room, entryway, and dining room simultaneous. I’m kind of stalled on the dining room right now until my new windows are installed. Then I’ll be able to finish up the trim and walls, and move on to the fireplace overmantel. In the meantime, I’m working on the music room.
These are my favorite posts! I love it when you talk about how to do something and also about your past experiences. When you did your piano reveal – no doubt it was really beautiful – but there were no process photos and I felt like I missed out. I have a hard time getting a nice clean finish on any painted surface. I would have been very interested to see how you actually painted it. I’m going to enjoy very much watching how this ceiling comes along because it looks like you are going to include all the steps. Thanks in advance
I know Kristi uses floetrel (I think is the name). It keeps the paint from drying out so quickly so you can smooth out brush strokes.
Love the current stained planked bathroom ceiling over all others! Are you going to do a shallow tray around the ceiling? That would be amazing!
I’m going to try to do something like a shallow tray, but it’s going to be VERY shallow since my ceilings are only 8 feet high. I’m hoping it turns out like it looks in my head. 🙂
Exactly the info I needed, to make an inform decision about my kitchen ceilings.! Thanks so much!!! Very economical, too! Ingenious way to hold them up! Any suggestions on doing it with a pickled look. I need it light colored, but would not really want just white, and with the nice wood grain, I think it would be my option. Would I still need to paint the ceiling dark?
I love yours, and looks like your going with the stacked edges Very cool look for your music room!
There are other options that I haven’t used myself, though! You might want to look into those, too, and really weigh your options before making a decision. 🙂 There’s a stain specifically made for giving you that white pickled look you want. I can’t remember who makes it. Minwax, maybe? You wouldn’t need to paint the ceiling dark. The dark painted ceiling is only if you’re using dark stained boards that you pre-stain before installing.
You’re genius! Lol! I love how you solved the problem of holding the boards up on the opposing end. I’m so glad you posted about the T&G boards, that was a product I was seriously considerin, but not now. Are you able to handle the 8′ boards on your table saw by yourself? Do you have an extension?
Thanks for the great info?
You’re genius! Lol! I love how you solved the problem of holding the boards up on the opposing end. I’m so glad you posted about the T&G boards, that was a product I was seriously considering, but not now. Are you able to handle the 8′ boards on your table saw by yourself? Do you have an extension?
Thanks for the great info!
Kristi, I’m so glad you mentioned the T&G and your disappointment with it. I WAS considering it for my laundry room, but no longer! My ceiling joists are on 24″ centers and I was planning to use 1/2″ OSB for underlayment. Do you think I should run the finish ceiling perpendicular to the OSB or would it not really matter?
Thanks for your detailed explanation Kristi. I’m just about to do some planking on a wall, and that was all very helpful. Interestingly, you can buy Eucaboard in the USA, but although Eucalyptus is native to Australia, that product doesn’t exist here! Tsk!
Kristi, I love how you problem solve! I don’t know I would have ever thought of that little lip number! My husband and I drove into Waco today from Tucson. Came to visit The Silos before heading down to Austin for a wedding. Since I read you every day I feel like you are a close friend….even though you don’t even have a clue that I exist! Anyway, if you need any help tomorrow shoot me an email… I’m sure we could spare an hour or two to help you hold up whatever needs holding up!
You are hoot! I just went and reread your goals for the rest of the year and I didn’t see paneling the music room ceiling on the list. Did you sneak this in? LOL!
I love your ideas and execution! Can you tell me what color stain you used on your bathroom ceiling? So beautiful! Thanks
All of that info should be here: https://www.addicted2decorating.com/bathroom-ceiling-progress-make-plywood-look-like-beautiful-wood.html