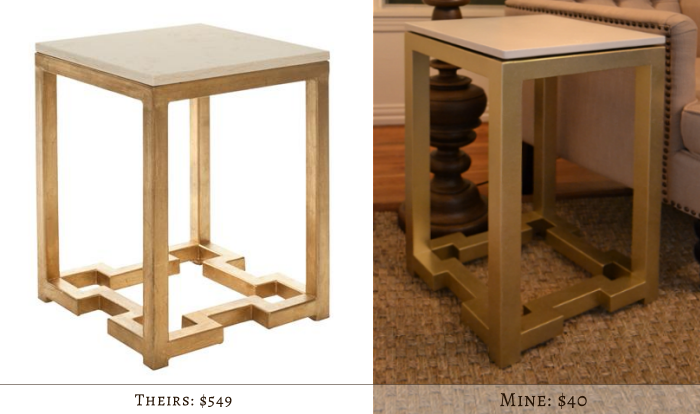
DIY Side Table With Greek Key Base
For some reason, the glass and metal side tables just weren’t cutting it for me in my living room, so I now have shiny new gold Greek key side tables.

The other end tables were fine, and I’ll probably end up using them in the family room once we remodel the sunroom and make it a family room. But for the living room, they were just lacking. They were to big, while actually not having enough visual weight to them. They just looked too light and airy. Plus, the room was starting to be a bit too traditional and predictable for my taste, so I wanted to create something with a more modern look to contrast all of the traditional stuff in the room.
When I found this Greek key side table from Shades of Light, I knew immediately that’s what I wanted for the room, but their $549 price tag was far from what I wanted. So of course, I made my own!
I used 2″ x 2″ lumber for the entire base of the table. I didn’t purchase the cheap furring strips that are around $1.80 for an eight-foot piece, since those are generally badly bent and warped. Instead, I went with the ones that cost almost five times that (about $8.50 each) so that I could have a much better chance at finding ones that were perfectly straight (or as close to perfect as lumber can get). In all, I used three pieces of 2″ x 2″ x 8′ lumber for one table. If you make two tables, five pieces will be enough.
(FYI, I built two tables, and took pictures of the process on both. I combined pictures from each table below, which is why you see some assembled parts in one picture, and then those parts unassembled in the very next picture. Sorry if that’s confusing!!)
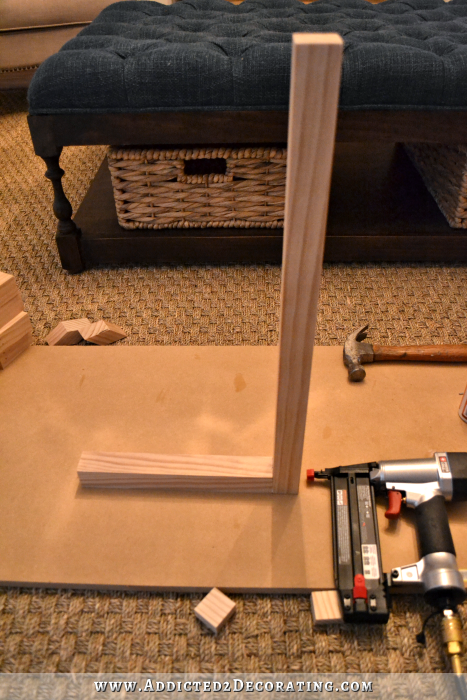
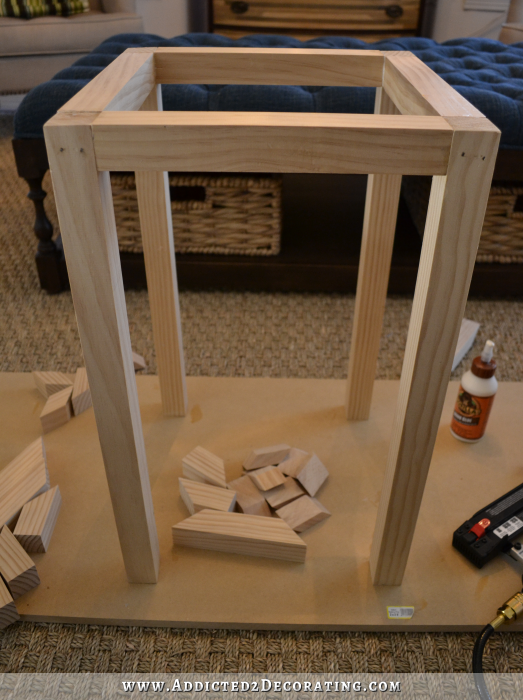
My tables are 14 inches square, and just under 24 inches tall. To make the basic structure of the table, I started out with four pieces of 2″ x 2″ lumber cut to 23 inches long, and four more pieces cut to 11 inches long. (I thought I would need those clamps, but I didn’t end up using them.)

I assembled the basic table form using wood glue and a brad nailer with 2-inch 18-gauge finishing nails. I also built the table upside down on a flat surface (scrap MDF in this case) so that the top would end up being as flat and level as possible.
I started by attaching one leg to one cross support, shooting the nails through in the direction as shown below.
Then one by one, I added another cross support, then another leg, another cross support, etc.

With the basic table assembled, it looked like this…

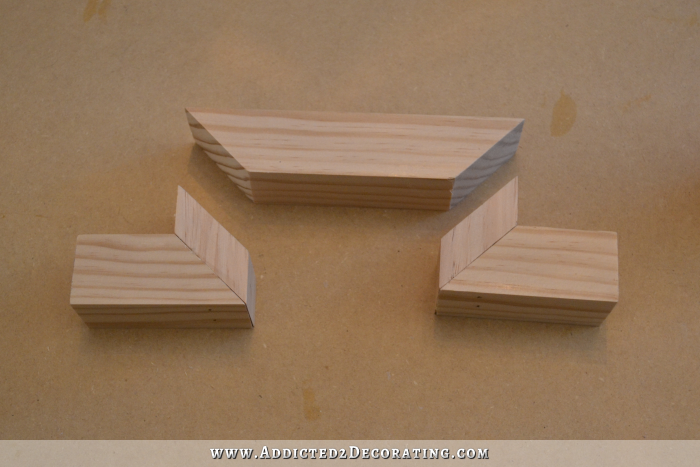
Then I needed to add the bottom support pieces that form the Greek key. Each piece was made of five individually cut pieces (three different types of pieces).

I absolutely hate measuring, marking, cutting, measuring, marking, cutting. So here are some pointers on making these pieces easier to cut.
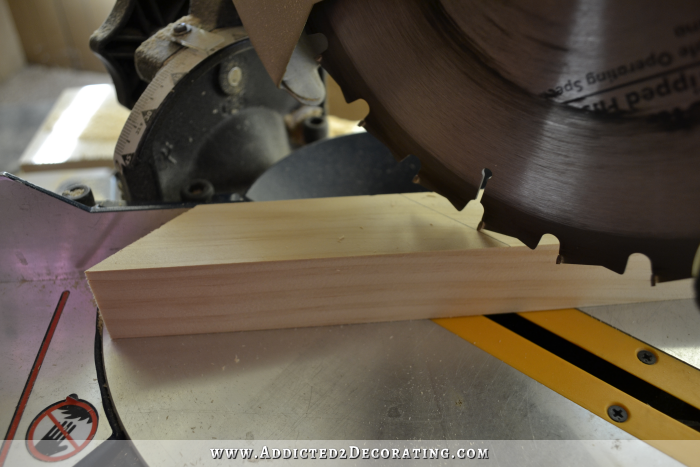
For the little pieces, start by cutting a 45-degree angle on the end of the board. Then set up a guide on your miter saw using a scrap piece of lumber and a clamp. That way, you can just slide and cut, slide and cut, slide and cut. And each piece will be exactly the same size.
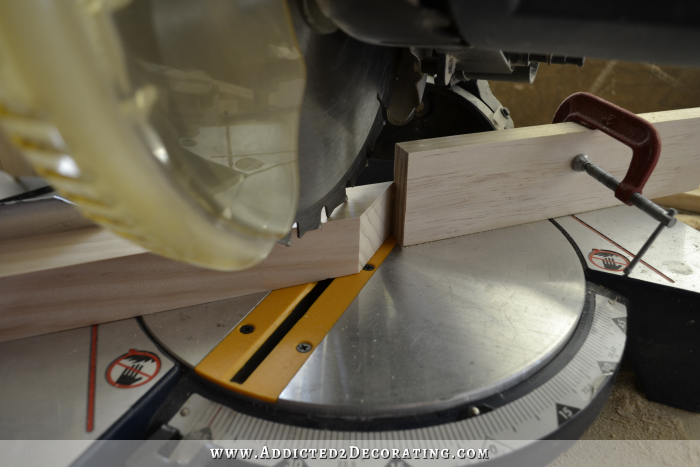
Continue sliding and cutting until you have all eight pieces needed for the table.
For the end pieces, you’ll need to measure, mark and cut the first piece. Then use it as a template for marking the next piece as shown below. Just use a pencil to mark the angle.
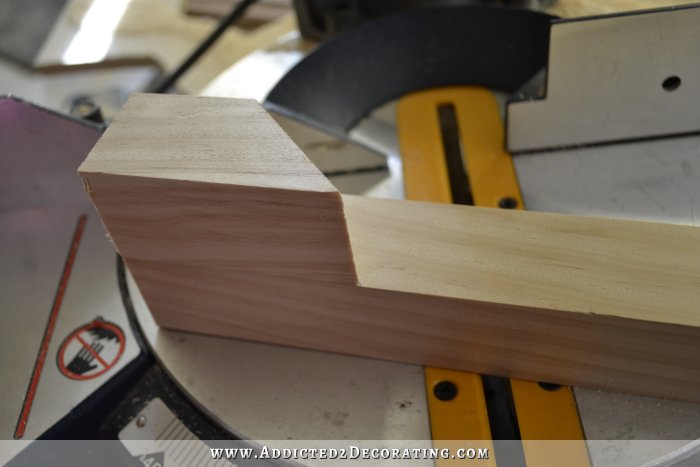
And then cut on the pencil line.

Then use the first piece as a template again. This time it’ll be facing the other direction, and you’ll be marking the 90-degree angle.

Set your saw angle to 90 degrees, and cut along the mark.

You’ll have to keep switching between a 45-degree cut and a 90-degree cut with each new cut until you have all eight pieces needed for the table. And always, always use the same (first) piece for the template each time. Don’t ever use different pieces as templates for each cut.
For the middle piece, again you’ll have to measure, mark and cut the first piece.
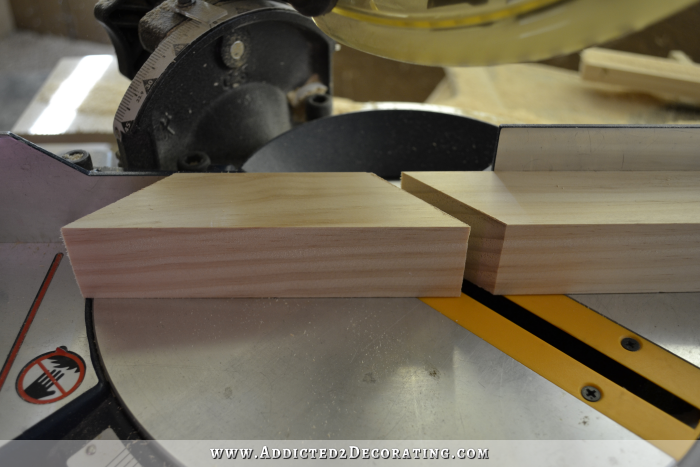
Then flip the board over, and use the first piece as a template to mark the next one.

And then cut along the pencil mark.
And after each cut, you’ll flip the board over, use the template to mark the next one, and cut along the line. Flipping the board over after each cut allows you to cut all of the pieces while keeping the same angle setting on your saw for each cut. Repeat until you have all four pieces needed for the table.
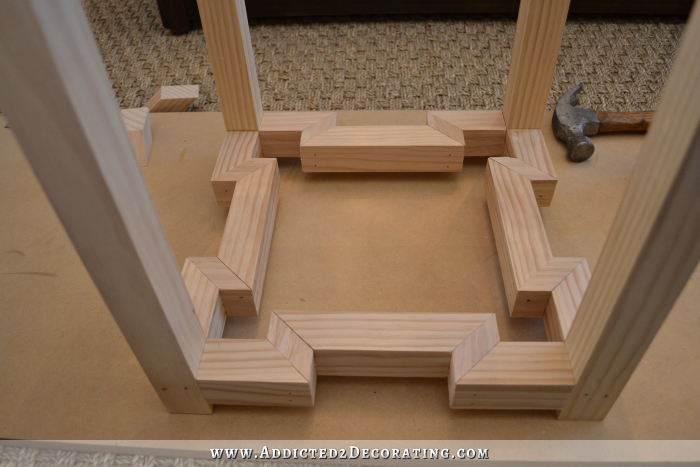
I assembled each support piece using wood glue and 1.25-inch finishing nails in my nail gun. I assembled the two ends first, and then attached the center piece last.
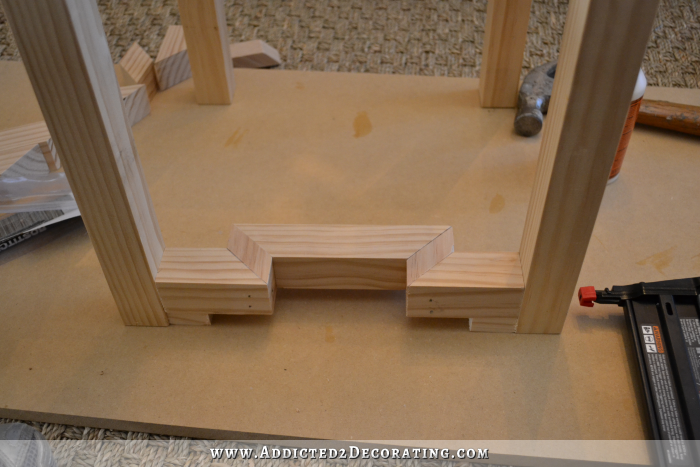
With all four support pieces assembled, I was ready to attach them to the table. To do this, I stood the table upright.
And then I cut two small pieces of 1″ x 2″ scrap lumber to use as spacers. I placed one spacer on each side right at the bottom of the legs.

And then I placed the support piece on top of the spacers and nailed the piece into place using 2-inch finishing nails.
I repeated that same process on the other three sections, and when all four pieces were in place, my Greek key design was complete.
The assembly of the table really was incredibly easy. After cutting all of the pieces, each table took me about 30 minutes to assemble from start to finish.
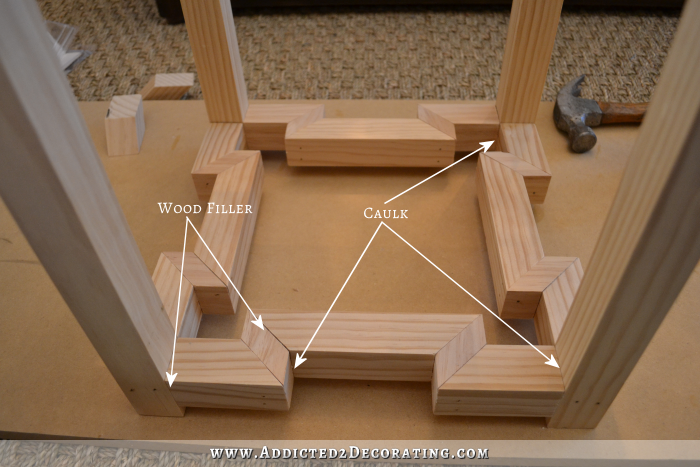
Then came the very time-consuming part — the wood filling, sanding, and caulking. I used wood filler first to fill in all of the nail holes, as well as the cracks where wood pieces met on the same plane. After the wood filler dried thoroughly, I sanded it all smooth. Then I used caulk to fill in any cracks where wood pieces formed a 90-degree angle.
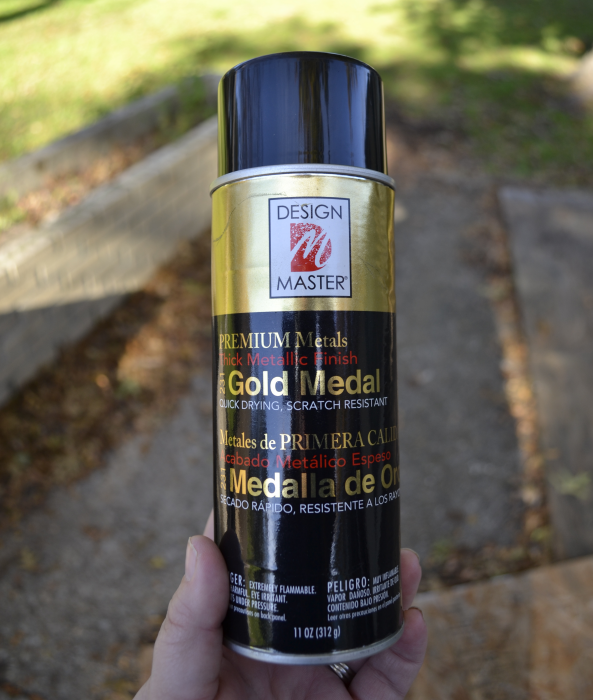
After giving the table two coats of spray primer (Rust-Oleum spray primer) and sanding it as smoothly as possible with 220-grit sandpaper, I tried to paint the table using my new favorite gold paint.
Sadly, all of the nail holes repelled the paint. I have no idea why that happened since they were all covered with primer, just like the wood, which took the paint beautifully.
But I couldn’t have all of those hideous discolored areas where all of the nails were, so I painted the table with Rust-Oleum spray paint first. I used some sort of copper color, although I don’t think the color really mattered.
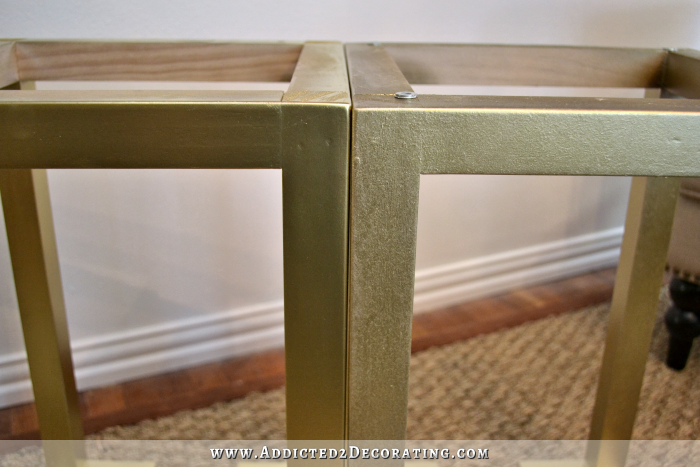
After that dried, I covered it with the gold, and it worked just fine.
I didn’t want just solid gold spray painted tables, so after the gold dried, I brushed on some Golden Pearl metallic paint (Martha Stewart from Home Depot in a small 10-ounce container), and then used a rag to kind of dab and blot the paint in a way that is very reminiscent of sponge painting a wall. When it dried, it gave the table not only a softer look, but also a more textured, varied look like you would get with gold leaf. You can see the difference below.
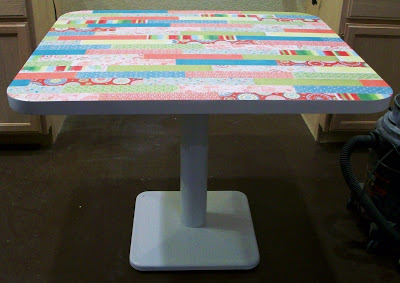
As far as the table top goes, I simply cut a piece of 1/2-inch MDF to the size of the table using my circular saw, and then sanded it (concentrating on the edges to give them a gentle curve rather than sharp edges), primed it, and painted it using Rust-Oleum Hammered finish spray paint in white. It gave it a beautiful subtle texture.

I also decided to add spacers between the base and the table top. I just cut four little pieces of a paint stir stick and glued them to the top of the table base, and then glued the table top onto the stir stick pieces. I tried placing the table top directly onto the base like the inspiration piece, but I just didn’t like the way that looked. I love that little space between the base and the top.

But of course, the star of this show is the Greek key base.

I think it adds the perfect modern touch to this room. I still want to add new fabric to the lamp shades, and add pillows to the chairs, using graphic and colorful fabrics for both to bring in more color and pattern. Right now, all of the varying shades of white and beige are a bit dull to me.

And of course, the best part of this project is the price. My table is a $509 savings over the other one. Mine doesn’t have that awesome real gold leaf finish, or a fancy granite top like the expensive one, but those are things I can live without.
If you make two tables, the price per table is actually less than $40 since you only have to purchase two additional pieces of 2″ x 2″ lumber, and one can of each spray paint is sufficient for both tables. The supplies for two tables cost around $60.
Not too bad for two custom side tables, right? 🙂

Addicted 2 Decorating is where I share my DIY and decorating journey as I remodel and decorate the 1948 fixer upper that my husband, Matt, and I bought in 2013. Matt has M.S. and is unable to do physical work, so I do the majority of the work on the house by myself. You can learn more about me here.


Your tables are perfect! I’m in love with gold accents, and the Greek key is very popular right now. These are so beautiful! I’m officially your biggest fan! 🙂
LUV the job and especially the breakdown explanation and pictures! You *are* such an inspiration!
What was the caulk you used, and why use wood filler on the angle cuts, but caulk in the corners?
Kristy explained a lot about caulk vs wood filler on her DIY Basics page but here’s a direct link: https://www.addicted2decorating.com/tips-for-installing-beautiful-almost-flawless-trim-moulding.html
Thank you for posting that link, Susan! 🙂
Both caulk and wood filler are used to fill in cracks and such, but the main difference is that caulk isn’t sandable,and wood filler is. So I use wood filer on any joint where I’ll want to sand to get a really flat, smooth surface. That includes nail holes, and anywhere that two pieces of wood meet on the same plane. Often times, one piece of wood will be slightly thicker than the one next to it, so if I’m wanting a perfectly smooth, seamless joint from one piece to the next, I’ll put wood filler on it, let it dry, and then sand the heck out of it.
Now in the areas where two pieces of wood meet at a 90-degree angle (or any other angle), obviously it’s not important for it to be perfectly flat from one piece to the next. So the easiest way to fill in those cracks with with caulk. Because if you use wood filler, then you have to sand, and sanding in angles can be quite a challenge.
So I always do the flat surfaces first, using wood filler to fill in any nail holes or seams/joints/cracks that will ruin that smooth, seamless look. Let it dry completely, and then sand the heck out of it so that it looks perfectly smooth and seamless. Then I remove all of the sawdust with a dry paint brush, and caulk the angles.
Of course, it’s also important to keep in mind that caulk isn’t stainable. So if you’re working on a piece that will be stained, I’m afraid you’re stuck with wood filler for the whole thing — even in the hard-to-sand angles.
Thank you! ~:0)
You’re my hero <3 Believe it or not my favorite part is the top! I love the textured top and the idea to lift the top off the base a bit, they're gorgeous!
Fantabuloso extraordinaire to the Hilt! Well done. And…you make it look so easy.
Wow, what an amazing job. This is truly an inspiring piece. Well worth spray painting in the wind.
Ok. I am ADDICTED to your blog! I seriously had withdrawls. Next time you take a WELL DESERVED break I will set up a rehab stint. LOL. Seriously though, I love the new tables. I really liked the others (once you painted them gold) and, I would have thought them perfect until these. After comparing the before and after shots I find that I like the size and weight of the new tables. As well I like the design of the base. Only after you made the new ones did I feel the originals were a bit light looking. (if that makes sense). Oh and the space between the top and base makes this look so much more expensive and custom. Again, I am learning so much from you! Thank you for taking the time to post your amazing talent. FOR FREE! Sorry Kristy Buck, I AM HER BIGGEST FAN!!!!!! LOL
Looking forward to tommorrow!
Sheila F.
Haha! Sheila, your rehab comment made me laugh out loud…literally. 😀
Kristi, you blow me away with your creative skills and talents. Plus your tutorials are outstanding. Thank you
Yet another beautiful creation by the amazing Kristi! I love it!
I am new to DYI furniture but love your blog and want to get started. I don’t know anything about nail guns but see there are a wide range of prices, types, etc. Any suggestions on my first nail gun purchase? Thanks and keep up the awesome work!
Check the blog a few weeks ago when Kristi was making the teal foot stool – she purchased a small compressor and nailers from Home Depot for $199 and highly recommends it. It’s also on her Facebook page.
You can check out this post to see a picture of the one I just purchased:
https://www.addicted2decorating.com/diy-ottoman-coffee-table-part-2-tufted-top-details.html
It’s AMAZING. I used a cheap air compressor for years, and this one is so much better quality. The package I bought (from Home Depot) came with two nail guns (one shoots 18-gauge finishing nails, and the other one shoots 16-gauge finishing nails) plus a staple gun. And as Darlene said, the whole package was only $199. I’m not sure if they still have this package deal, but if they do, I highly recommend it.
Oh my gosh, I love this! That looks just like your inspiration piece – even better because you made that! Even the detail of that little space between the top and the base, I just love that.
You are SO SMART! Every project proves beyond a doubt that no matter what the budget – a home can be as elegant as a person wants it to be. Your table will get that exact same use as the expensive one….materials don’t matter – it’s the beauty and usefulness of the piece that matters!!!
By the way I AM HER BIGGEST FAN!!!! 🙂
Wow. Your table looks exactly like the designer one! Good job. ….and I love that metallic paint!
You are amazing. Each post gets better and better. I wish I had an ounce of your creative mind.
Nice call! The only thing not working for me in this room were the tables. Just as you said, too big and too light. Now it’s perfect!! kelly
Gorgeous! You are brilliant!
Kristi! You hit it right out of the park!!! You’re awesome – they look so close it’s amazing. 🙂
Your table actually looks nicer. Love all the pointers, thank you so much!
I think your tables turned out just like the inspiration piece. Just beautiful!
I totally agree with your assessment of your previous tables and these new ones 100% fit the bill. Great job!!
Are you kidding me? Your mind works in fabulous ways. Love the tables.
Kristi those are amazing!! Seriously!!
These tables are much more interesting than the ones you had originally. They add the much needed creativity. And I disagree with everyone who says they look just like the $549 inspiration table. They look so much better. I bet furniture designers would like to take a page from your book! It seems everything you make looks better than the inspiration. What a joy to watch.
Now show us a new pic of your living room focal wall. What’s left in phase one? All I can tell is drapes and upholstery. Oh yes, pillows and lamp shades and a few accessories. Plus that sofa table. Do you realize how close you are to finishing phase one? Do you consider the greek key design as a possibility for the sofa table? Just wondering. Oh, I forgot, you probably can’t show us a picture of that focal wall until you finish your credenza. I’ll be patient, I promise!
Haha! You had me figured out. I didn’t show the whole wall because the credenza was still covered in primer. 😀 But I just posted the finished credenza.
Interesting idea…the Greek key design for the sofa table. I hadn’t thought of that. Hmmmm…
The projects that are left are all big ones — upholstering the sofa, making the draperies. Just thinking about the sofa makes me exhausted!! I’ve been considering taking the easy way out and buying a new one — just one I saw at Pier 1. But then I lose that possibility of having a “custom” sofa for my room. So I’m not sure if I’ll do that. It just seems so appealing to take the easy way out right now. 🙂
I am DROOLING over this table, it’s fantastic! A couple of thoughts for you…
Did you know you can find cedar 2×2’s at McCoys (and sometimes Lowes) for about half the price of poplar? They’re around 4-5 dollars each. Plus they’re true cut, which means they’re exactly 2″ by 2″. Though they are a bit rough, so it wouldn’t be great for this project without a lot of sanding. Sometimes it’s worth it to pay more so you don’t have to sand!
Also, if you didn’t mind the key extending a bit further into the center, an easier way to assemble the base would be to “layer” the 2×2’s by having two short pieces attached to the leg, and one long center piece that overlapped the two to make it look like it’s turning a corner. I hope that makes sense. It would be an easier way to construct the table for a beginner.
Your table looks so amazing! You truly impress and amaze me with every project you do. I never think your work looks “homemade”, always handcrafted to perfection. Bravo, and keep up the good work!
I like these tables much more than the inspiration piece too. They look more substantial but at the same time, lighter. ‘Floating’ the top on the base is one of those inspired details that kicks it up that extra notch. GREAT JOB, Kristi!
Btw, I’m curious to know how much you will have saved when you’ve completed the room. Adding up all the savings you’ve accomplished by building and sewing so many projects yourself would be interesting to know! Sort of a like that show, I can’t think of the name of it, where they would take a ridiculously expensive room and then re-create it on a budget. You could have your own tv show! lol
The name of the show is “The High Low Project” with Sabrina Soto. I watch it all the time!
you are amazing, I bow down to you.
You did a great job on the new tables, they look awesome!
You’ve done it again! Blown me away. My husband now knows what to expect when I holler, “come here, you’ve got to see what she’s done now!” It is always a pleasure to visit your home….its getting more beautiful with each project. Thanks for letting us peak in on the progress. I can’t wait to see what is next!
Oh my gosh . . . you did it again! Simply amazed at your talent!
You never cease to amaze me. I wouldn’t have ever considered making something with so many complicated cuts. You really break it down and make it look easy.
Another amazing project, Kristi. The tables are gorgeous. Is there anything you can’t do? 🙂
Wow, you are so talented! It looks incredibly difficult, trying to figure this out for yourself. I think my brain would explode!
I love your tables! Amazing job! Love following you through your decorating decisions and indecisions! Hehe! You do an amazing job! Have a great night!
Bravo, woman, you are simply unbelievable!
You really are head & shoulders above any of the other DIY bloggers out there! This is a great, easily manageable project! You room is really coming together so beautifully!
Something else you might consider (I did this on a iron base table that had lost it’s top)is using stone tile (perhaps travertine)if you can’t find the size you need, easy to cut down with a tile saw.
Okay, I’m laughing right now, because I did think about using tile, but I searched for 14″ x 14″ tile and couldn’t find anything that would work. It didn’t even occur to me to buy something bigger and cut it down! 😀 And I even have a tile saw! *Sigh* Oh well. If these tops don’t last, I’ll try to find some stone tile.
Wow great job.. Really great. 🙂
Kristi, You are way out of my league! Love them!
“Speechless” of Brisbane.
Love this!! Looks just like the one in the magazine!! You did a great job!!
Really gorgeous! Love the design and especially the finish!
Amazing! If you had shown side by side pictures of yours and theirs and asked us to choose which was the expensive one and which was the one you made yourself, I would have chosen yours to be the $549 one and theirs to be the DIY. Again…AMAZING!!!
Thanks for the great tutorial. I really, really, really am in love with the tables. And the other followers are correct: Yours look better, the floating top is perfect. Husband got his jig thingy out to show me. Amazed how easy it is to work. Yea!
Uh, not quite sure of the wording I used on this post. I meant to say he let me use his jig. Oh, I am embarrassed. How do I edit my comment after it’s been posted?
LOL! No way am I letting you edit that comment. It was just the laugh I needed to start my day! 😀 The funny thing is I never would have thought anything about it until I read your second comment. Now I can’t quite giggling! 😀
how i love your causal words …
so ‘of course’ i made it myself …
incredible!
I don’t know anything about decorating, but I love the new table SO much more than the metal one! Good job 🙂
I hope you never come to my house because I think i we are going to have matching homes. I can’t help it, you do something and I love it, so I copy it! Roman shades last week, tables this week. I love the stuff you do.
YOU ARE AWSOME .You make me speechless .Hats off for you.
That’s beautiful, the best hack you’ve ever shared with us (that I recall, anyway). Great job!
I personally like the idea of using a pre-cut tile of *real marble* (or granite) to top the base. No wet saw for me (however one could pay a nominal fee to get it cut.) Don’t have experience with MDF but it has piqued my interest. Good call on the spacers. Have to remember your gold paint suggestion.
Your skills are mad, by the way. Table looks awesome.
MIND. BLOWN! OMG, you duplicated those tables EXACTLY, except I like yours better! The finish on the table tops looks like marble, and I think those spacers add that “this is an expensive piece of stone” look to the top. I have a strange, unnatural love for anything Greek Key, so I am having FITS over these tables! I just want to stroke them and tell them I love them! Excellent, amazing job on these tables – now I want a pair for my home!
Best,
Kimberly
Just love it!!!!
Wow! I love the look for less- can’t believe the savings!! I could do without the real stone top and real gold leaf to save that much as well… or at least to get the look I wanted because I could never in a zillion years spend $549 on one small side table. Amazing project Kristi and so perfectly executed!
When I opened up your blog I said out loud to my husband, “OH, YOU’VE GOT TO SEE THIS GAL…SHE IS AMAZING” I think he’d understand my desire to DIY when things can actually look beautiful, like your inspirational blog. I have one silly question. You said that the legs are 2×2 and you said your brad nailer had 2 inch nails…when you nailed through the leg into the first Greek piece, what length nail did you use? Thanks so much!
Oh, good catch! That’s actually not a silly question at all, and I might need to clarify that in the post, because I didn’t realize that might be a bit confusing for some new(er) DIYers out there.
I actually did use 2-inch finishing nails. The reason that they worked is because lumber is never the exact size that it’s called. I think the reason for that is because lumber mills cut the pieces when the wood is still kind of wet, and they cut them to the size that they’re called (2 inches by 4 inches for a 2 by 4, for example), and then they dry them. So once they’re dried and shipped to the home improvement stores, they’re actually smaller than the name would suggest..
So, for example, these 2-by-2 pieces are actually 1 1/2 ” x 1 1/2″ when you measure them. A 1-by-4 is generally something like 1/2″ x 3 1/2″. A 2-by-4 is generally 3/4″ x 3 3/4″. And so forth. 🙂
So since the 2-by-2’s were actually just 1 1/2″ thick, the 2-inch nails were able to go through the leg and penetrate into the support piece by a little over inch (since the nail gun countersinks the nails by about 1/16th inch)..
WOW…you’re right…all new information to me! Thanks so much for taking the time to explain! 2″ brad nails it is!
I’m not a gigantic fan of shiny furniture but this is such a nice end table–a real standout piece. I have to say, I’m awed by how fast you complete these beautiful pieces, Kristi! This is shiny but not gaudy. I love it!
You are amazing!!! I love it!!! I can’t even read a ruler or use power tools, so you’re my idol!!!
That is MDF board for the table top? Wow….never would have thought. Looks beautiful.