The Five DIY Home Improvement Projects That Gave Me The Biggest Bang For The Buck
It’s hard for me to believe that after 9.5 years of working on this house, I’m down to just two more rooms (not including the future addition, of course) that need to be finished — the home gym and my studio. If things go as planned, I’ll have all of the rooms inside the house finished before we hit that ten-year mark in August. It’s been quite the ride! And being able to look back from where this house started to where it is now, there are a few DIY home improvement projects that I think gave me the most bang for my buck. These are projects that took a rather plain house and gave it a more custom look, and these things can be incorporated into any home remodel to create a more custom home.
Larger and Taller Window & Door Casings
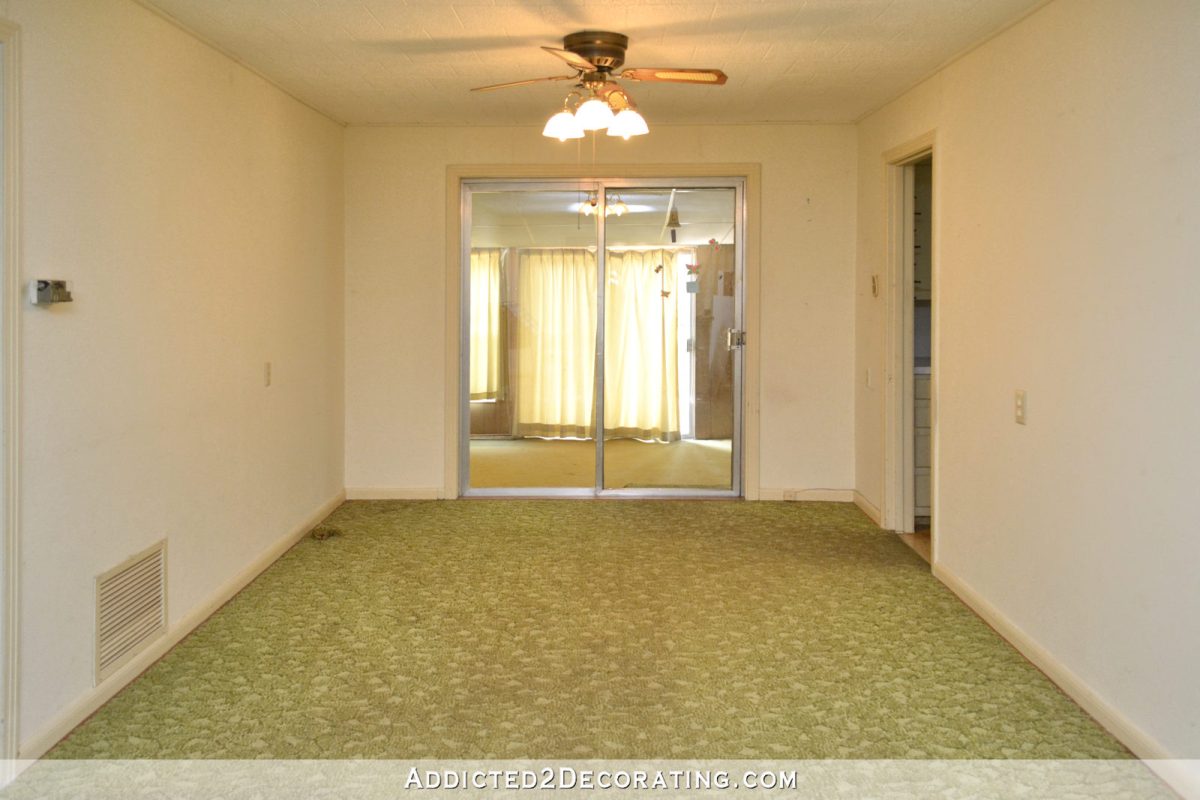
When we bought our house, it had very standard door and window casings with the thin molding and 45-degree cuts on the corners. Here’s a look at two of the bedroom doorways in the hallway with their standard casings.

From the very beginning, I decided that since I was going to be redoing every single window and door casing in the house, I wanted to come up with a design that would be beefier and prettier than that. And it was a huge bonus that the new design didn’t require any 45-degree angle cuts! Every single board in the new door and window casing design required a straight 90-degree cut.
It really doesn’t get any easier than this! Each door casing requires two 1″ x 4″ pieces, two 1″ x 2″ pieces, and one 1″ x 6″ piece. And that’s it!
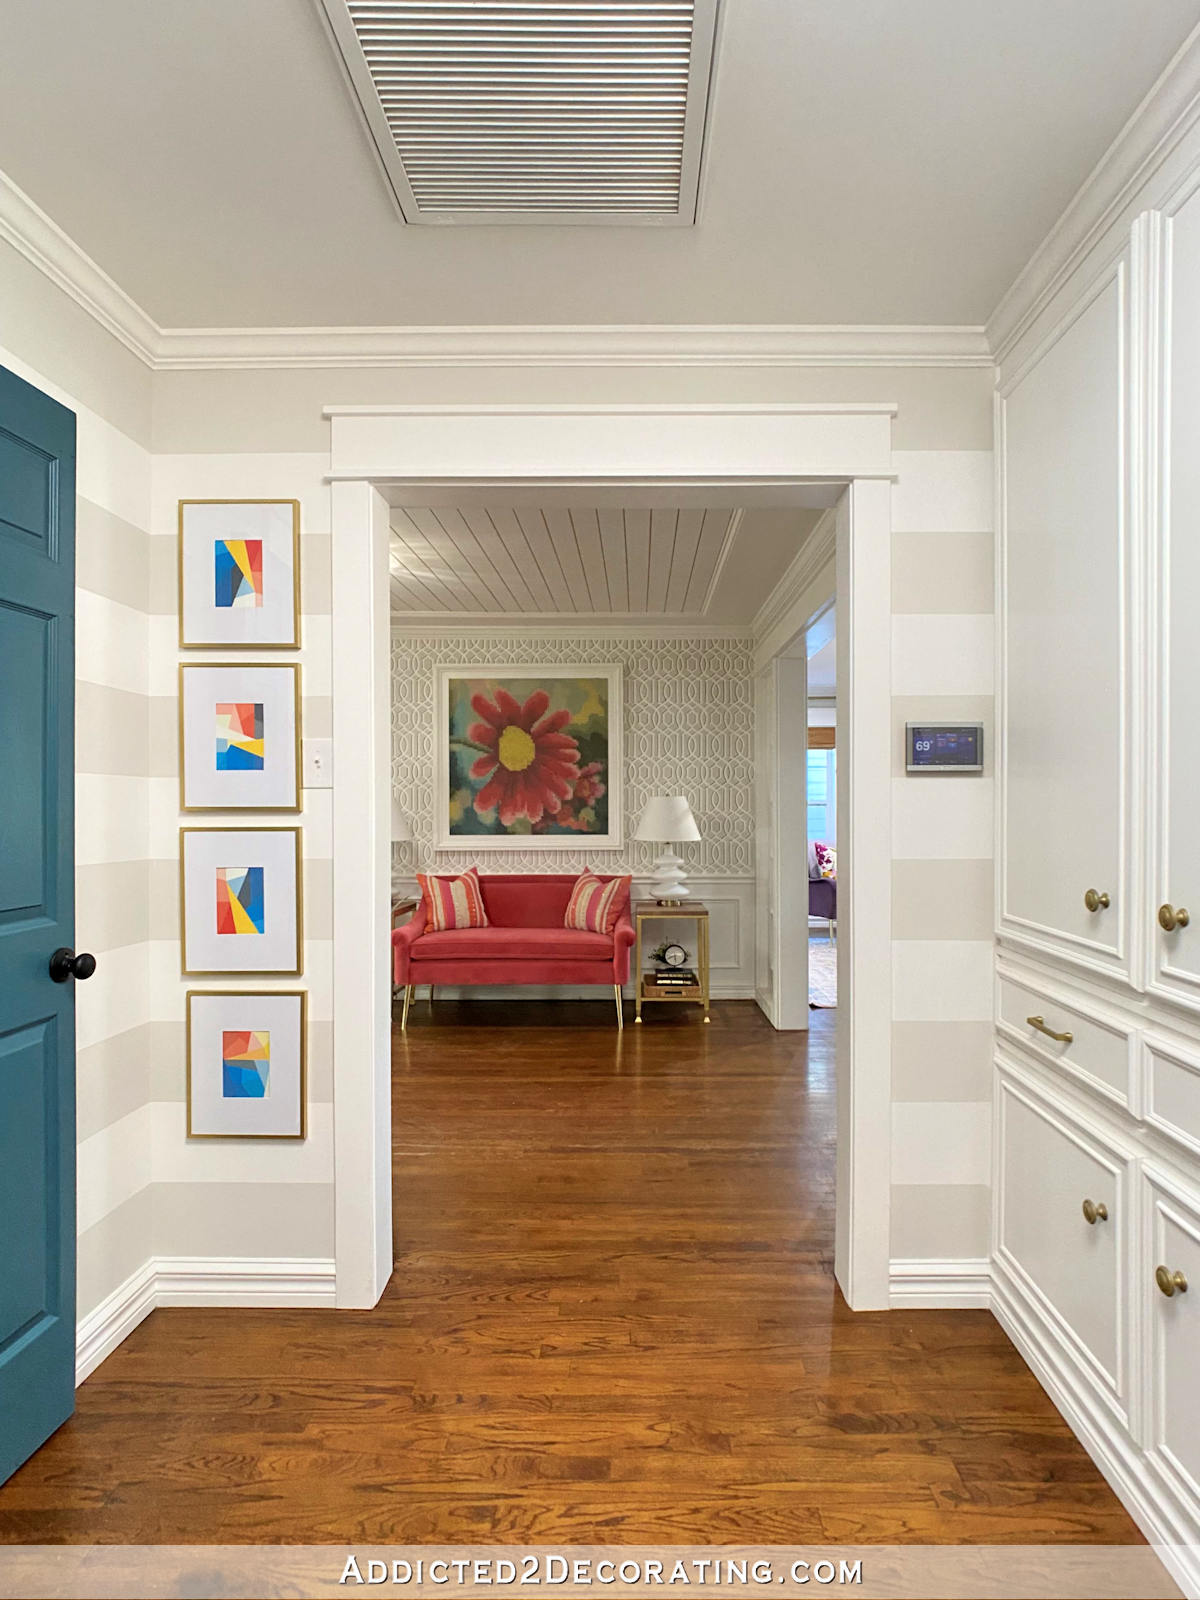
Windows require the one extra piece under the window sill. And, of course, if you don’t have a wide window sill, that may need to be replaced to accommodate the width of the two 1″ x 4″ pieces of the window casing. But it’s still pretty simple!
If you want more details on how to create this style of window and door casing, you can find that info here:
Adding Cased Openings
It’s still amazes me to look back and see how our kitchen looked when we bought the house. It just felt so tiny and closed in, mainly because it was! 😀 The room has no windows, so it gets no direct sunlight. And even though it had three doorways into the room, it felt so closed in, kind of like trying to cook in a shoe box.
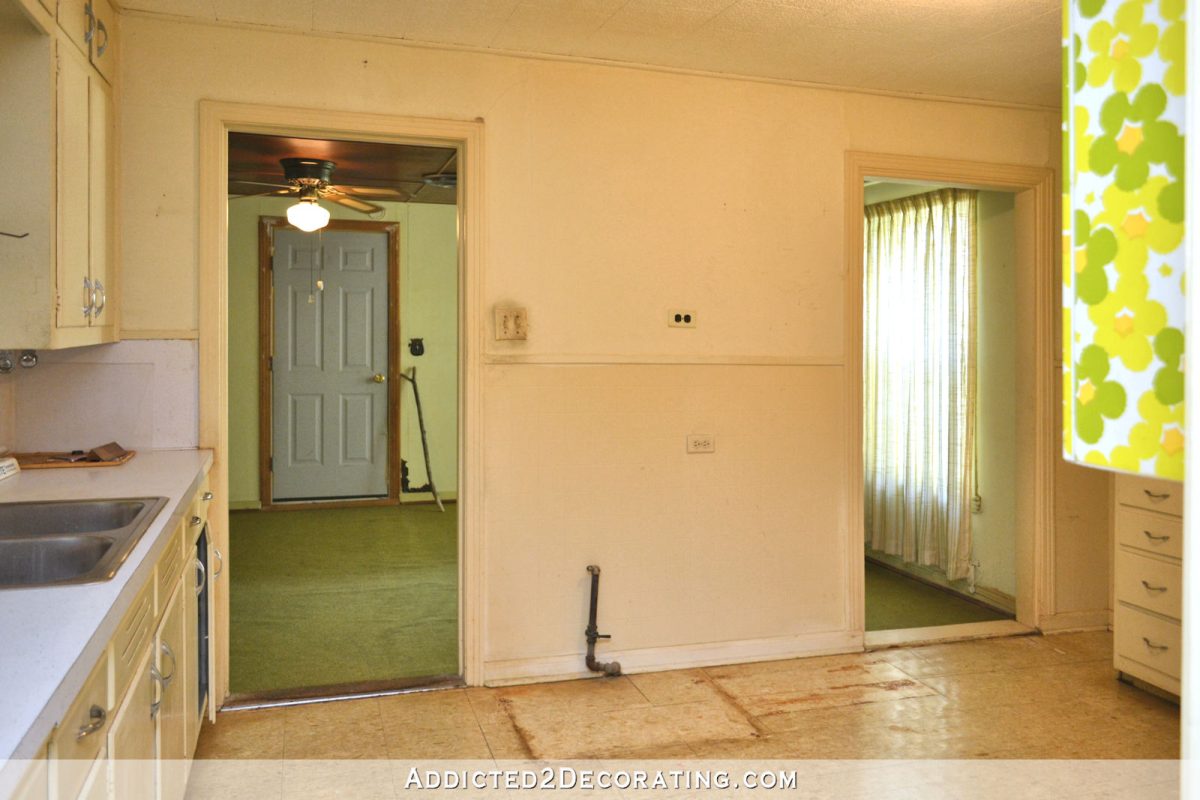
I made some pretty significant changes in here, and one of the first things I did was remove most of the wall that separated the kitchen from the room next to it, which the previous owners called the den, and what we call the breakfast room, and create a very large cased opening between the two rooms.
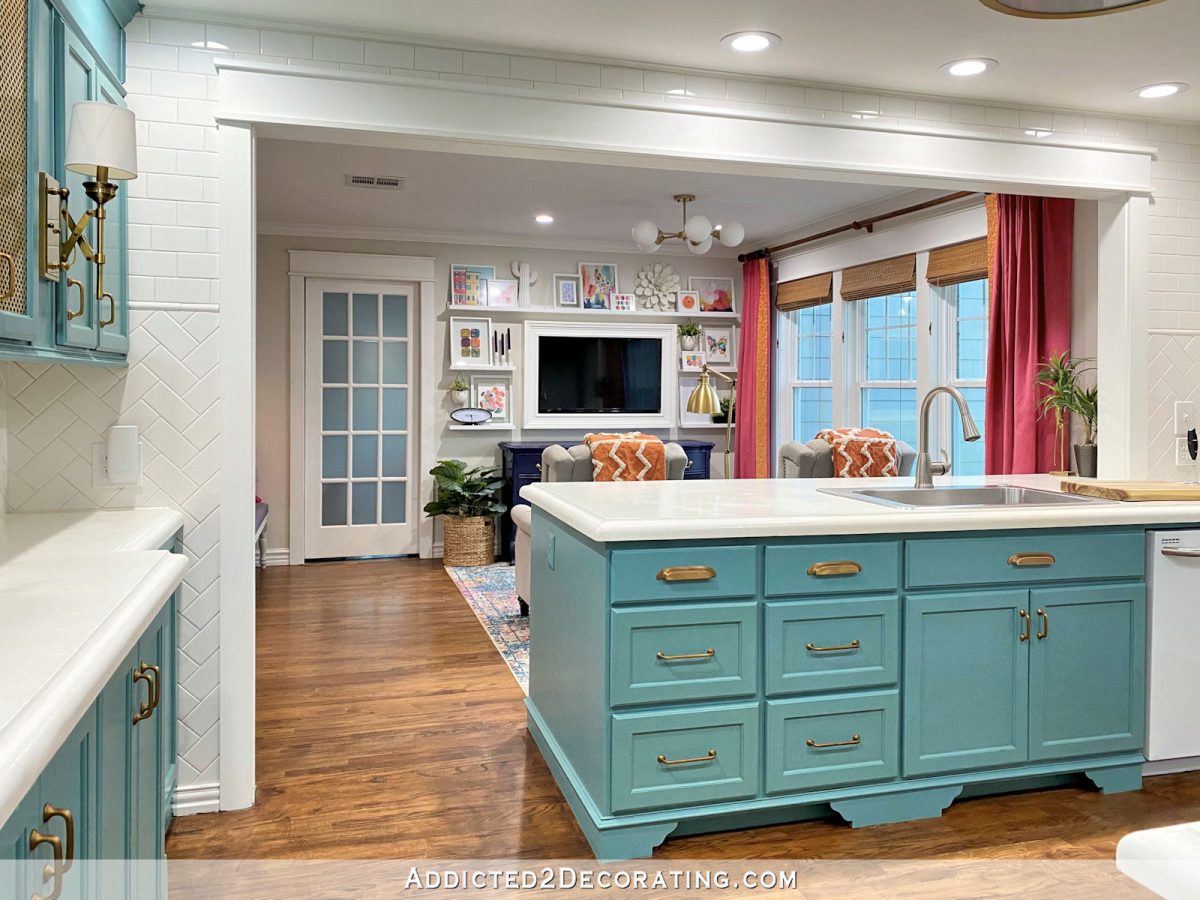
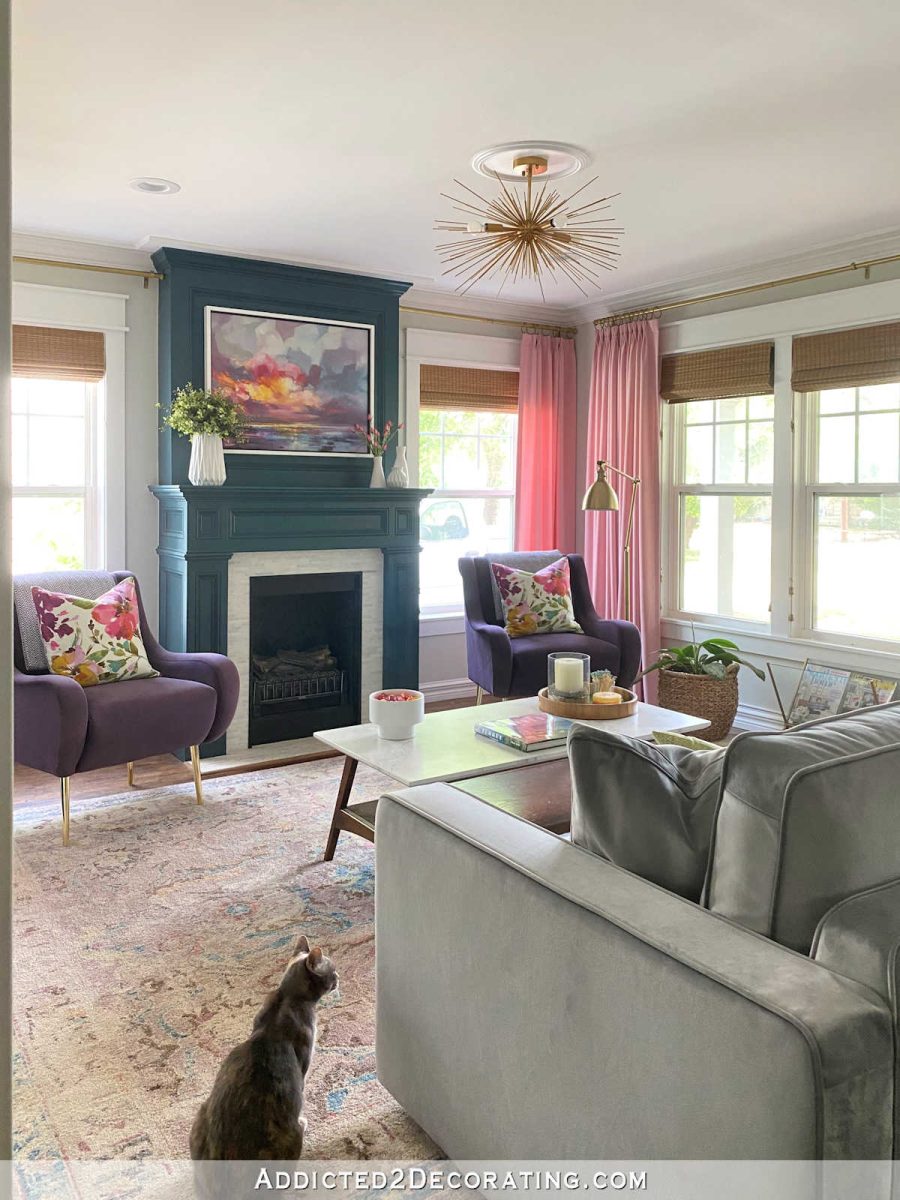
The original kitchen was also completely closed off to the front living room, which is on the other side of the wall to the right in the photo below…

So after doing the 11-foot-wide cased opening, I felt confident that I could do this one as well.
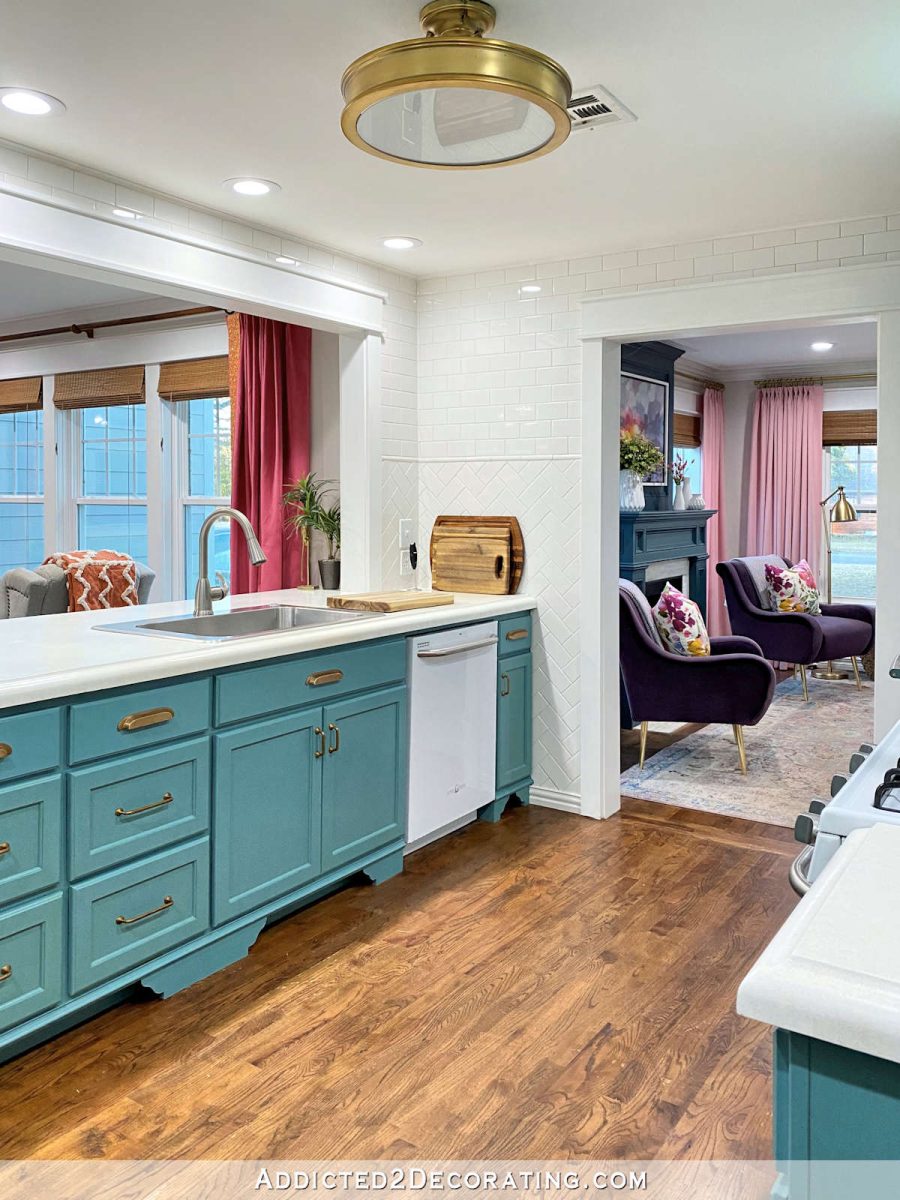
It’s really remarkable what a huge difference those two cased openings made. The kitchen is still the same small footprint that it was originally. It’s still the same 9′ 9″ x 14′ 4″ kitchen that it’s always been. But now it feels about double that size. Just being able to get some natural sunlight into the room from the front living room windows and the breakfast room windows made all the difference in the world.
DIYing a cased opening can seem very daunting, especially if you don’t understand the structure of your home (i.e., whether or not that wall is a load bearing wall, and what needs to be done IF the wall is load bearing). If you don’t know, please don’t start knocking down walls. Before you start cutting into walls, get a trusted contractor to come to your house and tell you if the wall is load bearing.
Ours was load bearing, and I did DIY both cased openings myself (with help from my brother on the big one), but before I even considered taking on this project myself, I had a trusted contractor come over and give me detailed step-by-step instructions on how to do the whole project from beginning to end. And I’m so glad I did it!
Building A Fireplace (Even If It’s Not Real!)
The very first time I walked into this house and saw the front room, I knew there should be a fireplace between the two side windows. That space just seemed perfect for one!

And, of course, I knew I wanted to DIY something. I didn’t need it to be a real, wood burning fireplace. I just wanted it to be pretty and add some architectural detail to the room.
It was a long process, and took me a few tries to get the fireplace to it’s final (current) look, but I DIYed the whole thing from beginning to end.
You can see my process of building this fireplace (and tweaking the look, which went from craftsman style to traditional style over the years) at the following links:
- The Original DIY Fireplace
- Fireplace Makeover — From Craftsman To Traditional
- How To Build A Quick And Easy Fireplace Overmantel
- Fireplace Makeover (Plus My Paint Color Trial and Error)
Building A Wall (Separating One Large Room Into Two Rooms)
In addition to taking down a wall, making cased openings, and opening up rooms to each other, another thing I did that I believe really improved the function of part of our house was to build a wall to turn the long room that the previous owners called a den into two separate rooms with very different functions. This is what the back of the room looked like in relation to the kitchen when we bought the house…

And here’s what it look like now with a wall separating the room into two different areas, with the back area behind the wall as a walk-in pantry, and the area at the front of the room as a breakfast room (currently being used as a sitting room, but it’ll eventually go back to being a breakfast room).

Building a wall is super easy! Since there’s no wall there to begin with, that means you don’t have to worry about anything being load-bearing. You might have to get an electrician to come out and add some new outlets (if you can’t do that yourself), but adding a wall could add a huge amount of functional space to your home.
Adding Faux Pocket Doors
Sometimes adding pocket doors just isn’t feasible. In my case, I wanted pocket doors at the back of the music room, but that is the back exterior wall of the house (the sunroom was added later), so that wall is carrying a whole lot of weight.
There was no way I wanted to cut into that wall and DIY some pocket door pockets inside the walls, or try to figure out how what kind of load bearing beam would be needed to span such a large opening.
So instead, I left the wall as is, hung the doors on the wall to function as barn doors, and then built bookcases flanking the doors. Those bookcases sit a few inches away from the wall, and the space between the wall and the back of the bookcases create the “pocket” into which the doors slide open.

So functionally, they are pocket doors, but they’re not true built-in pocket doors where the pockets are inside the walls. But I was able to get the look and the function of pocket doors without the huge price of creating a wide opening requiring a huge load bearing header in an exterior wall.
If you want to see the DIY details of this project, you can find those links below:
I’ve done a ton of projects in this house, and they’ve all added up to a very custom “Kristi” look. But if I had to choose the five things that I think have added the biggest bang for the buck, these five would be at the top of the list.

Addicted 2 Decorating is where I share my DIY and decorating journey as I remodel and decorate the 1948 fixer upper that my husband, Matt, and I bought in 2013. Matt has M.S. and is unable to do physical work, so I do the majority of the work on the house by myself. You can learn more about me here.


I really like your fireplace and your framed in ‘barn door’ and hardware to look like pocket doors!
Great job!
Love, Love, Love all your fabulous ideas!!!
Very Proud of you and you have given me so many ideas and I only hope I can do them!!!
I remember when you wanted to bust through the wall from the kitchen to the living room; you had recently tiled it and had a lovely art piece there. From your mom I think. I was horrified!!!!! Why???!! I thought. But in the end, like so many other projects you take on, it was the right decision and looks beautiful. But let’s farce it, I don’t have the vision you do😉
Or… let’s face it!!
I knew I should have proof read this🤪
I luv when you go back to the original spaces and bring the transitions forward. Your visions never cease to amaze me.
Amazing transformations!
I love your remodel and am amazed at how creative you were in getting your “pocket doors.”
Wait, 9.5 years!!? I’ve been following you since your condo days and that is a mind boggling amount of time.
Me too. Has it really been that long. Time flies when you’re having fun. 😂😂
Thanks for this awesome post! Really enjoyed it.
You clever, clever girl!
I had totally missed the description before now of your pocket doors. What a great idea!
staggering effort – but what a result – a beautiful silk purse out of…..!!!
You always amaze me.
What brand and formula of paint did you use on the kitchen cupboards ? My daughters are not finished and she wants to paint them .
I used Benjamin Moore Advance on my cabinets, and then topcoated with General Finishes High Performance Topcoat in a flat finish. The reason I topcoated is because the paint was too shiny (even though I bought the lowest sheen available), and I wanted a more satin finish. But after using it, I’ll never paint cabinets again without topcoating with General Finishes. I’ve been amazed at how well that paint job has held up! And I’m not easy on my cabinets. In hindsight, if I had to do it again, I’d spend less money on paint (perhaps even using Behr Premium), but I wouldn’t ever leave off the General Finishes topcoat.
A topcoat! I need a topcoat! I spent the $$$ for the Advance too. I love how smooth and hard it dried, but is is chipping off the primer (also Advance) LIKE CRAZY. I think I need to give them a 3rd coat and topcoat. Thank you for that comment!
I have been foloowing you since you did your kitchen cupboards…the first time, lol. I am copying your idea for trimming out windows and doors, But I can’t figure out for the life of me how you install your baseboard corners. Do you mitre those, or deal with it another way?
All of my baseboards are mitered at the corners.
Your projects always amaze me! When you encase a window, what happens when you eventually need to replace the window? Do you have to take down the casing and redo it? Thanks!
It depends on the type of windows you currently have, how they were installed, and which type you replace them with. My mom had all of her windows replaced, and they didn’t have to remove any of her trim.
The before and after pictures of your house are ASTOUNDING. I have so many pins of your projects! I never realized those were “pocket” doors before. Sliding behind bookcases??? Beyond brilliant.