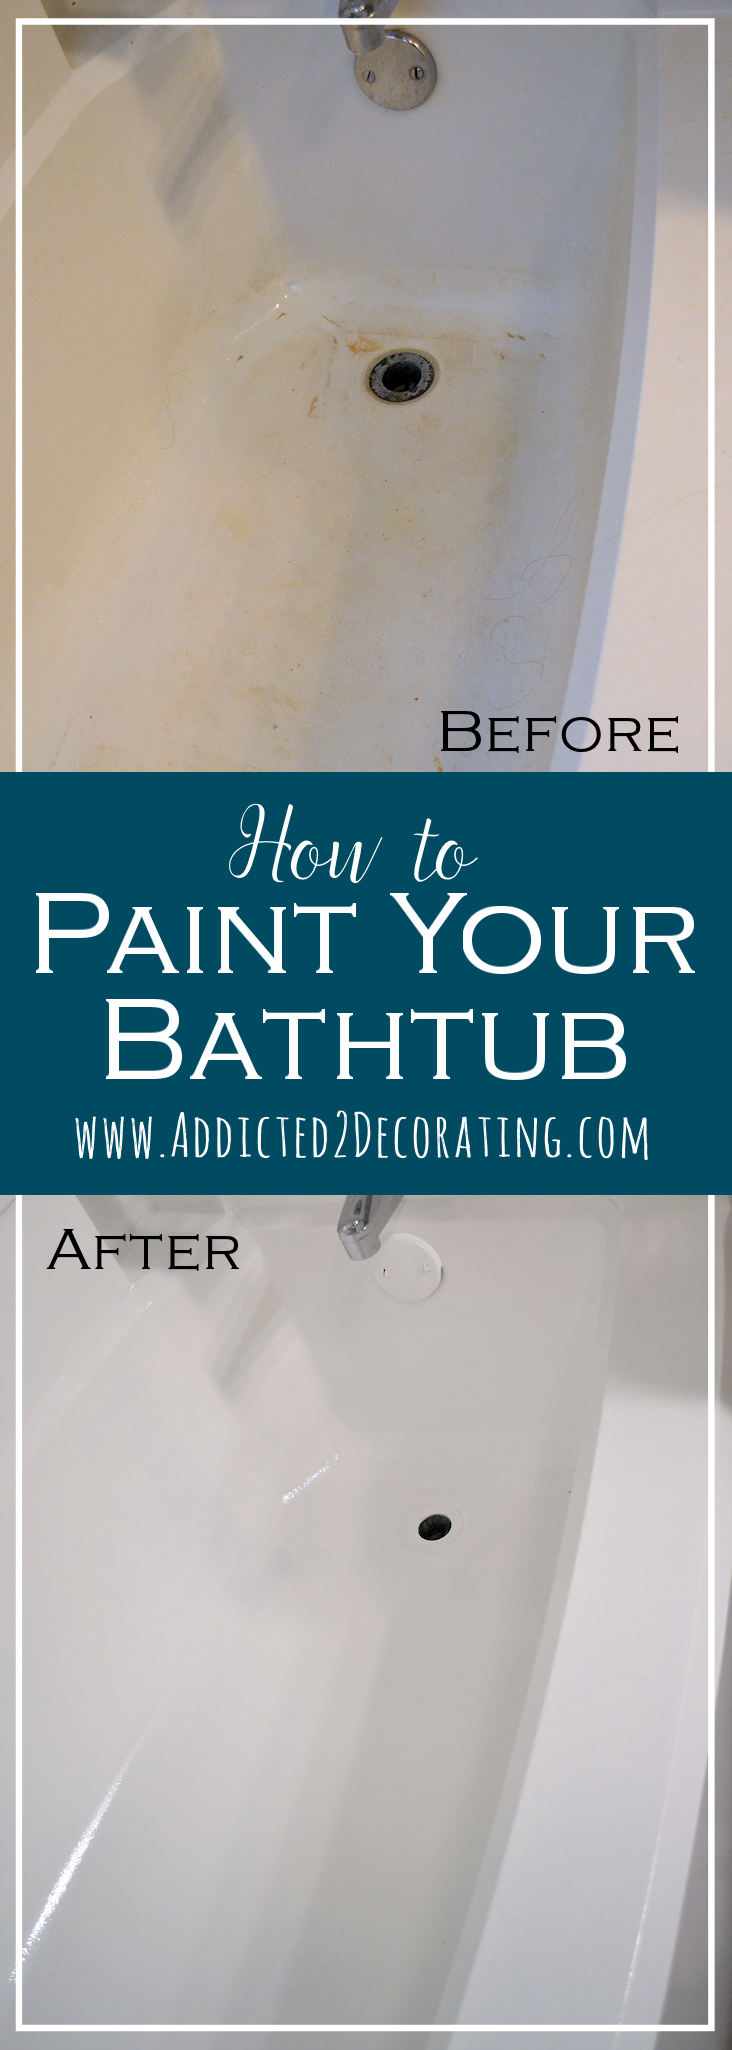
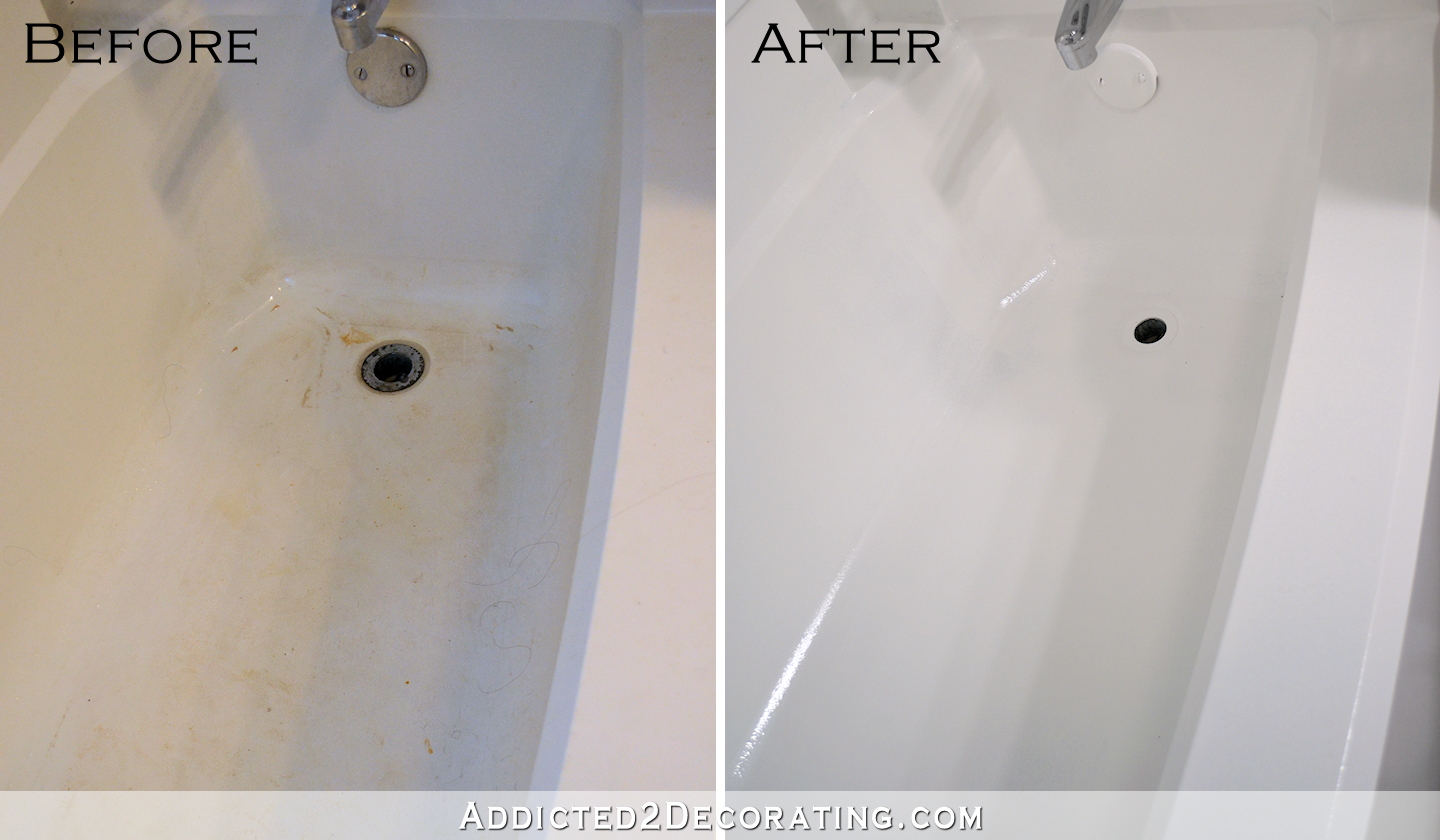
Bathroom Makeover Day 11: How To Paint A Bathtub
Note: I do not live in this condo anymore, so I have no idea how this tub has held up in the years since we sold the condo. We lived in the condo for eight more months after I painted the tub, and it looked just as good the day we left as it did the day I finished painting it. There were no chips, scratches, or peeling.
I did it! I painted my bathtub! The process wasn’t fun, but it also wasn’t too terribly difficult, and I’m quite pleased with the result. So let me show you how to paint a bathtub so that you can stop living with that ugly stained bathtub and have a shiny, bright tub that looks brand new!
To paint my bathtub, I used a bathtub paint from Rust-Oleum called Tub & Tile Refinishing Kit.
You can CLICK HERE to purchase this product on Amazon.
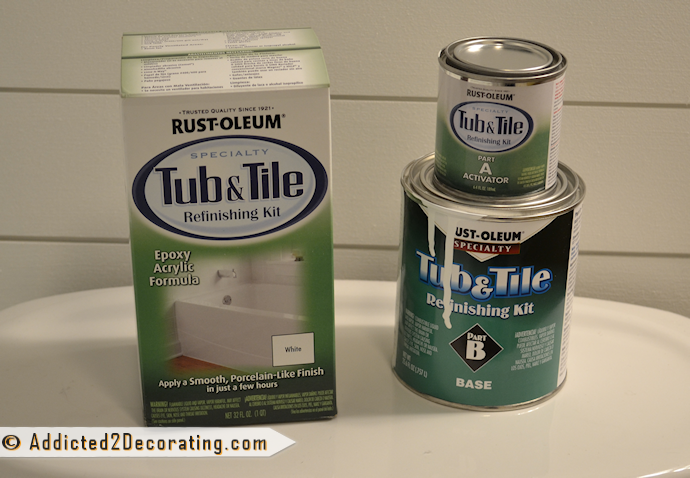
It’s a two-part epoxy paint that you mix together in the one-quart container (no additional container needed…just use the Part B container). You can use it on porcelain, ceramic, and fiberglass.
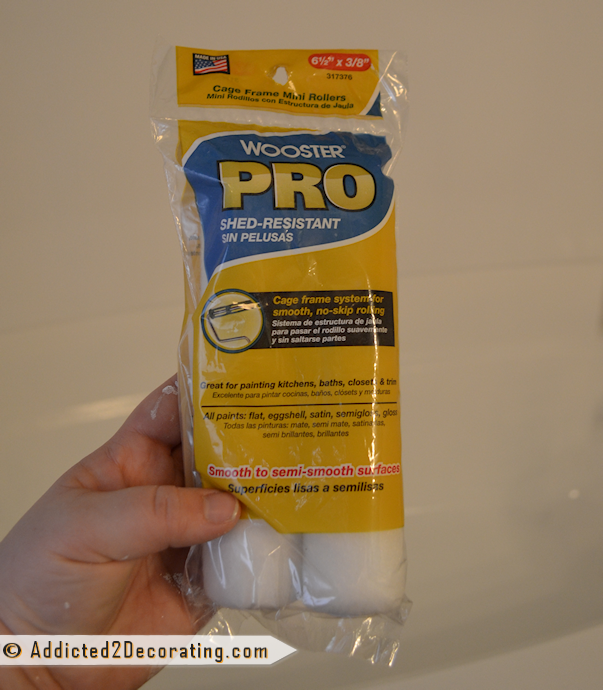
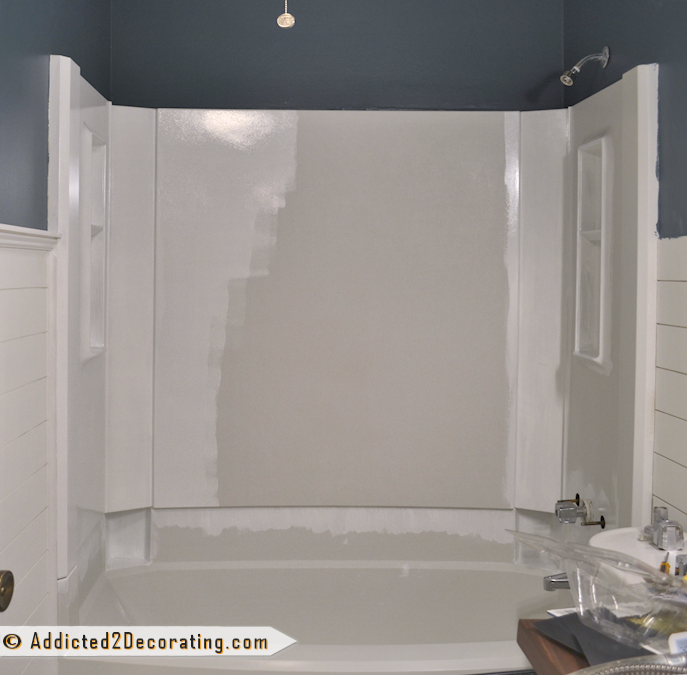
I treated the tub just like I was painting a wall. In other words, I used my 2″ Purdy sash brush* to do the “cutting in” on areas that I knew couldn’t be reached with a roller, and then I painted all of the big areas with a 6.5″ roller.
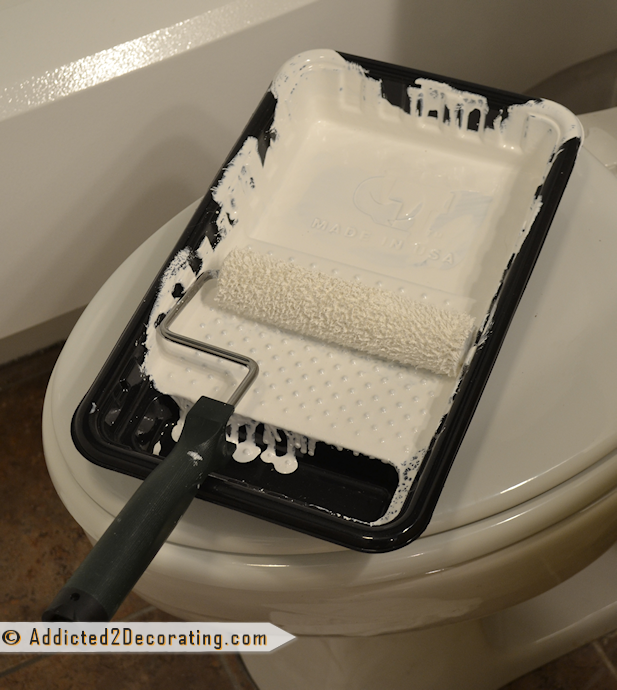
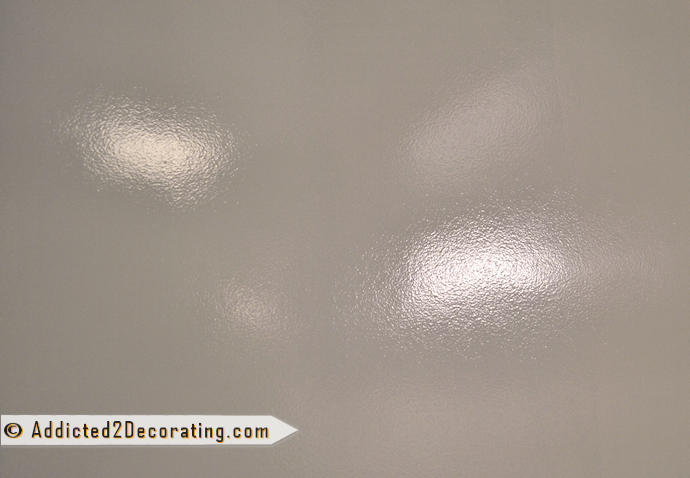
As you can see, I didn’t use a foam roller. (I’m not a fan of foam rollers at all.) Instead, I used a regular roller with a 3/8″ nap for smooth to semi-smooth surfaces.
It gave the paint a really nice subtle texture, which you can see here…
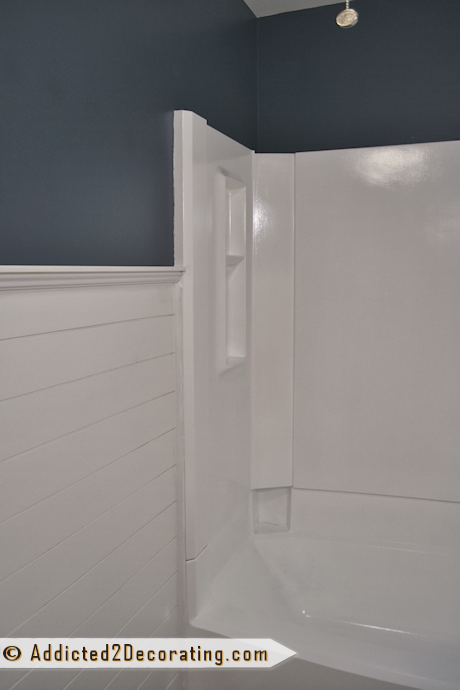
I used a bright white paint, and as soon as I started on the first coat, I could tell a huge difference between the original bathtub color and the color of the bathtub paint.
The overall working time was about 4 1/5 hours, but the overall time from start to finish (including drying time after the prep work, and drying time between coats of paint) was around 8 hours.
The prep work took about 1.25 hours, and was a multi-step process that included:
- Washing the tub with a water and bleach solution to remove any mildew,
- Scrubbing the entire tub with Comet,
- Scrubbing the tub with Lime Away* and a scouring pad, and
- Sanding the tub with 400/600 grit wet/dry sandpaper*.
All of these step-by-step instructions come with the Rust-Oleum Tub & Tile Refinishing Kit.
After all of that, I brought a fan into the room to dry the tub completely. I let it dry for about an hour and a half while I had dinner, and then it was ready to paint. I wiped it down really well with a dry cloth before painting, and then did the “cutting in” with a brush, and followed up with the roller on the large areas.
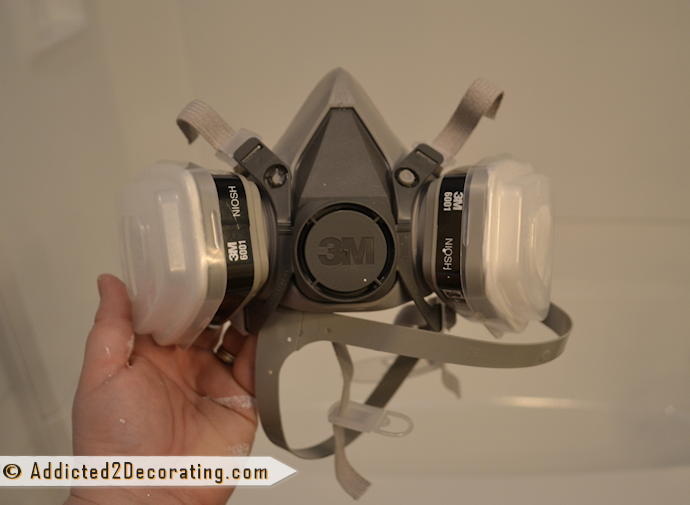
The one thing that I absolutely must warn you about is the smell. It’s very strong. In fact, don’t even consider using this product without using one of these.
After the first coat of bathtub paint was applied, I let it dry for about an hour-and-a-half before applying the second coat. At that point, the first coat was completely dry, and the paint was very durable…so much so that I stood in the tub with my bare feet to reach some areas of the tub while applying the second coat, and it didn’t mess up the paint at all. In fact, I even sat on the edge of the tub at one point, and even scooted my bum across the edge of the tub, and the paint was perfectly fine. So I have no doubt that after the required 3-day drying/curing time, the paint will be incredibly durable.
So that’s it! That’s my experience with painting a bathtub! If I’ve left out any info that you want, or if you have any questions, just let me know and I’ll do my best to answer!
Here’s a little video I made of my bathtub painting adventure…
CLICK HERE to find the Rust-Oleum Tub & Tile Refinishing Kit on Amazon.
Update #1:
Click here to read the follow-up post where I answered your questions about this painted bathtub project. Questions like:
- Is that really the same tub in the before and after picture?
- What material is your tub made out of?
- How long did the fumes hang around?
- Was your tub chipped or cracked? And how would you take care of chips and cracks?
- Will this work on cultured marble?
- How much did this project cost?
- And many more…
Update #2:
Click here to see more DIY projects for this bathroom. Here are some of my favorites…


Update #3:
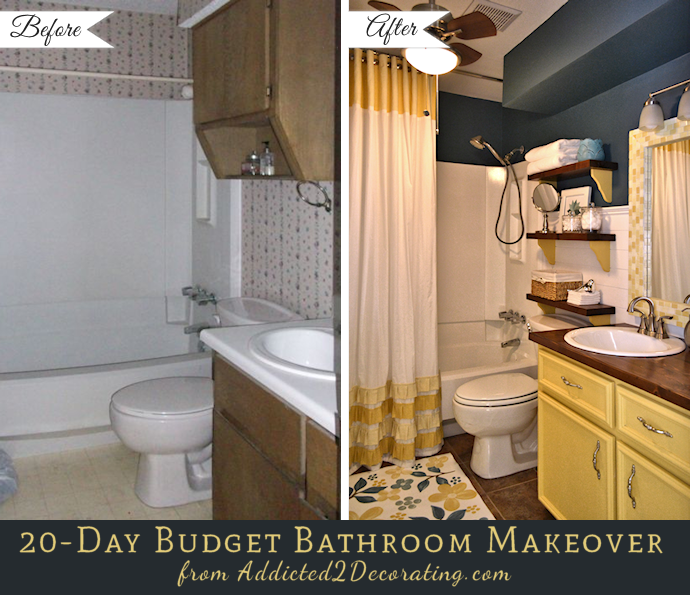
This bathroom remodel is finished! Click here to see the finished bathroom.

Addicted 2 Decorating is where I share my DIY and decorating journey as I remodel and decorate the 1948 fixer upper that my husband, Matt, and I bought in 2013. Matt has M.S. and is unable to do physical work, so I do the majority of the work on the house by myself. You can learn more about me here.

That looks incredible — I would have never thought that could be a DIY project. Can’t wait to see the completed room. It is turning out so nice… just like the rest of your place 🙂
I used the exact same product and mine started peeling after a couple of months?
So you feel this product is not the way to go? I’m looking to update not replace.
did you ever find out why it peeled?
did you do all the bleach/water, comet, lime a way cleaning followed by the sandpaper? I am curious because I am thinking of doing this myself and definitely don’t want it to start peeling after a couple months, or years even, if it can be helped.
We want to do this in our bathroom, so I’m TOTALLY excited that you did this. We’re looking to do it during spring break when my stepson is with his mom, so we can use his bathroom while we do the master…
This is really good to know! I’ve been looking forward to this post since you mentioned it at the beginning of your plan for the bathroom. I didn’t know you could paint a bathtub like this until a couple of months ago, so thanks for showing us how! Was it recommend to do all those prep steps, or did you just do all that for good measure and caution? And it looks SO much better, the nice crisp white against the dark teal, just beautiful, I LOVE contrast like this!!
From someone who knows from experience, please be careful in your newly painted tub! The paint seems to make it more slippery. It looks wonderful! 🙂
I really need to do this to our tub. The previous owners painted the mauve tub a light yellow with latex paint, complete with paint runs down the outside!!. We can’t use it and it flakes off like crazy. I need to somehow sand it down and refinish it. How long did the fumes hang around?
Kristi!
I’m sitting here with my mouth hanging open! What a transformation! I have a similar situation in a hall bathroom where the acrylic insert isn’t cream and it isn’t white….and this is exactly what it needs! I am always amazed at what you accomplish!
Thanks for sharing!
Martha
Did you have any chips in the tub at all? The tub AND shower stall in our house had chips that the previous owners tried to cover up somehow (looks like nail polish to me!). I’d love to do this to both bathrooms, but I’m not sure how the chips would come through.
Hi You need to use steel wool to sand down the chips, you can not do this to your tub if you have chips. Although she made it look easy this is not a simple project. If you attempt it do it, do it when it’s warmer outside so you can open your windows. It smells horrible for hours. Pam
Just make sure the filter is an R type (and replace after every 8 hours of exposure to oil based fumes) or a P type (and replace after every 40 hours of exposure to oil based fumes). An N type filter will not do anything to remove oil fumes.
And when Ellen says “we” she means me!! haha. I am glad that you shared as I was under the impression that you had to wait days between coats. Of course, when we do this, the rest of the bathroom is going to look even more horrible…
That looks fabulous! Now I’m extra excited to tackle the ugly pinky-peach tub in the house I’m buying on Friday! I had planned to tear it out and put in a shower before moving in but I’m going to wait a bit (buying a house is expensive and my cash pile is getting thin)…this is a great alternative for now!
I may just steal your entire bathroom look so…just giving you a warning that there’s a copycat on here! LOL
Gorgeous work!
I too have been waiting for this post. We have an enameled cast iron tub that I think someone tried to paint in the past and didn’t do such a great job (there are drips). I’ve been eyeing the Rustoleum kit for awhile as a possible temporary solution as we don’t have the cash to rip the tub out (and have to redo the flooring and all the tile work for the whole room) nor to have it professionally sprayed.
Couple of thoughts/questions if you do a follow-up post after the curing:
– You said there’s a 3-day cure. I assume you can’t use the tub during that time at all?
– The fumes…I’d love to know how long they linger. Our bathroom has no window, so we’d have to basically rely on the vent fan or rig something more complex up.
– You liked the texture from the roller. What if you wanted it as smooth as possible? Do the instructions suggest the best type of roller or brush to do that?
– Do the instructions suggest what you can do to fill chips in the original enamel before painting? We have a pitted area in the bottom of the tub where either the original enamel or the first paint job chipped off. I know the pro’s use Bondo (like for auto body work), but that seems extereme for a DIY job.
– How long do you have to work with the paint once the two parts are mixed? Clearly, enough time to do two coats.
There are other types of paints that dry faster and self level not leaving marks from the roller (smooth) in 24 hours so you can use the bathtub sooner like in a day – check out the link I provided refinishingonline.com
This is amazing!!! There is nothing you cannot DIY! You just saved yourself so much money hiring one of those bathtub resurfacing companies to do this. So glad you put the warning out there about the fumes. So many people do not protect their lungs with working with paint chemicals. Looks great!
How about coming and doing mine know 🙂 lol I so want to paint my 50’s peach tub and mint green tile .. I just haven’t found the courage yet. On tile what kind of bruch would you use or could you roll that too ?? Love you blog .. the bathroom looks fabulous !!
Did you do your tile tub? How did it turn out?
I’m curious – how do you think this paint would work in a sprayer? Do you think it would be more prone to drips and runs than regular paint?
I have been waiting on this post too. I cannot wait to show my husband. The bottom of our shower and tile needs to be done and I am not wanting to replace before we list our house… This is the answer!! Thank you!!
A few years ago I wanted to paint our bathroom tiles so badly. They were a hideous shade of pink, peach AND mint. Before we painted we decided to replace a few loose tiles first. When we popped the first tile out, we noticed mold behind it so we pulled a few more tiles off of the wall. That led to a complete bathroom reno! Ah well…. the life of a home owner.
Love the super new white against the wall color! It’s looking great!
That is what happened to me. Even though it was hard work I’m glad we did the whole renovations. At least we know what is behind our walls now. Mine didn’t have a vent system so we added one and the best thing of all, we are enjoying a new bathroom that we did by yourself and with our own style. It cost us very little so we saved a ton.
Holy Smack woman!!!!!!!!!! This is amazing!!
Ok, so would this work on a faux marble bathroom vanity? I have a pink cultured marble bathroom countertop that is itching for a coat of this stuff if it would stick!
Me, too. I want to change the countertop in all my bathrooms, as they are all that pinky color.
I got here from Pinterest because I’m in the middle of a bathroom remodel. Painting my contractor grade tub insert? I’m so in! (At least, I’m in when summer comes around.)
However, I’m leaving a comment because I have used a great product to recover my countertops. Rustoleum has a great bathtub kit but their countertop kit is, well, awful. Instead I used the countertop recovering kit from Daich Coatings. I did my kitchen two summers ago and I’m still thrilled with it. It was easy, fume free, and one of the more hassle free projects I’ve completed. I bought a second kit only last week to do my bathroom counters and will complete those this morning. Check it out…it’s an inexpensive solution to awful laminate.
http://www.daichcoatings.com/spreadstone_countertop_kit.html
My mom actually sent me a link to that website about a month ago! That product looks quite amazing. I haven’t tried it yet, but I definitely have some laminate countertops that could use some attention.
Hi, does this kit come with the rollers, etc or do those have to be purchased separately?
Thanks
You have to purchase those things separately.
Kristi, I think this may be the first time that I’ve ever done a double take online! I think I literally said “oh that’s cool…Wait, do what!?!” I didn’t even know that Rust-Oleum made this! Very cool and what a great transformation! Your hard work really paid off!
I’m in total agreement with Matt@theDIYvillage. I knew Rust-Oleum made the cabinet and counter transformations kits (used the cabinet one),but one for the tub? WOW! I could have saved a couple hundred when I had the claw foot tub refinished a few years ago. Absolutely a great job!
Wow, what an amazing difference. I have those same fiberglass tub surrounds – easier to keep clean than tile/grout, but so ugly. One question on the paint – once it’s mixed, I’m assuming it doesn’t keep very long? Like if you did one tub, and then a month (or 6 or 10) later wanted to tackle the other?
Really glad to have found your blog (I think I got here through a Pinterest link to some “best of” round-up on another blog, and then here). I’m in a 950 sq. foot condo so have been looking for a blog I could relate to more – you’ve really done a great job customizing and upgrading your space, incorporating storage, etc. Can’t wait to see more.
What an amazing transformation! It looks beautiful. What a great – and cost-effective – way to update a tub.
This looks amazing!! I had no idea it was possible to paint a bathtub/shower! I definitely need to do this to ours. We were considering replacing it, but the huge cost factor stopped us pretty quickly. If you don’t mind me asking, how much did this project cost?
Wow! It looks awesome! I didn’t even know you could paint a bathtub! Thanks for sharing!
Leslie
thank you for sharting I want to do thisd very soon to my tub and shower does the same paint work on a bathroom sink too?
thanks
Brenda
This is great! I have been looking for a way to “refresh” the shower tile without paying a fortune. Pinned it for “someday” haha. Thanks!
I am bookmarking this post for future reference!! We are looking to purchase a house now and the tub/shower needs to be redone…this is a great alternative to replacing them! Keep us posted how it holds up!
Kristi, That is amazing! Do you think it would work on my fake marble sinks/counter tops? How are you supposed to clean it? I may have to go buy this!
I’m so glad you reviewed this product!! I’ve been wanting to try it on my ‘almond’ fiberglass tub (another 80’s remnant, sigh) that, while in perfect working order, doesn’t match the white vanity cabinets they installed to update the bathroom. Asking them to replace a perfectly functioning garden tub with jets would be insane, but asking to repaint an almond tub white to match is almost a guaranteed yes. It’s great to see that it works well!
WOW! That is amazinG! I didn’t even know that you could paint the tub & enclosure. I definitely need to show this to my mom!
Fascinating story. I’ve been wondering about doing something like this for our tub also. It’s from the 40’s, cast iron I guess. But it’s become so porous and cannot get it clean anymore.
Your tub and surround looks fabulous! Does it say what products to use or NOT use for cleaning the tub now? Can foam cleaners be used?
You did a great job! That bright white is perfect with the walls/teal paint. You made this process look easy. Maybe I should give it a try.
Your tub looks amazing!!!! Great job.It looks brand new!
xx
Anne
You did an awesome job! I did not know this could be done.
I never knew you could do this to a tub and stall. After you mentioned how bad the fumes were, I decided not to try it. I’m allergic to a lot of things and I am afraid the smell and the fumes would get the best f me. I admire your ambition. You are truly and inspiration to DIY.
You answered my big burning question…does it smell. I’m now wondering how much a mask like that costs and do you use it for other projects and does it get in the way of your being able to see what you are doing? Also wondering about the 3/8 nap. Isn’t there a smoother nap roller that would have left a less textured surface, aside from foam, and how did you make your choice?
The bathroom is looking fabulous. I can only imagine how excited you are.
BTW….love seeing your cute face showing up on other blogs. Will you be sharing about your little Rust-oleum adventure? Glad you were able to get away, too!
Another fabulous makeover and tutorial! Great job Kristi.
Whoa, cool! I didn’t even know you could do that!
I’m so excited to read about this project Kristi! The tub looks amazing!
Awesome job!!! Looks so bright and clean!! Way to go!!
Hi Kristi,
I’m glad you told others about the dangers of the paint fums because I’ve literally got sick to my stomach when I used a similar product and felt sick the rest of the day. Seeing that your using bleach first and then another product this all adds to what you could be smelling. I had trouble with it settling at the bottom did this at all happen to you? I would like to try it again but worried I’ll run into the same problem. Pam
I have this exact kit sitting up on a shelf in my laundry room. I bought it, bondo, sandpaper, etc about a year and a half ago. All excited to dive in, then I read the directions. I wasn’t that brave after all. You didn’t mention it, but how did the bondo-ing part go? Or did you even have to use it?
Awesome!
I’m sick. Just this week we contracted to have our old blue tub replaced, as the salesperson told us we couldnt paint fiberglass. I did know about this product, & honestly hubby nor I could have done all the prep needed. 🙁 Oh well…
So glad it worked. I hope it holds up for a LONG time.
I love your blog–and share your sense of style. I also just bought those exact “shasta” vinyl tiles for my bathroom remodel (which exists in my head, but not yet in reality.) I like them because they are speckled like a bird’s egg and they have a hint of turquoise….they are also warmer and I think prettier than the ceramic ones.
Thanks for this post–I was wondering how I could get my old off-white tub to match my bright white new tub surround.
I read the article and then I watched the video, and I have to say, I was excited to get started with this project until I got to the part regarding the fumes and the mask. I have tried painting with a mask before, and I have an aversion to chemical fumes, so that being said, I will not be trying this system for refinishing my bathtub/shower. Thanks anyway.
Ive looked everywhere for this product. Can someone tell me whereto purchase this.Thank you,
You can order it online thru Amazon.com, I have seen it there or you could check the big box stores perhaps.
That looks great! I may have to try this.
Great blog post, interesting tips that we should all listen to
Great Post!!
These do it yourself looks great, would be try and using it as early as possible, hope I can do some wonders with it.
It looks awesome and difficult to believe that its DIY project. How much does the materials cost and is it possible to do a DIY shower fitting job we haven’t got one always have to draw a bath which takes up a lot of time.
We had contractor put a shower head added to our tub. They have to be able to get to plumbing & go up the wall to fit the shower head. We also have a window that I had to craft a mini shower curtain to cover it while showering. They were able to cut the surround to fit around the window. Love it.
You did such an awesome job on this tub and surround but my question is…I live in a manufactured home (mobile home) and the tub is not your standard steel tub. I believe its more like the same material as the tub surrounds….will this kit work with my tub? I don’t want to have to but new tub and surround for my trailer that is 14 yrs old when I’m on a low income. I have bookmarked your site. I just love the mirror you did with the plastic spoons I am thinking of making one but in a different color and smaller for one of my bath rooms…so cool! Hope to hear from you soon……Thanks.
Thank you so much for posting this. I’m completely inspired, and I’ve just ordered the kit from Amazon. Rustoleum should pay you commission!
Can you please give a follow up on this? Did the tub peel at all? I’ve seen several reviews that these tub kits peel after a while…
Hi Missy~
My tub hasn’t peeled at all. The paint is holding up very nicely. And this is the shower that I use regularly.
Very useful information. I just leased a 1905 Victorian house to use as my interior design studio and there are two bathrooms that need major help. One is an original claw foot tub (excited about this one) the other is a sunflower yellow tub that was added in the 50’s. This will definitely save me loads of cash. Thank you!
So after 10 months now, how is it holding up? I am thinking I need to try this!! Thanks for all your amazing posts and tutorials! You rock!
It was still holding up perfectly when we moved out in mid-October.
I purchased my kit online at Amazon. Did the prep work required, fille d one badly eroded area and then applied the first coat. The fumes from the epoxy paint are really intense and dangerous. I have a large whole house fan that helped to pull fresh air into the house. I left the area every 5 minutes for fresh air for a 5 minute period as instructed. A respirator would have been better. I decided not to do the second coat the same day because I felt sick from the fumes. The paint stays workable for up to 6 hours, so instructions say. I only mixed half a batch and plan to wait a few days before doing the second coat. I plan to lightly sand before the second coat, recommended on another blog. Even first coat is a wonderful improvement. Most important, have plenty of ventilation. Smell leaves once epoxy hardens for a day or so. Great for those on a limited budget and don’t want a big expensive redo. Your video was helpful in making my decision to proceed.
what if I have a tub with tile around it? It is probably the original tub from the 50’s. I don’t have a vent in the bathroom and I get mildew from the steam. Can I do this and make it look new again, what about the tile? I don’t really have money to redo my bathroom, but its hideous……. the tile is the subway tile and it wraps around the entire bottom half of the bathroom, and over the top half of the shower. I am pretty artsy, and I think I could paint it and come up with a nice hand painted design on tiles, similar to a stencil. What do you think, should I just get a remodel done? or is there a paint for those small square subway tiles???? Also what about the caulking aspect that is normally around the top of tub where it meets the tiles? would I paint over it?
I was wondering how the tub is holding up now? Does the paint seem to be lasting? I bought the paint and am going to tackle it this weekend. It will be better than the yellow I have now and cheaper than buying a new surround tub.
Shannon, we actually moved out of this condo last October. But from the time I painted it in February until we moved out in October, it was holding up perfectly. It still is, but of course, it’s never used now. 🙂
Oh my goodness!!!!!! You just saved me a ton of money! One of our tubs is a complete surround and the other has the same problem, a white tub and off white cheap surround. We are looking to update on a minimal budget and thanks to you I just ordered all that I needed for both tubs! I cannot wait to see the results! Thank you so much!!!!!!!
Hi,
Question: how safe is it, in terms of chemical release from the paint afterwards, to bathe a child in this tub?
Just curious, i understand this is actually a paint, but still, how much danger does it pose?
Thank you
I actually don’t know. Since we only used ours for showers, I didn’t do any research on that. You’d probably need to read the Material Safety Data Sheet (MSDS) to find that info. You can find the MSDS for this product here:
http://www.rustoleum.com/product-catalog/consumer-brands/specialty/tub-and-tile-refreshing-kit/#tab-1
I cannot believe I found probably the only other person in the entire world with the exact same tub enclosure that I have! I absolutely hate mine too but I can’t afford a bathroom redo. Mine was never white to begin with; it’s beige and being the largest surface in my bathroom makes it hard to match things. I want white! Anyway I never thought I could paint the material it’s made out of but if you can, I CAN! From your video (s), (I’m a huge fan of yours) It appears we have the exact same bathroom too. I finally ripped off the foil wallpaper after 20 years and can’t wait to paint the walls. I have a skylight in my bathroom and personally love darkish colors. You’ve more than inspired me so I’m off the get the supplies I need and the painters mask!
What do you do in between coats if you had an area that got some fuzz in it??? Help asap
I would sand it with some fine sandpaper, wipe up the dust, and then apply the next coat.
You inspired me to do my own tub and I’m VERY happy with the results! Looks like a brand new tub!
I wish you could come and do mine, just too afraid.
Any suggestions on how to paint a black lava rock fireplace? I want it to be white.
Do you know if I can do this on cast iron tub?
Thank you SO much for writing this up! I had no idea this product existed for DIYers. I’m a HUGE DIYer, but I was going to have 2 of my tubs professionally refinished. This will save me SO much money! Our tubs aren’t even THAT bad, but the original finish is wearing off, so I just want them looking more like new. Both are the same fiberglass tub, so I think this will work SO great!!
Just wondering how much paint was required. I’m about to do mine. 🙂
I used two kits for mine. If you just have a tub to do, one will be enough. But if you have a tub plus surround, you’ll need two.
I just found this post on Pinterest and I’m so glad I did because I desperately need to paint my tub! I received quotes from contractors and it would have been a pretty penny to replace the tub. Thanks so much for sharing!
This is amazing! I found this on Pinterest as well, but I am texting this URL and sending to my son. We are trying to remodel my home and use it for rental property! I live with my husband in his home! Thank you , Thank You, THANK YOU!
Now that it’s been over a year….how is the finish holding up?
It’s holding up great, but we haven’t lived there since October 2013. I did use it regularly from February to October while we still lived there, and in October it looked just like it did the day I finished painting it in February.
How does ur tub clean now that u painted it? What cleaning solution do u use?
I use a non-abrasive cleaner on it, like Soft Scrub.
Hello! I was wondering how this paint job is holding up? My parents had their mauve tub professionally painted white and it’s already chipping only 6 months later. 🙁 our own tub is in dire need of a paint job.
Never mind I see you no longer live there.
After reading multiple blogs about how great this product was I painted our tub and tile surround. All was wonderful for a few months and then i noticed a slight crack and bubble. A week later there was a chip and then I had to peel it back, buy a repair kit and fix the spot. A few months later more cracks/bubbles/chips in other areas. I hope no one else experiences this, but having taken all the required precautions and even some additional ones, it has been very time consuming for no long-term fix. We are now looking to gut the old tub and tile :/
The thing I would be most worried about is it being slippery. One of my biggest fears is slipping in the tub. Is there a way to add MORE traction/texture to make the floor part less slippery?
Something where I could avoid having to use the stupid rubber bath mats in there?
Also, can you do other colors, like black?
I don’t know of a way to add more traction other than a rubber bath mat. It does come in other colors, but I don’t remember seeing black. You can look up the product on the Rust-Oleum website and find all of the colors available.
I have never used this product, but it seems to be an epoxy paint similar to what some people use to paint their garage floors. I know some people mix a small amount of sand in with the epoxy when using it on a garage floor, so I would think that same idea would work here. I personally would try this method out on something else before doing your bathtub with it, just to get an idea of how much sand to mix in. Maybe an old sink or a broken piece of ceramic tile, for example. Also, sand might not be the perfect ingredient for a bathtub, but it’s a place to start. Good luck.
I stumbled across this on Pinterest and would LOVE to do this in my bathroom. I am currently pregnant so I don’t plan on doing it until after little one has arrived and even then I would arrange for someone to take care of him/her at their house while I do the project. However, I also have 3 dogs. Should I arrange a boarding situation for them for a few days while the fumes clear out or are the fumes really only bad during the actual painting process?
I think it depends on how big your home is, and whether your bathroom has a window that you can open to air it out. I kept my animals at the condo. My bathroom didn’t have a window, so I locked my animals in a room together, opened the window,and blew in fresh air from outside with a box fan. I think I even put a towel under the closed door to keep the fumes out of their room.
Would this work for a fiberglass tub that creaks when you walk on it, or would it crack off? We can’t reinforce it from underneath, so are just going to live with the creak. I’m hoping to seal off any cracks that may be developing because of the flexion.
Thanks
Do you think it would work on a beige kitchen sink? My sink has rust spots and shows orange well water stains. I hate it.
We have been contemplating doing this to our tub and surround. We have a window so hopefully the fume situation will be okay. What I really want to know is how is it holding up now? Does it still look as wonderful as it did when you first painted it? How is cleaning it now?
Hello there! I enjoyed your post about refinishing bathtub.Now that some time has passed, I was wondering, how did your bathtub hold up? Have you seen any flaking, or is it still in good shape?
This is so awesome the difference is amazing I’m truly inspired. Just want to know of does the paint come in different colours? As my tub is a soft pink and I don’t really want to change its appearance but make it look new.
It does come in different colors, but I highly doubt that it comes in a soft pink. I think you’ll find just the standard neutrals.
Hello!
I’m really impressed with this project! It looks really great. My question is, if my tub is a beige color, do you think two coats would cover it all?
Thank you!
Yes, I think two coats will cover it.
“But even though I was wearing this mask the entire time, and I couldn’t actually smell the fumes, they were still so strong that they burned my eyes and made my eyes water.” – when seeing the photo of the mask I immediately thought that’s not the right one – you’ll probably want one of these or similar: http://www.amazon.de/Esska-X-plore-5500-Dräger-Vollmaske/dp/B002MFGE92
Looks nice! How well has it held up over two years??
I too would like to know how it’s holding up.
COMMENTS: Always adhere to safety precautions of product; open windows, fans, masks, etc. Effects on your body could be permanent and deadly.
I think the ring around your drain screws out according to my husband, perhaps this might help: https://www.plumbingsupply.com/how-to-remove-a-bath-tub-drain-flange.html – it’s better not to seal in something you may want to remove later.
Is your tub kit a Kohler? It looks exactly like the tn one I have and painting is such a novel idea since it’s so much cheaper (hate to say that word) to repaint than replace. It’s not cheap, it’s smart money and a new product. I can’t wait till spring so I can throw open the windows, turn on the fans, wear a mask and redo everything in that little box. I have all winter to design what I want and how to get there and you were a YUUUUGGGEEEE step in that direction. Hugs.
I’m not sure what brand mine was, but it was just a cheap fiberglass tub and surround.
Can you tell me if you actually painted the surround walls also?
Yes, I painted the bathtub and the tub surround.
Great job! I read the follow up post as well so I feel like I’m ready to go! I saw that in your original post, you wrote that you are not a fan of foam rollers and used a regular low nap roller. Why do you dislike foam? I’ve never used one before….
Thanks!
I just don’t like the finish that they leave (bubbles) and they push paint up around the edges of the roller.
SO glad I found this post. It gives me hope, lol.
Thanks for posting the tips about the smell. I have never used this product but I used Rust-O-Leum’s Countertop Paint–ye CATS the odor was abysmal. I had every window in the house open and fans a’blowin’, but I still thought I could throw a raw egg in the air and the fumes would cook it before it hit the ground, lol.
I have heard that it peels–but I think that has more to do with not-so-thorough prep work on every square inch. I have been digging in your blog quite a bit and I see how meticulous you are in your work execution, so I’m sure it will be beautiful for years to come :).
Do you think this paint would work on a bathroom sink?
My bathroom guest bathroom and tub is a very dark “biscuit” color and the sink matches it. If I could paint both, it would really upgrade the look and then I would only need to replace the toilet. We can’t quite afford a full bathroom remodel yet.
I do think it would work as a temporary solution until you can afford your full bathroom remodel. I don’t think I would ever use this product as a permanent solution to an ugly sink or tub problem. But if I had a full remodel planned for two or three years out, I would certainly spend a weekend and update the current sink and tub using this product in the interim.
Would you recommend NOT doing this project while being pregnant? Thanks!!
I would definitely not do this project while pregnant.
I found your post(s) on Facebook today and am very impressed with your talent. Is painting the tub and surround holding up well after the past two+ years? I want to update my home to sell if possible or if not, enjoy it more myself. Please let know before I invest time and resources. Thank you!
Re: Bathtub painting. We have a condo with a tub so very similar to “before.” However, it was about 3 of 4 of those non-slip strips. How would you go about getting those up. With a knife and then the sanding will take care of it? Just wondering. I’m totally new to anything DIY or “crafty.” Not very talented–but can read and follow instructions!
I wish you made a video on the actual steps and not of final product… including on how you removed hardware and drain or how you cover it with tape. At least I would like to read a description on how to remove or apply tape that it covers it completely without touching the tub so it does not block the paint where it is needed.
Also, how long before the smell disappeared completely? Do I need to seal the door to the bathroom so the smell will not enter sleeping area?
Hi, thanks for the post. Its really informative.
One question. I have very similar situation as yours but I am not sure if my surrounding is plastic or fiberglass. Will it stick to surrounding if its plastic?
And I also have another stall shower. Would you recommend same product for that too?
Thanks for inspiring me to make some much needed changes to my blue tub and sink!
So I use a bunch of those suction cup things in my tub; mirror, holders etc. Seems this comes out with a slight texture on it, will I still be able to use the suction cups? Thinking the texture will not hold the suction in…. Please advise
I have no idea. I would suggest calling Rust-Oleum.
The paint destroyed the brush as I was painting and pieces were stuck on the surface… What do you recommend doing to remove them?
Hi Kriste,
I’m curious if your tub refinishing is still intact. I would be interested to see an update after all these years! Thanks!
See the first paragraph in the post.
Not sure exactly how I came across your post but my guess is it had something to do with updating a bathroom. I really love the yellow pleated shower curtain and mat in the bathroom, the entire space is sooo my style. In fact I love all your spaces especially what once was your green kitchen cabinets. It is all so unique, one of a kind, and fun. You sure have talent. Do you still happen to have the curtain and mat you used in the condo bathroom and if so…are you willing to sell it because although we may have similar style ascetic I have absolutely no sewing skills.
I no longer have those. I left them behind when we sold the condo.
They used that in my building. All surfaces are now peeling, not to mention how very toxic it is. Just think about all the chemicals you’re soaking in in your hot tub, heat helping to release more volatile compounds that enter your opened pores. Use an eco-friendly product, instead.
Did you replace the drain trim (metal) or did you paint over it?
I couldn’t get it out, so I painted over it. I painted over both drains.
Thanks Kristy for the wonderful article. I was just wondering if you knew approximately when was this bathtub installed in the first place and how many years it lasted before repainting it?
Thanks!
It was installed in 1984.
Hi, I redid our tub, using the same product. Overall, a great thing –
I did the various grits, and followed directions – it came out great
it lasted over a year, looked fantastic, yes bit slippery when wet ……
BUT-
my mother in law, decided to put one of those suction cup shower mats in the tub,
when my wife removed it, to wash and clean, it pulled up the refinish.
The suction cups on the mats pulled up the paint where the cup suction is / was.
so, just sharing – keep my mother in law out of the bathroom and it will live longer