Hallway Flooring Progress (And Disaster)
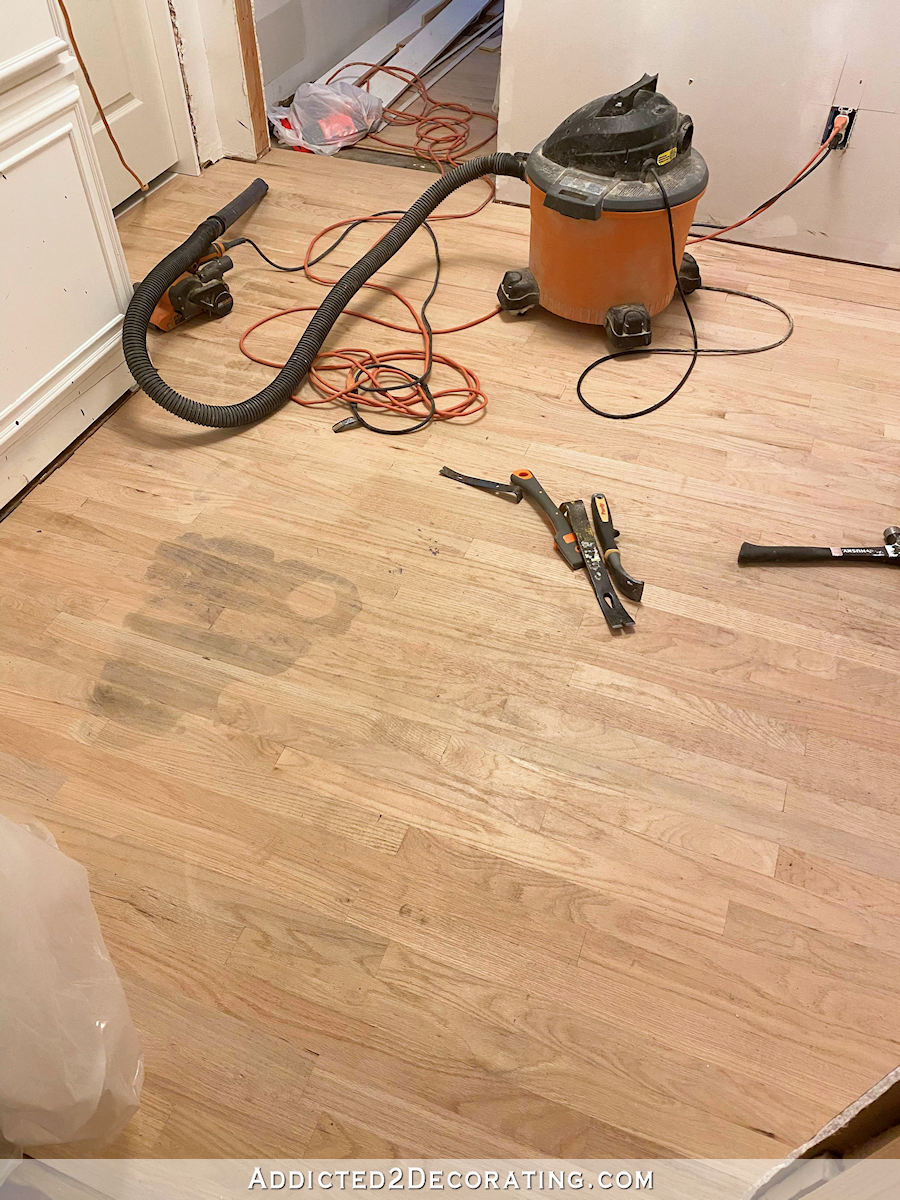
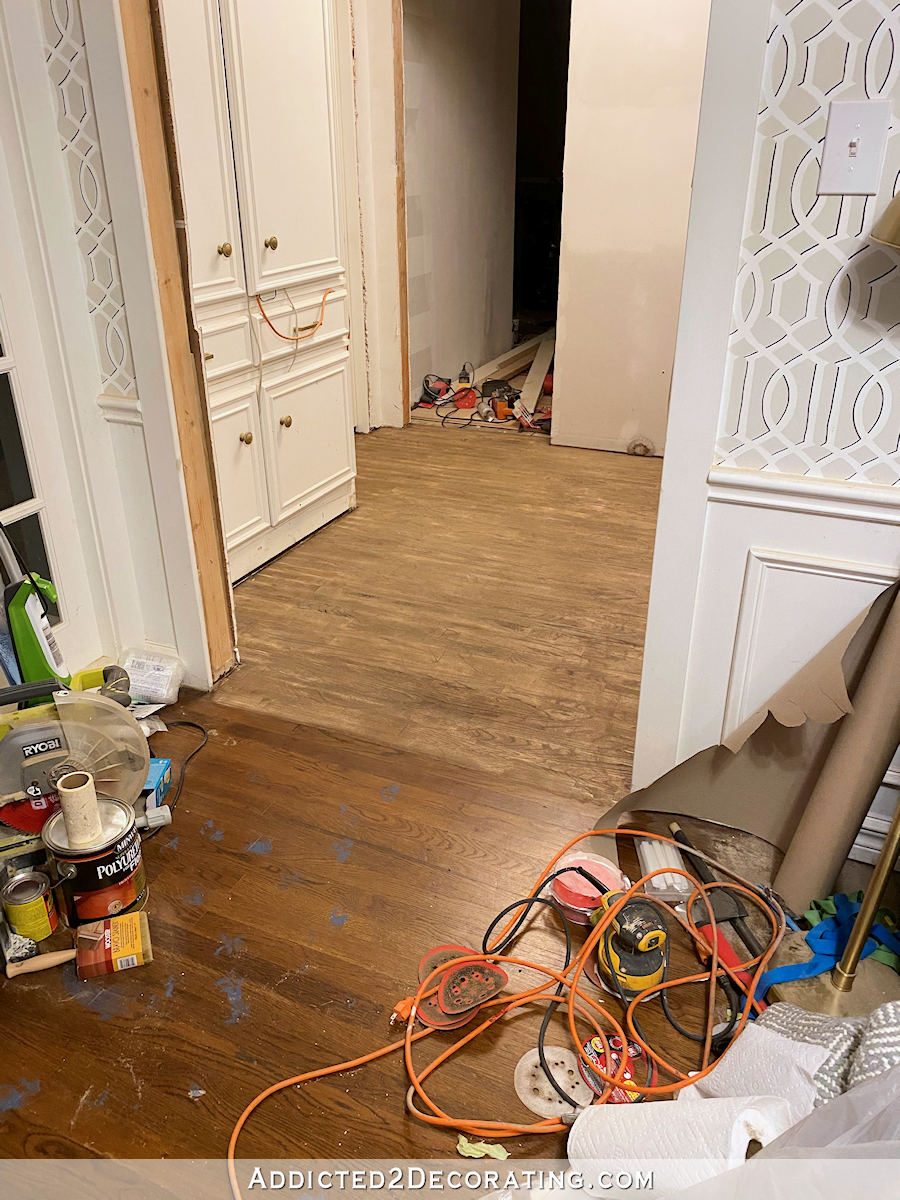
I finally had a chance to get back to the hallway flooring project. I was determined to get the floor stained and at least one coat of polyurethane on by last night. Well, I met my goal, but with pretty horrible results. But let’s back up a bit.
When I last wrote about this hallway flooring, I was dealing with a paint stain from where Cooper knocked over a quart of blue paint on the unfinished floor…
After reading all of your suggestions, I decided that paint remover was the way to go. I was concerned that other options like wood bleach would bleed over onto the unaffected areas and lighten the wood that didn’t need to be lightened. Paint stripper seemed like the safest option. So I covered the area with Klean Strip paint stripper, let it sit a few minutes, scrubbed the area with a wire brush, cleaned it up with Klean Strip After Wash, and let it dry.
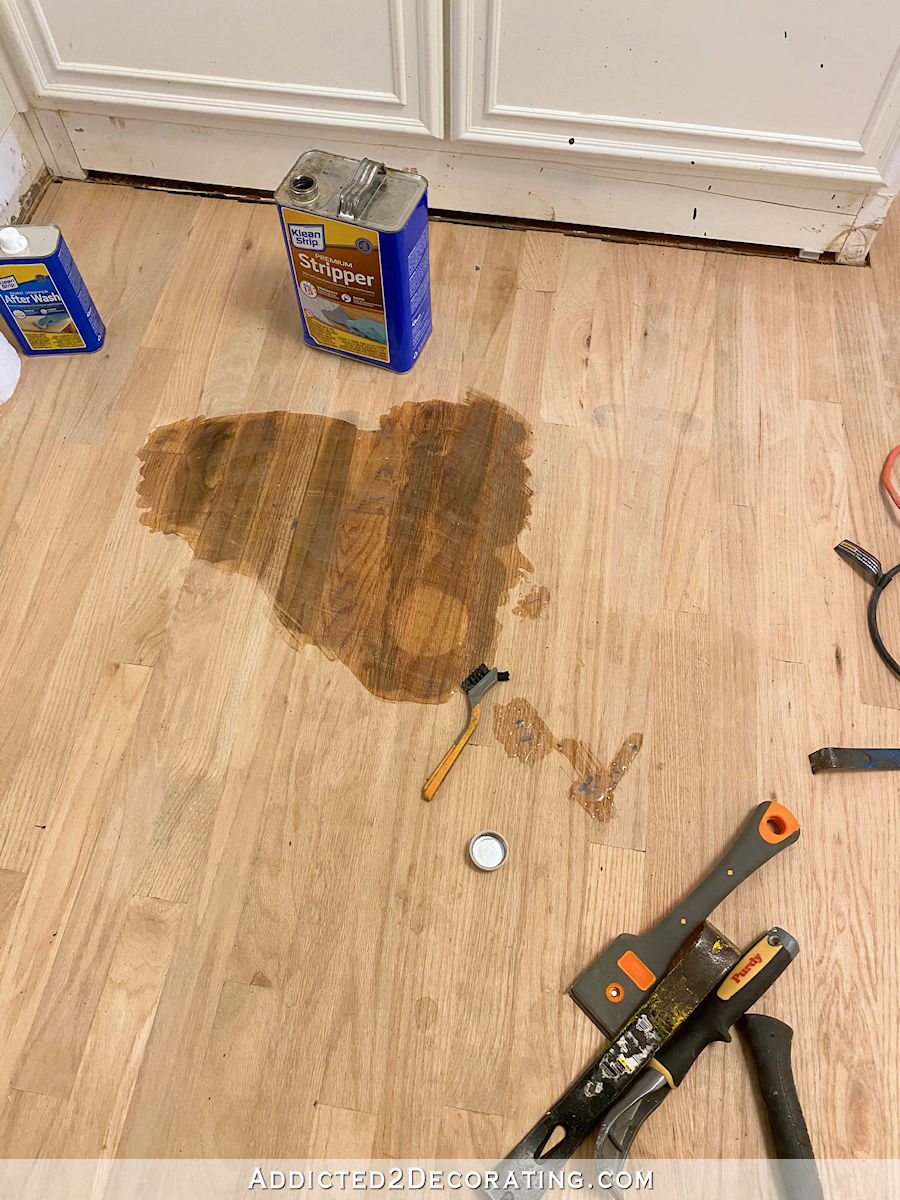
I did this about three times, sanding between each application. After the third time, I decided it was good enough.
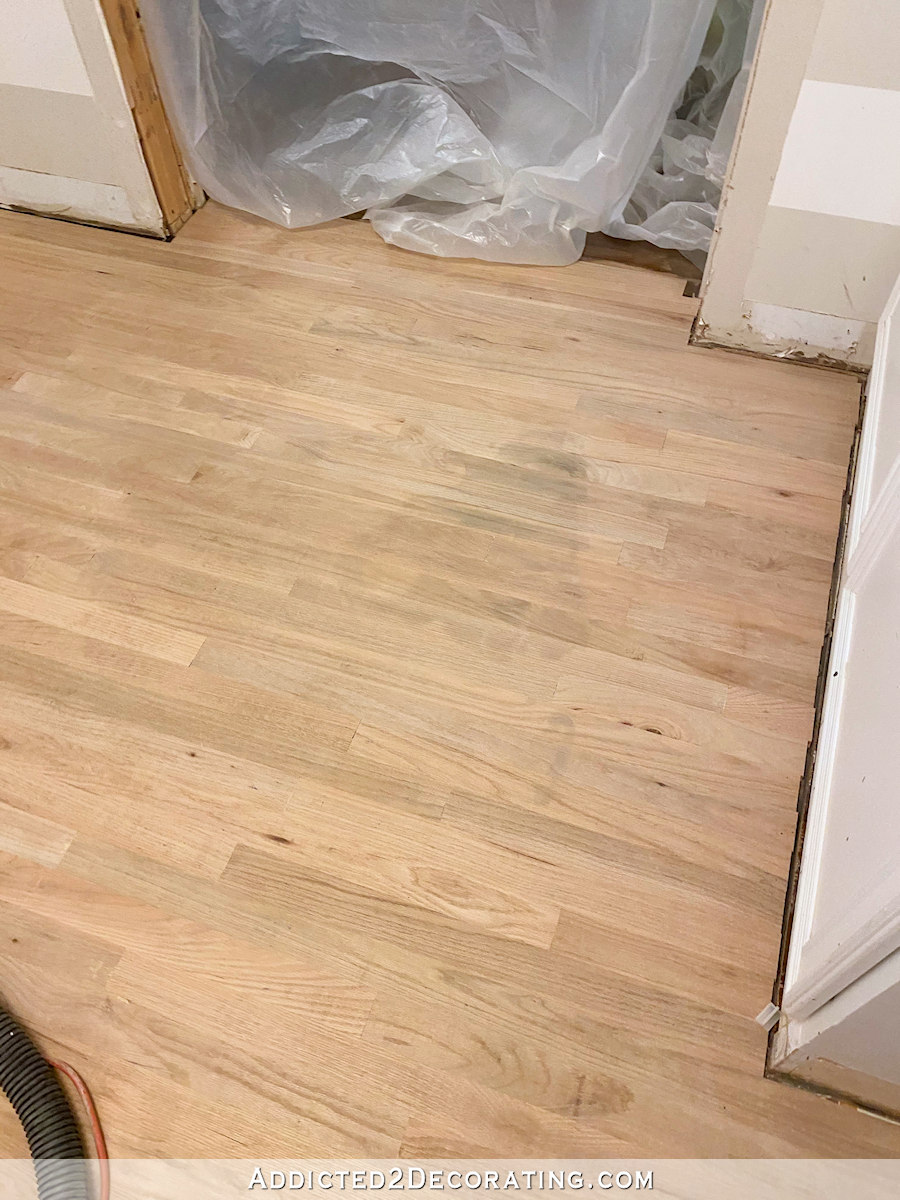
After sanding the entire floor with 34, 60, 80, and 120 grit sandpaper on my handheld belt sander (which I chose to use instead of renting the big floor sander since this is such a small area), I referred back to my posts that I wrote when I refinished my floors the last time so that I could follow the exact process.
You can see those posts here:
So after refreshing my memory on the process, I started with the pre-stain conditioner on the whole floor…
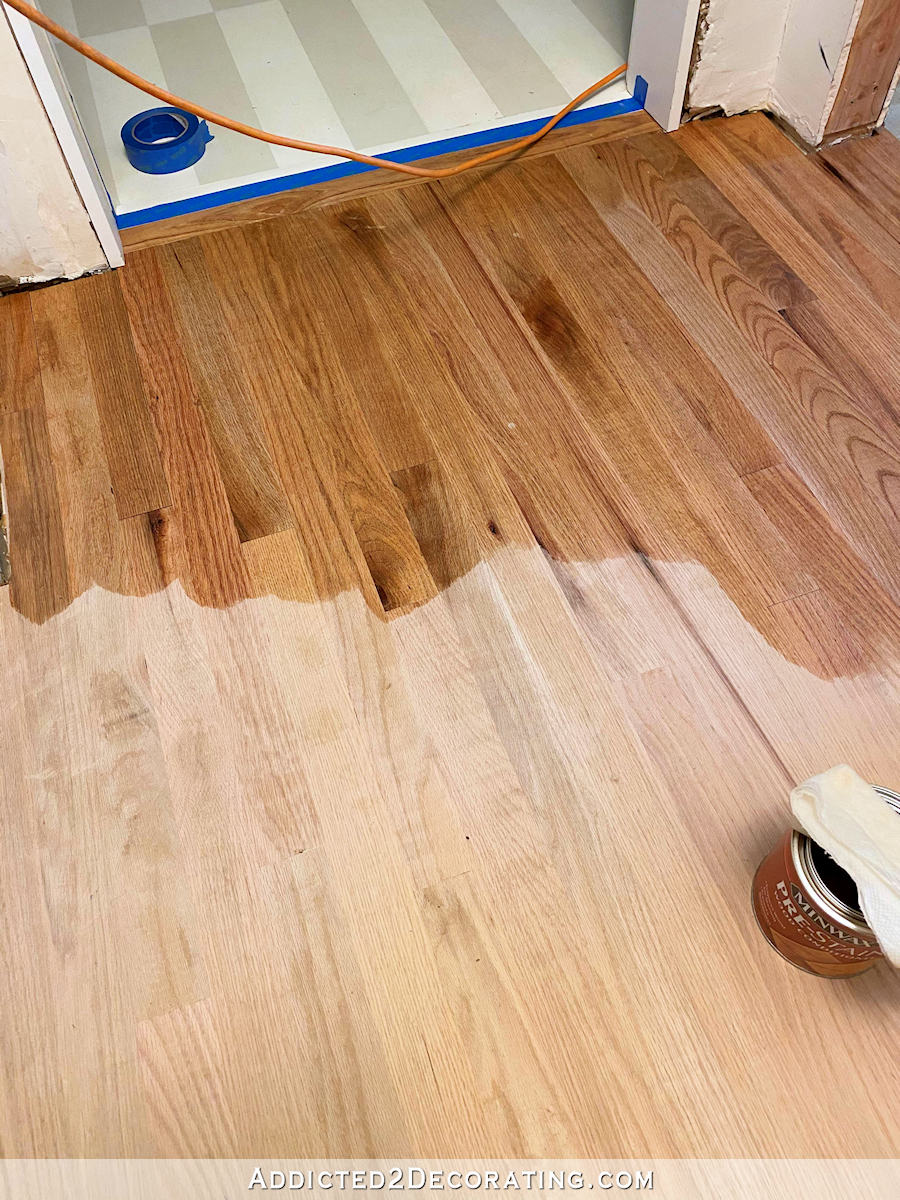
And then I mixed the stain just as I did before — 50% Minwax Dark Walnut and 50% Minwax Special Walnut.
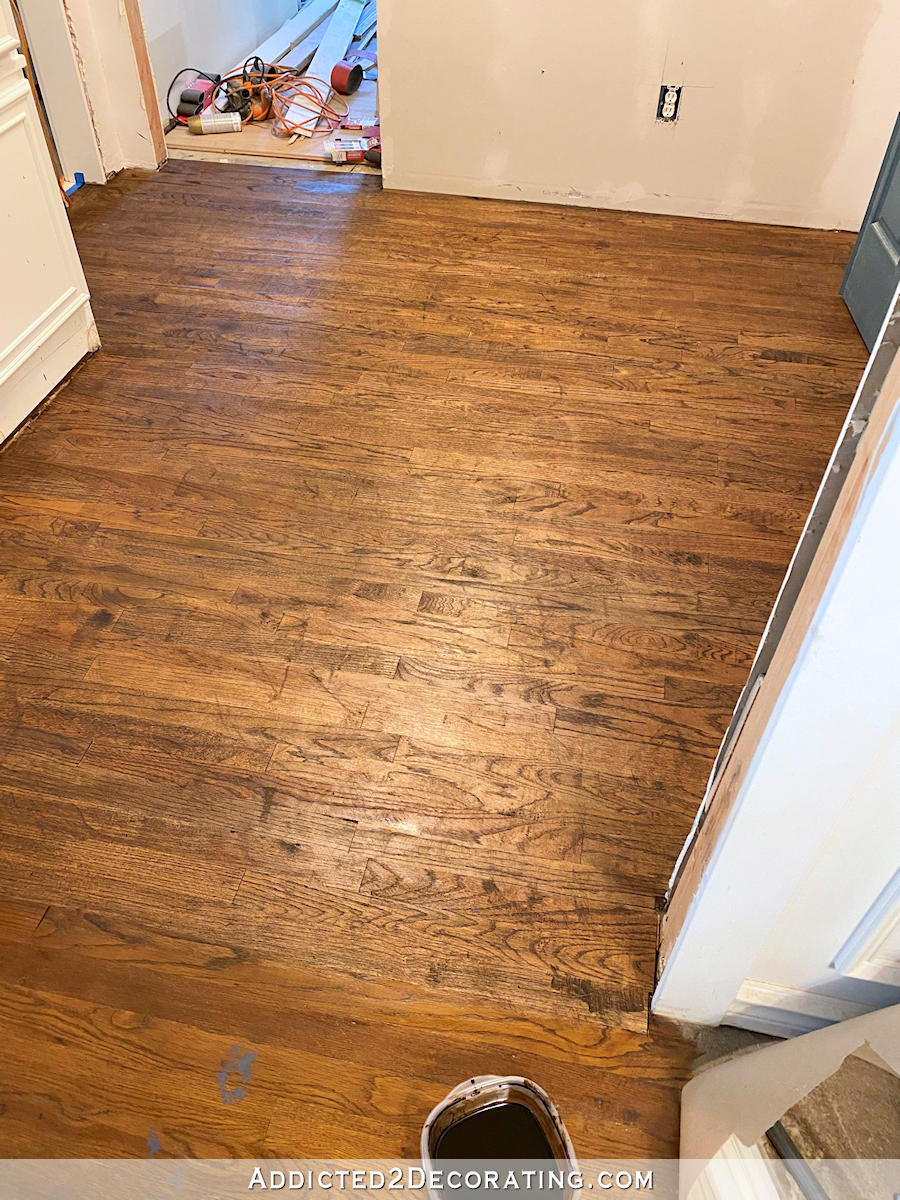
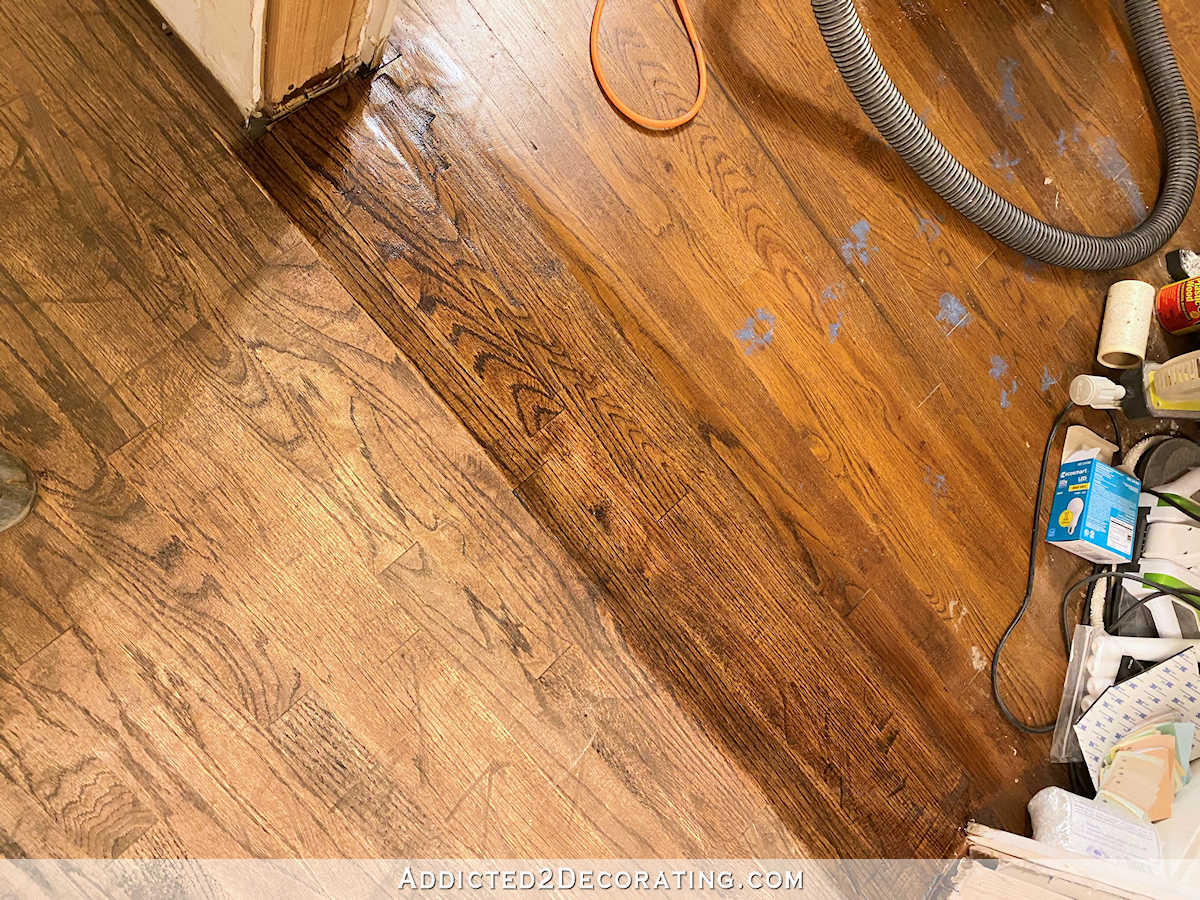
And that right there is where I should have realized that things weren’t quite right. Do you see the new stain against the stained music room floor at the bottom of that picture? There’s no way those two floors would end up being the same color with them so different at that stage.
But rather than trust my eyes, which were telling me that this wasn’t right, I decided to ignore my eyes and just press forward with the exact process that I had used before. With one small change.
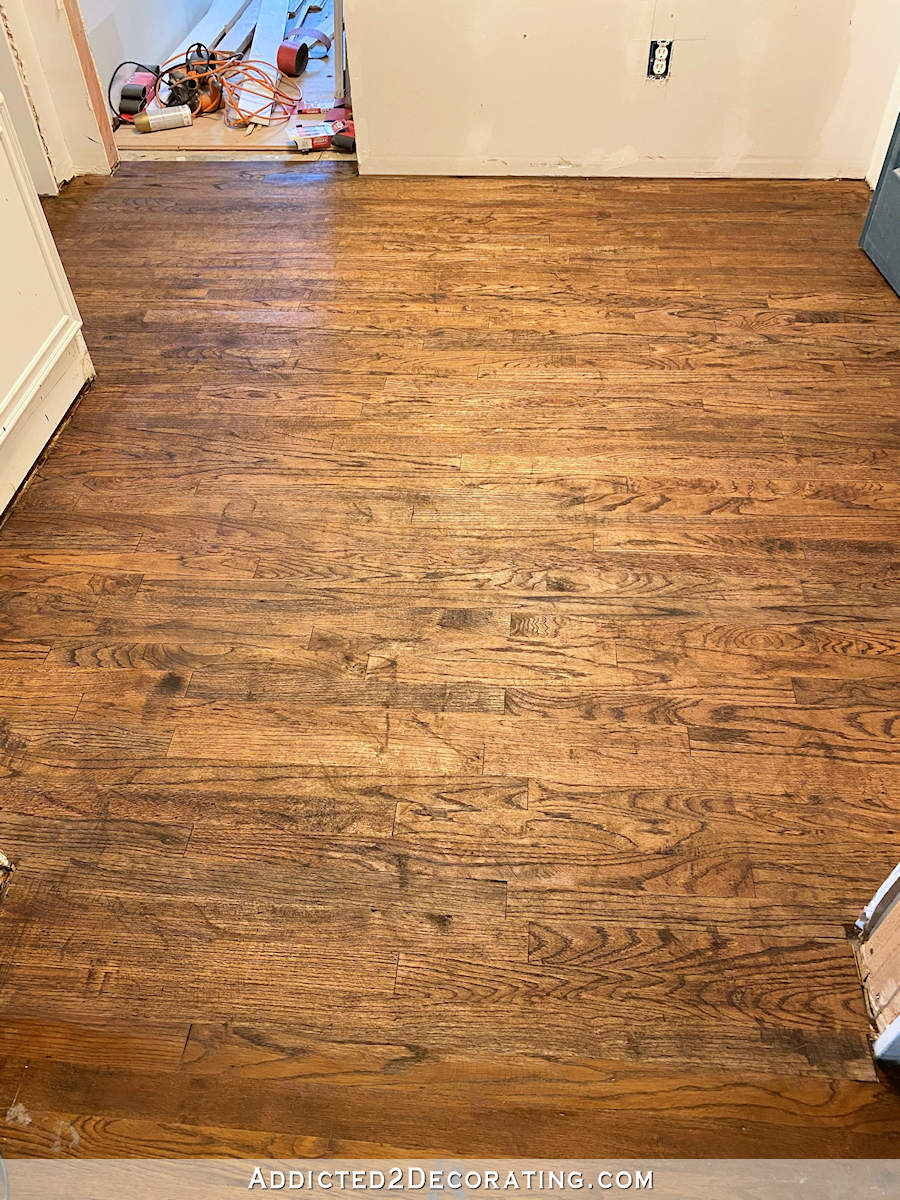
This stain seemed to stain the floors much darker than the stain did the last time. So I convinced myself that all I needed to do in order to correct the situation was just to sand away some of the darkness. And that’s what I did to the whole floor.
With the whole thing sanded and lightened up a bit, I was ready to move on to the next step. Once again, I decided to ignore my lying eyes which were telling me that those two colors are still nowhere near the same!!! The hallway was way more of a true brown, and the music room had way more red/orange in it.
But I kept telling myself, “This is the exact process I used last time. I just need to trust it.” Plus, when I would step back a few feet and look at it, the color difference seemed to be way less noticeable. So once again, I convinced myself that somehow, magically, the end product would be just right even though things seemed way off at this point.
So I continued on with the next step — mixing some of my stain with the first coat of polyurethane in a 1:8 ratio. I tried it right next to the music room floor. Now I know you’re thinking, “Surely THIS is where Kristi can see that this isn’t going to end well, right?” Wrong.
I mean, I could see it. But y’all, I was just having a really stupid moment where some wiring in my brain clearly got crossed. Because while I could see those color differences, I kept telling myself to keep on and trust the process. I mean, it’s the exact same process that I used before! There’s no reason it shouldn’t work, even though my eyes were telling me, “Hey!! It’s not working!!! Stop!”
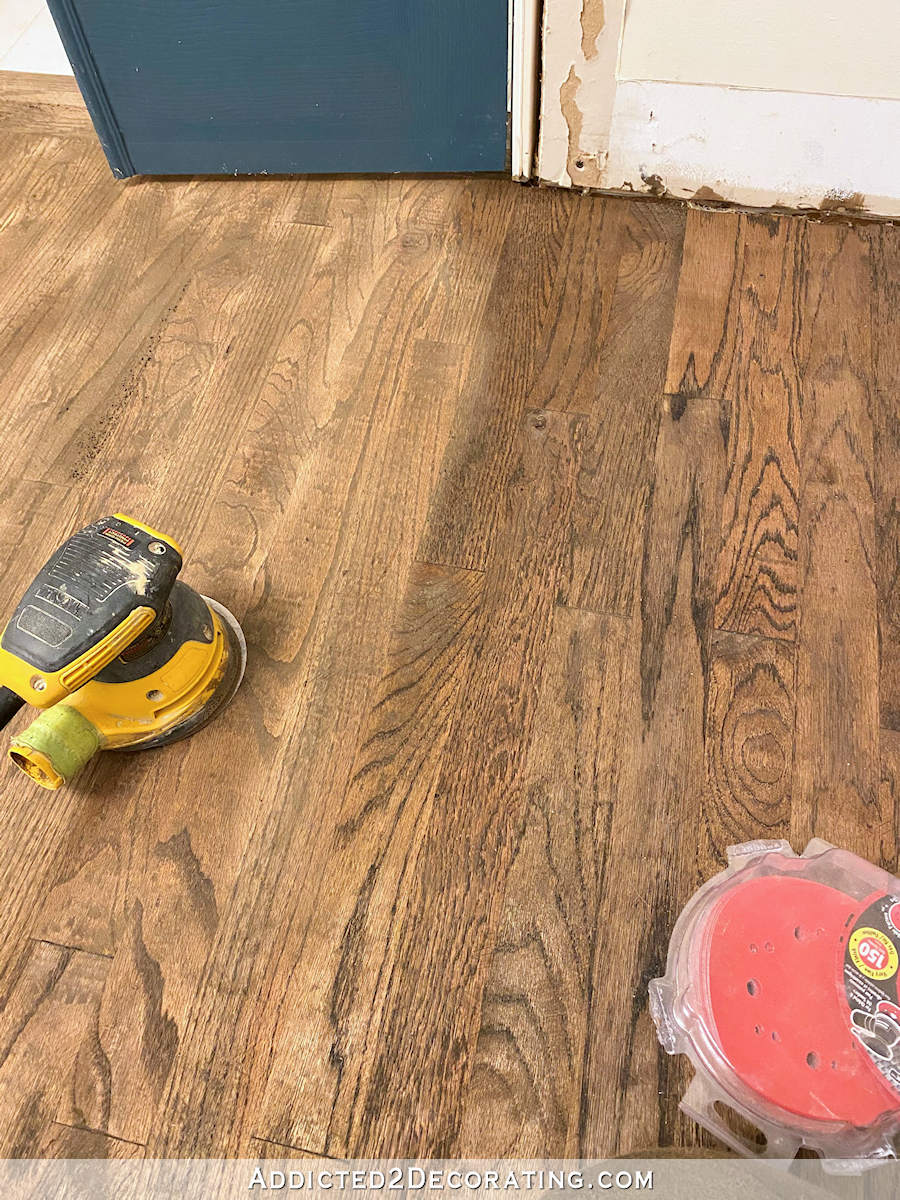
I didn’t stop. I kept on. I put that first layer of polyurethane on the entire floor.
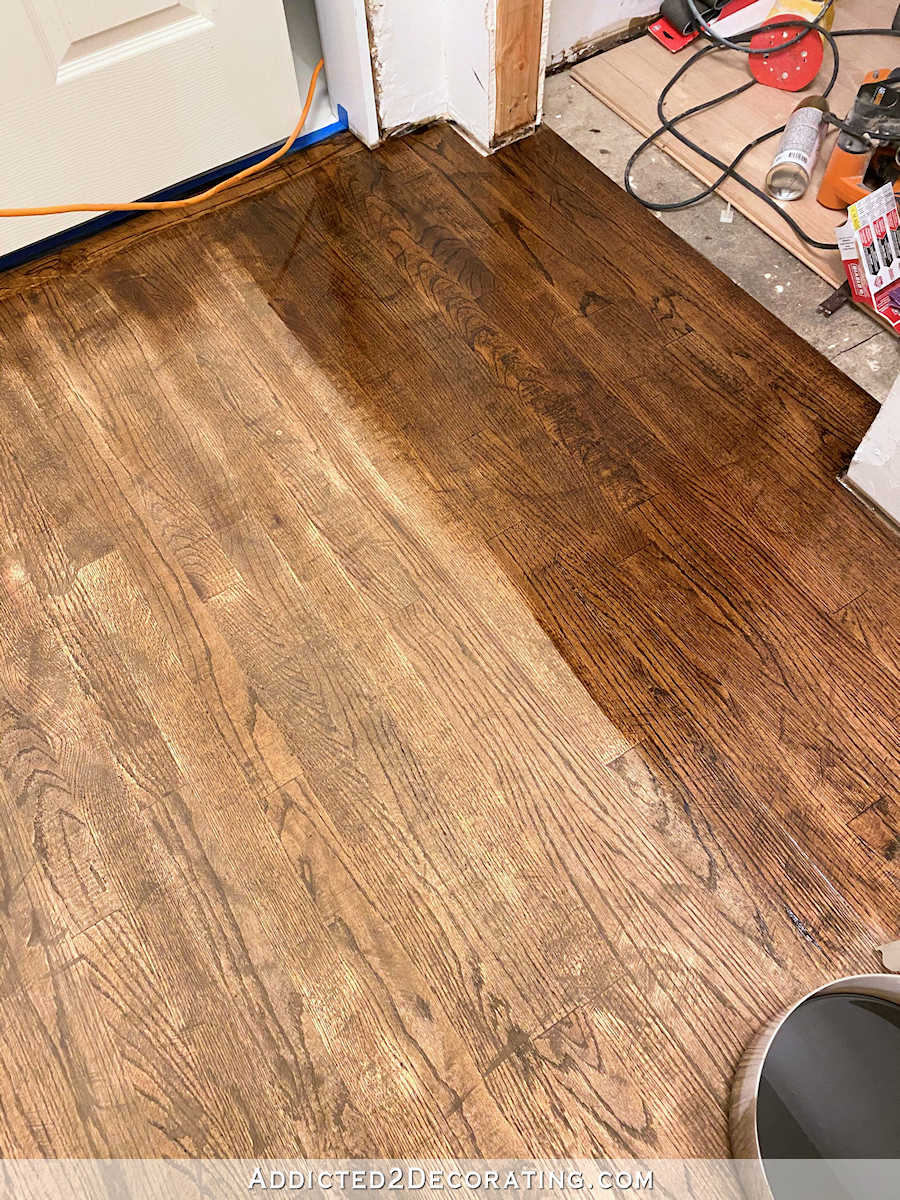
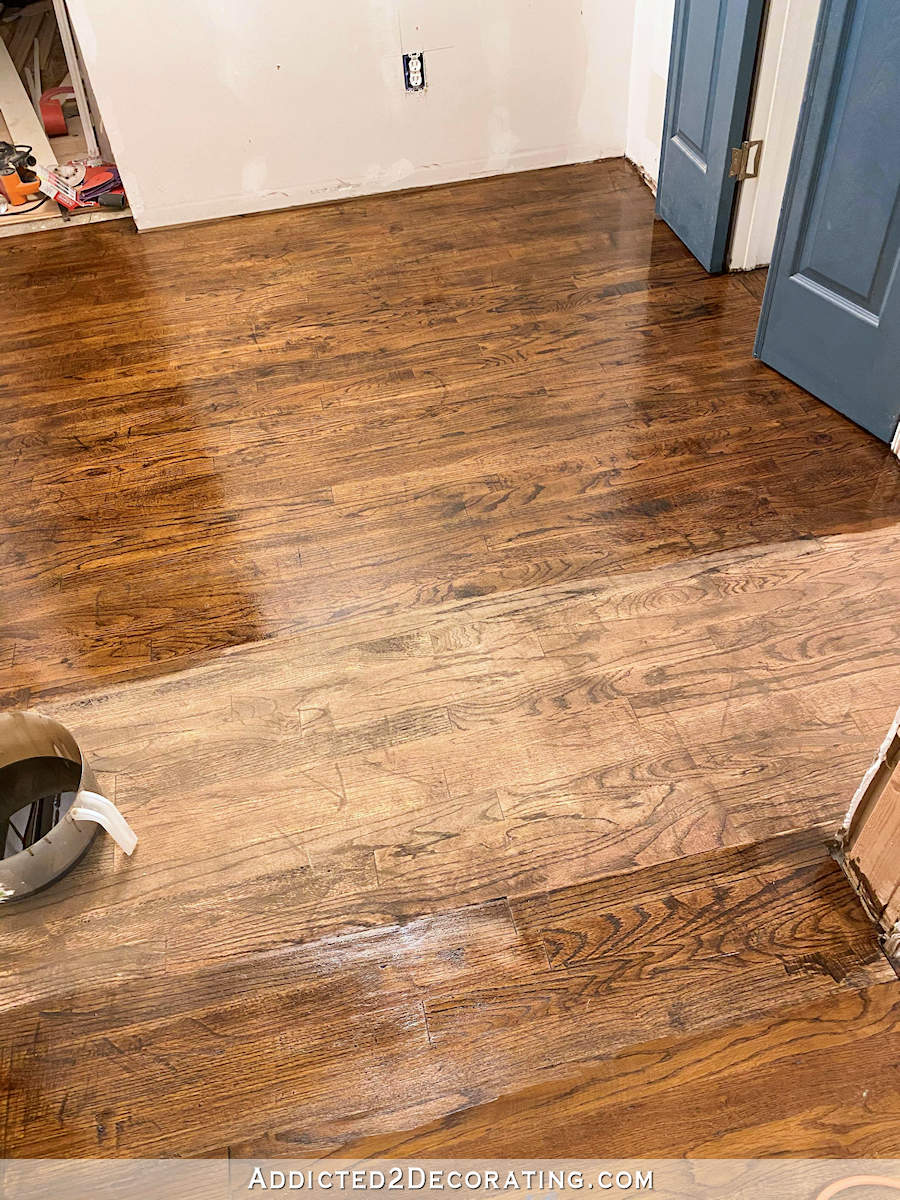
And sure enough, when it was done, it was awful. I hoped that things would magically transform as I slept last night, but I got up this morning to see this mess…
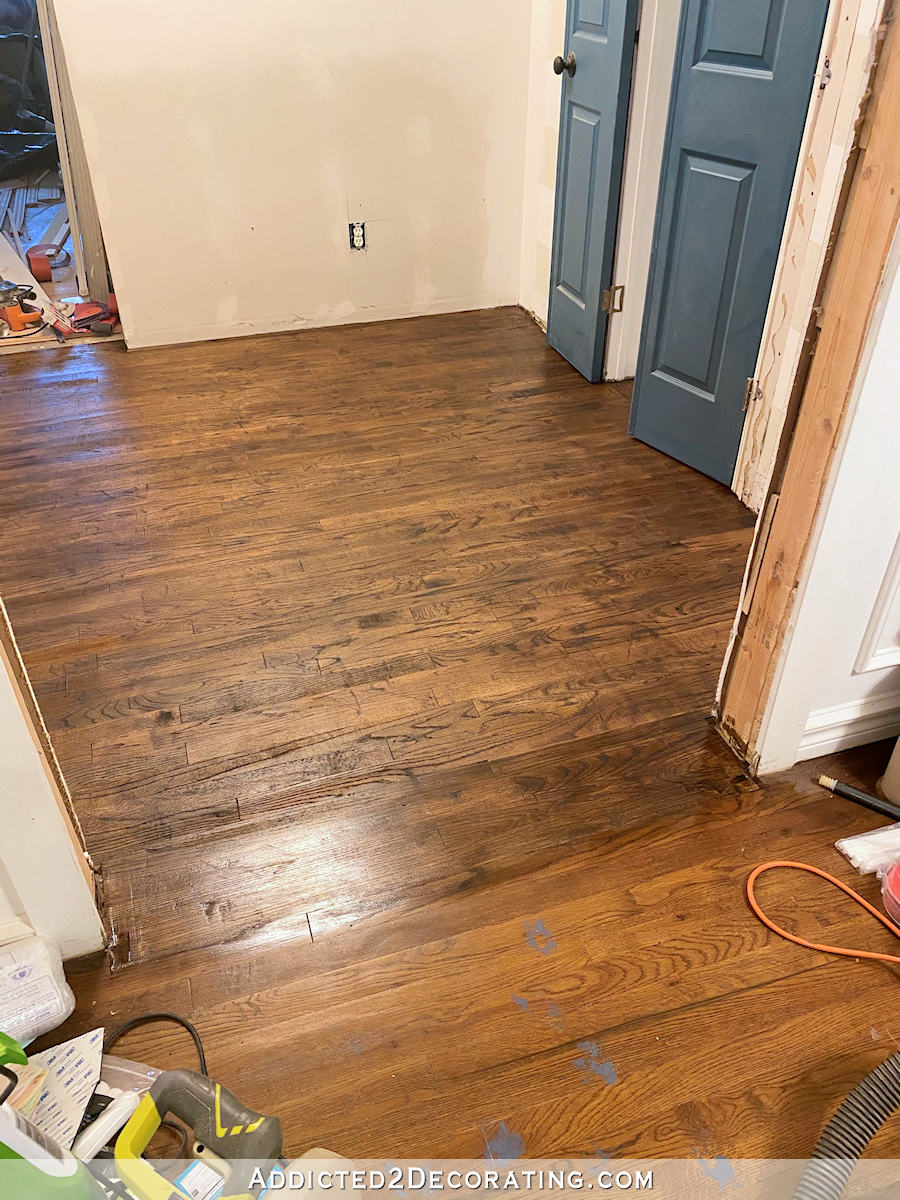
So why did this go so wrong? Well, I could have saved myself a whole lot of trouble had I taken the time to look back on my pictures I took right after I finished the floors last time. Here’s what they looked like…

I tried to find the most recent picture showing my hardwood floors, and this is it…

Those don’t even look like the same floor. I have no idea why, but my floors have lightened over the years, and they are decidedly more orange now. They’re still not that obvious orange that they turned when I used Waterlox on the floors, but they are definitely more orange than they were right after the new finish.
I had honestly never noticed this happening over the years. When I look at my floors now, the orange doesn’t stand out to me at all. And I certainly hadn’t noticed that they were lighter than they used to be. But comparing the current floors to old pictures, it’s obvious. And it became all the more obvious when I tried to used the exact same staining and finished process and products now to match a floor that was finished years ago.
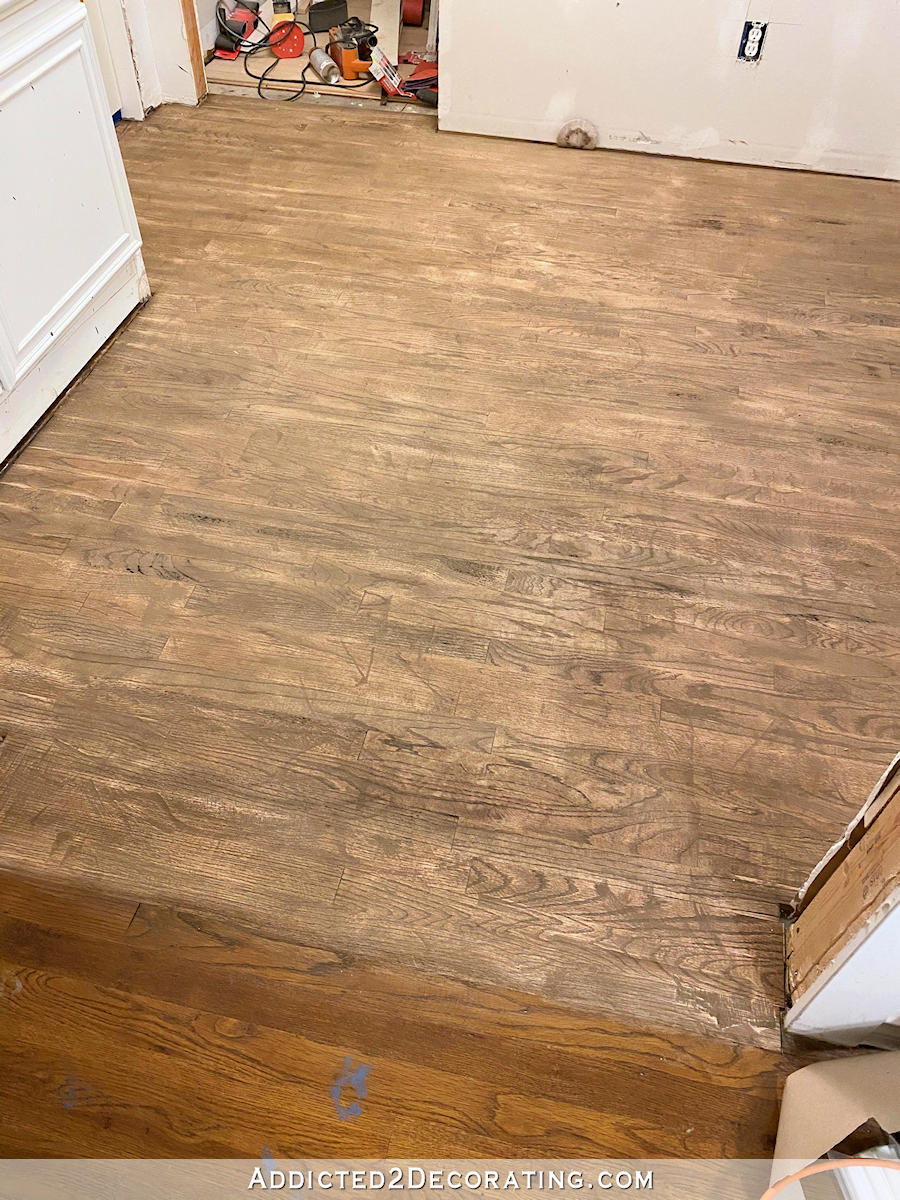
So at this point, my only option is to re-sand the whole floor and start over on the stain. I’m so glad this is just a very small hallway. If this were a bigger area, like a bedroom, I’d be in tears right now. But it’s a small area, and I’m determined to just get it done. There’s no time to waste on tears. I’m ready to get this ridiculous floor project behind me so that I can move on to much more interesting things.

Addicted 2 Decorating is where I share my DIY and decorating journey as I remodel and decorate the 1948 fixer upper that my husband, Matt, and I bought in 2013. Matt has M.S. and is unable to do physical work, so I do the majority of the work on the house by myself. You can learn more about me here.

Good luck! I hope that ‘second time’s a charm’.
I’ve done the same thing! Despite knowing that things weren’t going the way they should be, I have forged ahead and experienced the horrible end results! Hopefully you are able to get this figured out so that the two floors match.
I’m sorry!! Oh man I just did a similar thing. I painted an entire office light baby pink because, even though I could SEE that it was pink in front of me, the sample I had gotten a few days earlier WASN’T pink on the wall. I told myself it wouldn’t dry looking pink. The next morning, the whole room was dry and pink lol. Why the sample paint was different than the 5 gallons I got was a mystery to me and the Home Depot worker. But when we painted the two paints side-by-side, one was pink. At least she gave me my money back.
I am sorry you are dealing with this. It is a learning tool for us though. I also have flooring finishing in stages. I will look out for this happening. Good luck.
Won’t today’s same process just ‘orange-up’ to match the older floors in a couple years? Just throw a cute area rug over your newly refinished floors while they go thru the inevitable color change…OR, might you do a stenciled or taped-off type pattern in an even dark/lighter finish to purposefully give the hallway it’s own personality?
Are my eyes deceiving me, or are there blue paw prints on the music room floor? Are you going to be able to get rid of them without a ton of work?
You’re eyes do not deceive you. That’s cooper’s doing…again. 😂 The boy is like a wrecking ball. But it comes right up. It’s latex paint on an oil-based finish. If I put a wet sponge on it for a couple of minutes, it comes up very easily.
Ouch. Sorry for this bump in the road. You’ll get it right soon.
You’ve got this on the 2nd try!
Kristi, love your honesty. You had a lot of competing demands on your attention, you were trusting your process, you had previous experience that the finished result turns out differently, it’s completely understandable. Been there myself many times! I’m left wondering though, won’t the hallway floor eventually change to the same color as the rest of the house, since that’s what happened with those floors?
It probably would, but it would take years.
So disappointing for you after all that work. But, you are the most resilient DIYer and with all your stick-to-it-tiv-ness (?), that floor will be as beautiful as your other ones in your gorgeous home!!
Maybe a sunlamp is all you need in the hallway! If you say your floors have lightened over time with the same formula, it must be time and light that is working, and not the wrong stain mix. I would let them sit a while and work on something else. Just be sure they have poly to protect them. Of course maybe I’ve totally misunderstood the entire post…I got my 2nd COVID vaccine yesterday, slept awful, and am feeling flu-ish a bit today with foggy head, aching joints and super tired.
Marianne, I’m with you! If it were my floor, I would finish off sealing the floor using the basic recipe, and then leave it while I worked on all the other projects in my queue.
Kristi, if you concoct a new recipe to make the floors match now, then what happens if (more likely, when) the hallway floor changes over time? Leaving it as is, you know that after awhile they’ll match, and maybe sooner than later. Perhaps the changes in the rest of your house actually occurred soon after they were refinished, so you might not have to wait as long you might think. I also like Marianne’s sunlamp idea.
I’m thinking your steadfastness in sticking to the recipe was actually a wise choice.
Congratulations on getting through your second dose, Marianne. The reaction can be astonishingly intense for awhile, can’t it?
As I was reading along my first thought was that it has been a while since you finished the other floors and all things being the same that time was the wild card. I thought the finish was darker in the beginning and sure enough – as your pictures reveal – the warm tones were less obvious in the beginning.
All wood changes colour over time. As Linda suggests you may get a match right now by mixing a different stain – but over time I would think the difference would become apparent again as the new mix ages and the wood ad finish oxidize.
I would go ahead and finish it – it’s not like it is in the middle of your living room or somewhere where the colour shift is blindingly obvious and hope the two sections eventually come closer in colour.
I meant to add that I know the change is visible but it is in a transition area between one room and another and less jarring as a result.
UGH…so sorry. At least you know what to do to fix it. By now I WOULD be crying and giving up somehow. I guess my husband would have to step in…and do whatever he thought – I can’t take that much stress!!! You are the bomb! Can’t wait to see the new pictures – I know you will get it right!
This is real life! Thanks for sharing!
Stained wood floors do lighten, and oil based finishes tend to amber-ize whatever is under them over time. Stain tones can change even from batch to batch at manufacture, let alone from years lapsing between uses of the exact same color.
So sorry you have to re-do that floor, Kristi. I say “have to”, because I know you will, because it will make you crazy to see two such different floor colors. Just get a few tiny cans of stains and custom mix, keeping track of ratios until you hit it on scrap planks. The hallway gets zero natural light, so it would likely not lighten enough to create the sort of gradual, mellowed transition you would have seen had the floors been done together. If any DIYer can mix up a custom match, it will be you. :hugs:
If it is coated in oil based Polyurethane, it will match. It yellows over time (not too long)
If what Phyllis says is true, then in a few months the colour should match. On the other hand, if you match them now, maybe after the yellowing happens they will no longer match!
Maybe wait a bit before re-doing everything?
Can you find photos from different timepoints and create a timeline of sorts to see when the change happened?
How discouraging! But the phenomenon of project blindness is well-known to me. I know you will pick yourself back up, and it will come out better than ever! I have no doubt!
Your comment “hoping it would be magically transformed in the morning” made me laugh out loud. How many of us have had projects that weren’t looking like we’d imagined, but we still had hope (and prayers) it would mysteriously look better in the morning light?
I bet in a year they will match as the new polyurethane in the hall becomes worn. I really think it looks ok
So sorry that this has happened. DIY fails are so heart breaking when they happen, and I know, I’m always having them. Have you tried putting a small amount of your polyurethane mix on the music room floor to see if it brings it back to its original colour? Would perhaps coating that floor after a clean be easier than stripping the hallway?
I thought about that, but the floor is continuous from the hallway to the music room to the entryway to the living room to the kitchen to the breakfast room to the pantry. That would be a massive project.
Kristi, Thank you, thank you, thank you! We purchased an old rental back in 2004 and are finally down to the end. Put on a family room addition off the kitchen, renno’d the kitchen and 2 baths. and kitchen. Landscaped and added a shed and 3 level deck in our ravined backyard. Now we are moving on to new carpet and refinishing the hardwood floors. Every where I check and everyone I check with tells me I can’t do what I want. We have a ranch and like yours the rooms and hardwood flow into each other. I’ve wanted to do this one room at a time so as not to have to disrupt (any more than necessary) the pets and us. Everyone tells me no, you can’t t do that. BUT YOU DID AND SHOWED ME HOW! THANK YOU, THANK YOU, THANK YOU!