Small Condo, Small Budget Bedroom Makeover – Before & After
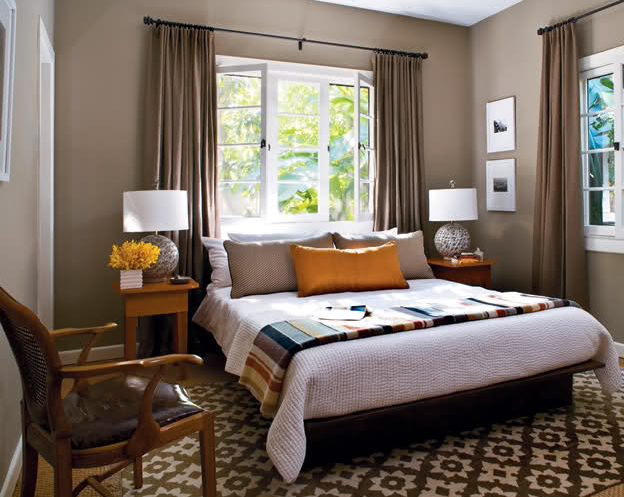
I finally got the condo bedroom completely finished yesterday! This room needed the most work of any room in the condo, so it’s such a relief to have it finished. It might even be my favorite room in the condo!
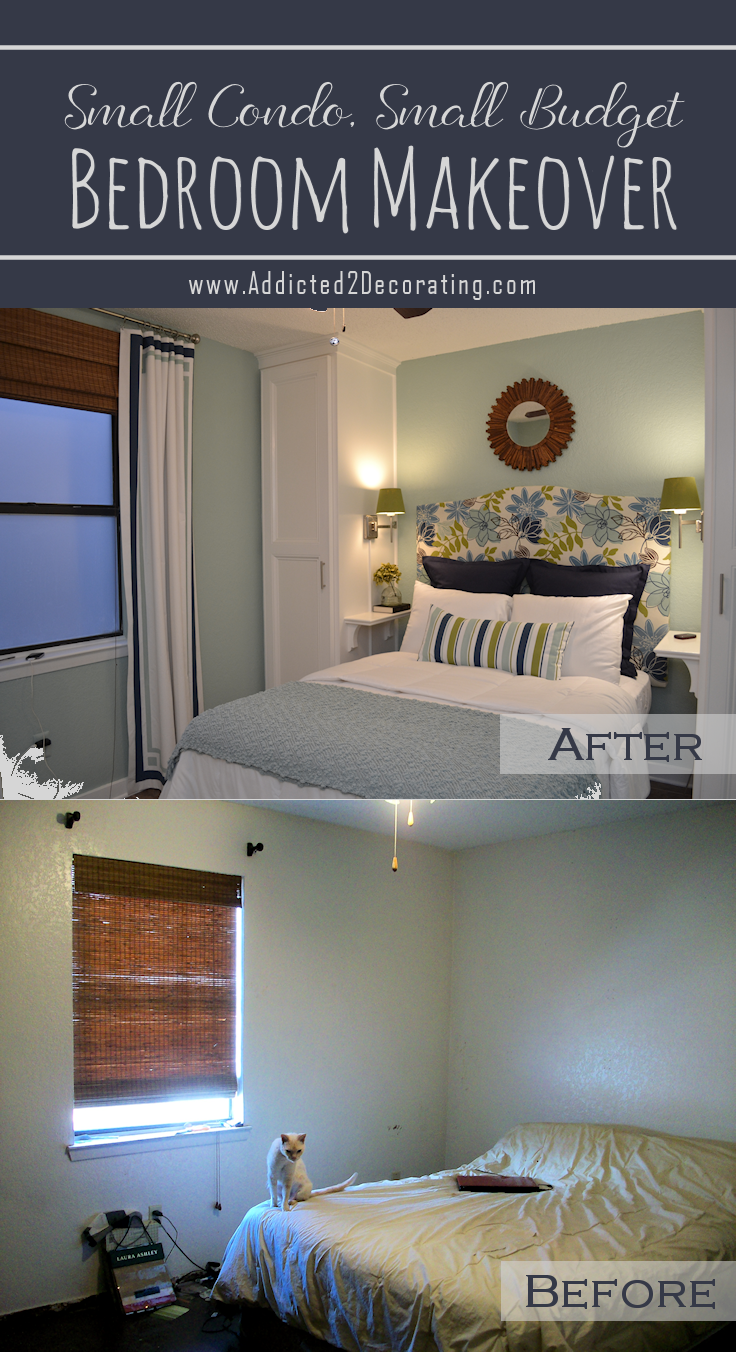
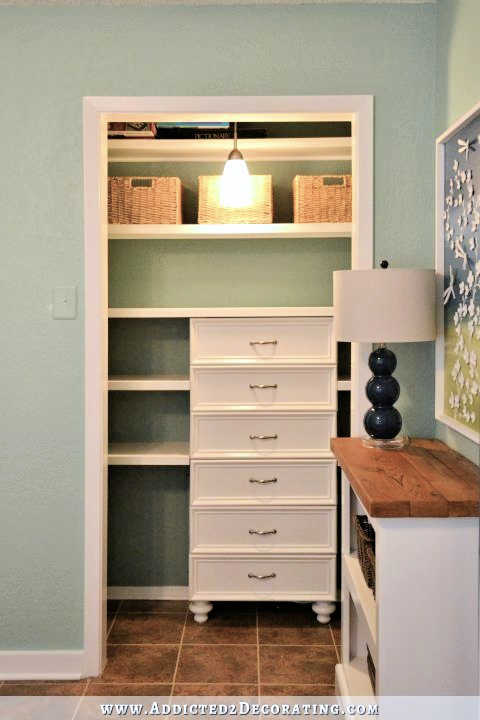
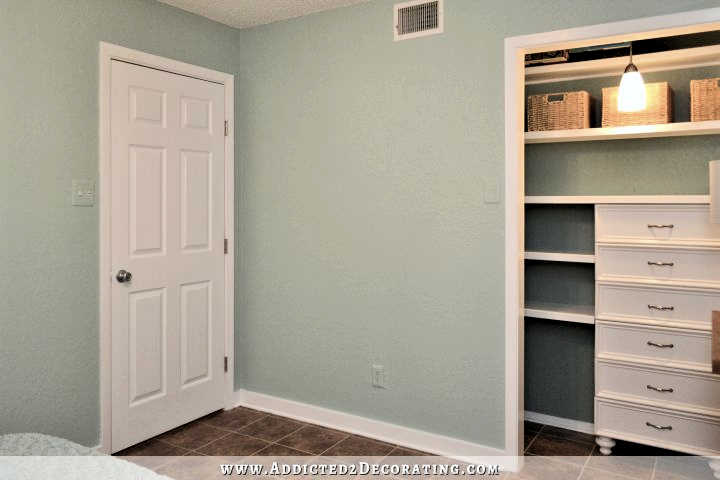
The closets that I built were the most expensive thing in the room, but I think the added storage is so important in a condo this small. The two closets cost around $340 to build from scratch. Oh, how I wish I had finished them when we still lived there so that we could have actually used them!

I looked high and low for an actual “before” picture of this room, but I don’t think I took any pictures of the bedrooms when we moved into the condo. They were both just boring, empty boxes — old dingy carpet, textured walls with glossy white paint, white metal mini blinds, and popcorn ceilings with old white ceiling fans. I don’t think I took a picture until we had been there a while, and I had already removed the carpet and painted the concrete floors (which didn’t hold up at all, by the way).
Awwww…our sweet kitty Powder. We had to say goodbye to her about 3 months ago. We miss her. 🙁
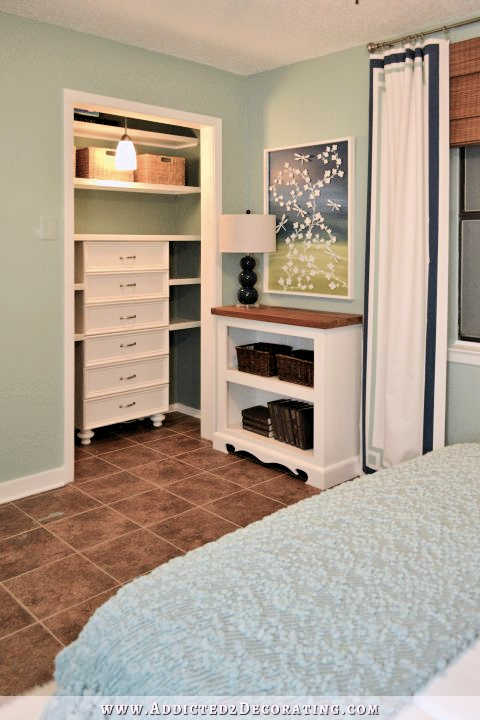
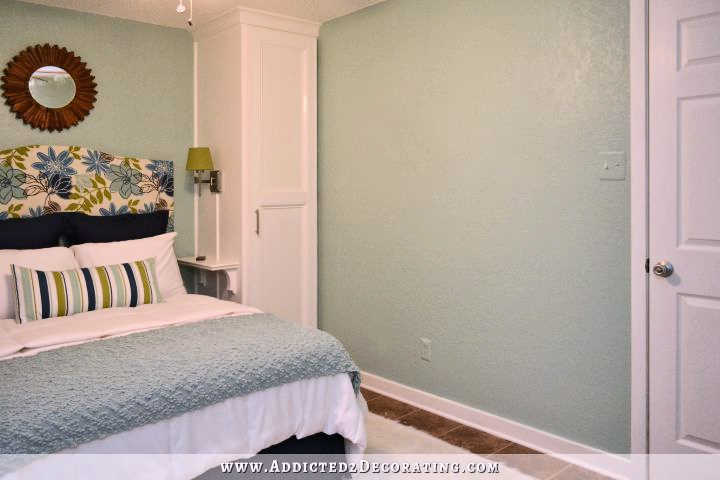
Anyway, when I finally did start working on the room, and I built the first version of the bedside closets, I made them a few inches wider than they are now. You can see how close the side of the closet is to the headboard. That’s the same headboard that’s in the room now.
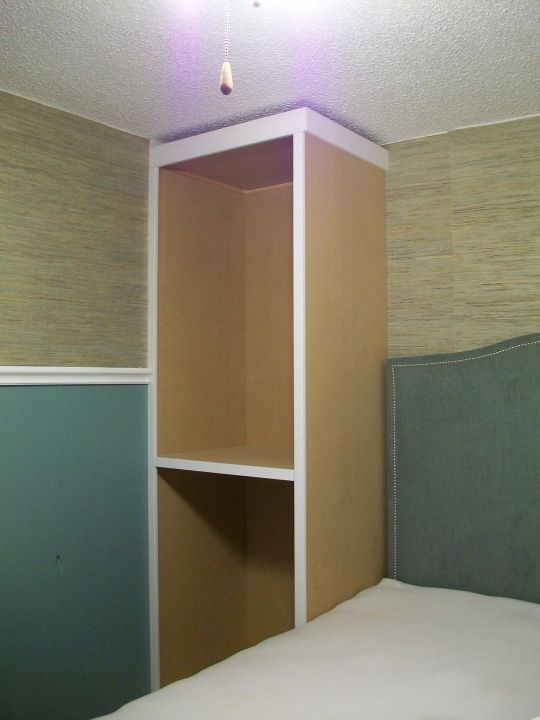
Now that the closets are narrower, there’s much more “breathing room” between them — enough room for a shelf on each side of the bed.

Here’s another view of the headboard between the old closets. So close!

And here’s the same headboard (with different fabric) now. It definitely looks better this way.

I reused so many things in this room that I already had on hand, which obviously helped me to save quite a bit of money.
The headboard is one that I originally made the headboard in 2010, but took about 45 minutes to wrap it with a new layer of batting and fabric to give it a brand new look. That cost me about $25.
I made the little shelves by the bed out of scrap plywood and trim, and the corbels holding the shelves up are the ones that I originally purchased for my kitchen remodel at the house that got rained on and warped. I cut them down much smaller (also cutting off the warped sides and making them 90-degree angles again) with my miter saw
The vine and flower artwork was made out of scrap MDF and polymer clay flowers that I recycled from an old project that I made back in 2012.
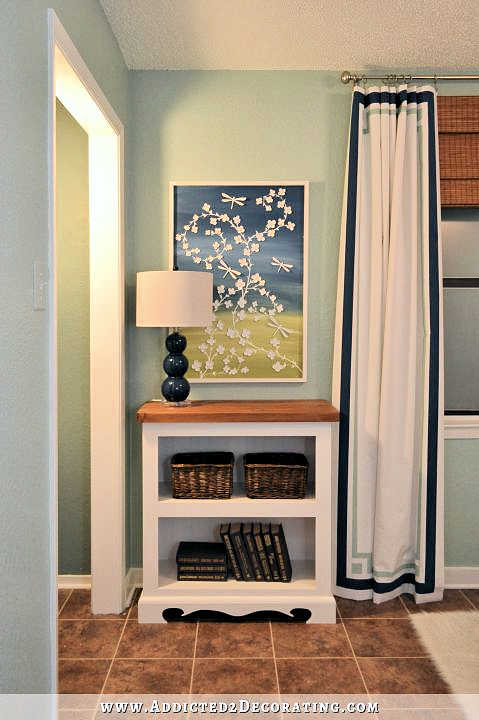
The bookshelf was made completely out of scrap MDF and lumber, so that didn’t cost me a single penny out of pocket.
The lamp was $32 at Marshall’s, and I already had the baskets and books on hand.

The original closet got a makeover back in 2010, when I removed the hanging storage and added drawer and shelf storage.
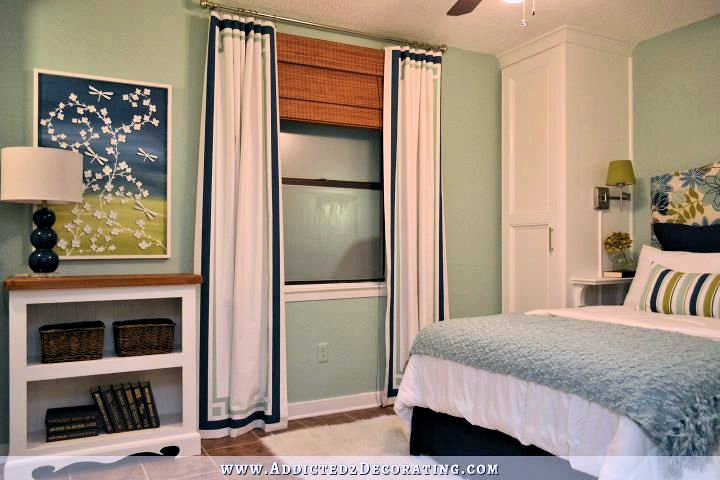
The curtains are very inexpensive drapery lining that I bought during a 50% off sale at JoAnn Fabrics. I used regular Behr paint (which is actually 100% acrylic) to paint the design on the fabric. I already had the rod, brackets, and clip rings from the original closet makeover in 2010, so I just reused those. And the woven shade is from Home Depot, and it’s been on that window for years. I did move it up (it’s now mounted outside the window instead of inside) to make the window look larger. So in all, I only spent $30 to dress up the window with new curtain panels this time around.
The wood shim sunburst mirror above the headboard is one that I made back in 2011. I just gave it a quick coat of stain to freshen it up, and it didn’t cost me a penny since I had the stain on hand.
The swing arm sconces are from Home Depot, and I bought them back when I built the first closets. I wanted to use them in the room, but the shades were yellowed like old shades get from years of incandescent light bulb heat. So I painted them (both the inside and the outside) to give them a fresh look and put new lower watt bulbs in them. I already had the paint on hand, so that didn’t cost anything. I did purchase a package of cord covers to give the sconce cords a cleaner look. Those were about $10 for a package of three, and I only needed two of them.

The throw at the end of the bed is from Marshall’s, and it was $19. It wasn’t with all of the other throws. In fact, I went there specifically to find a colorful throw for this room, and gave up. Then as I was headed out of the store, I walked past the gift section (I guess that’s what you’d call it), and this throw was there, packaged in a gift box with a big bow around it. It was the perfect color, and much cheaper than the throws in the bedding/home section!
The rug is one that I made by taking an old indoor/outdoor rug (one that I had had for a couple of years now, but had never used) and covering it with faux fur from JoAnn Fabrics. That cost me about $50. And by the way, for those of you who were wondering, I did vacuum it yesterday and it worked out just fine. I didn’t have any issues with vacuuming it except the vacuum flattened the fur and I had to fluff it up again with the broom.
The navy blue bedskirt is from WalMart, and was $16. It’s literally the cheapest piece of junk I’ve ever wasted money on. It pains me because bedskirts are so easy to make, and you can get a quality bedskirt for very little money and just a little bit of a time investment by making it yourself. But I didn’t want to take the time to make one, and I didn’t want to spend more money that I had to. So I got exactly what I paid for. Ugh. The decking is so cheap that as I was ironing the bedskirt, I accidentally hit the decking with the iron in two areas, and the decking melted immediately on contact with the iron.
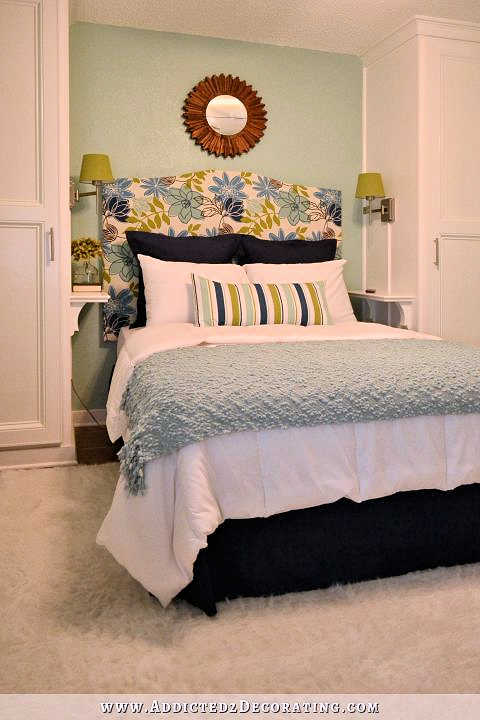
I made the navy blue shams out of some cotton twill that I found at JoAnn Fabrics for 50% off. So the 2.5 yards that I needed cost me about $12.50. Shams are quick and easy to make, taking about 45 minutes from start to finish per sham. The pillow inserts were old polyfill inserts that I’ve had for years. They were flat and lumpy, so I opened them up, fluffed up the polyfill, and sewed them back up. They looked good as new!
The white pillows are just standard pillow cases that came with the sheet set that I got for $30 at Marshall’s. I didn’t have any extra pillows that I could use, so I just picked up some cheap ones for about $8 each at WalMart.
The striped pillow is leftover blackout lining that I had in my scrap fabric pile. I painted the stripes with paint that I had on hand, and used a pillow insert that I had on hand.
The comforter is the cheapest solid white one I could find at WalMart, and it was $25. At least it didn’t melt when I ran the steam iron over it to get all of the wrinkles out!

I didn’t add any decorations to the other two walls. If we were living there, I would probably add a full-length mirror to the wall to the left of the closet. But we’re not. So I won’t. 🙂
The bedroom door leads out to the hallway. If you walk out straight ahead, you’ll be in the hallway-turned-laundry-room. To the left is the hallway bathroom. To the right is the other bedroom, which is actually, officially the master bedroom.
It’s so nice having this room finished!! I kind of had to start from scratch, because there was very little done in here, and what was done (i.e., the closets) needed to be done over. So I had to:
- paint the ceiling
- remove wallpaper and chair rail
- patch and paint the walls (wall color is Marina Isle by Behr)
- remove old closets and build new ones
- install baseboards and shoe moulding, and paint all of the trim
- install trim around the door
- paint the door
- replace some floor tiles, and grout the floor
I’m sure there are a couple of things I’m forgetting, but they’re done now!
In total, I ended up spending about $740 on this room. That includes the items needed to finish the actual room, plus the decorative items that I added for staging the room. About $475 of that total cost was on the actual room — materials to build the closets, wall paint, ceiling paint, trim paint, baseboards, shoe moulding, grout, caulk, etc. The decorative items that I added to stage the room — bedding, curtains, rug, etc. — came to about $265. I think it was money well spent because I really love how this room turned out!
Click on the thumbnails below to see the various DIY projects that went into this bedroom makeover.
[categorythumbnaillist 498]

Addicted 2 Decorating is where I share my DIY and decorating journey as I remodel and decorate the 1948 fixer upper that my husband, Matt, and I bought in 2013. Matt has M.S. and is unable to do physical work, so I do the majority of the work on the house by myself. You can learn more about me here.


This looks amazing. It is what I was thinking of for our cabin (but not so fancy on the bed part). What are the measurements for the bedside shelves?
Oh darn. I knew someone was going to ask that, and I forgot to measure! I think they’re about 6.5 inches deep, and about 20 inches wide. You can see that I put a book on one side, and an old cell phone on the other just to demonstrate (for prospective buyers) that there’s plenty of room on those shelves to hold things like eye glasses, a water glass, a book, cell phone, alarm clock, etc.
Those shelves are just what I was thinking about for this room and they are perfect with the bed. What a great room and its staged perfectly. Can’t you imagine two college students parents investing in this for them?
Kristi, It turned out beautiful!!!!!! LOVE it!!
The colors are perfect, bright, clean, inviting. The whole room looks lovely Kristi, and I absolutely adore you little ‘free’ bookshelf. Congratulations on finishing and doing such a beautiful job.
That is my dream bedroom. Your work is simply beautiful.
I agree.
It is a lovely inviting room, tranquil. Just the kind of room the promotes a peaceful night’s sleep and a joyous awakening in the morning. ~:)
exactly what I thought: a room for peaceful dreams and slumber. Congratulations on a fantastic job!!!
I want to come visit and lay in this room for a day. How beautiful, peaceful, and cozy. I love every bit of the room and it’s story. My heart ached a little reading about Powder. I’m so sorry for your loss. 🙁 Thank you for sharing your down to earth, honest and creative ideas, opinions and lessons learned about your projects. xoxo, Lindsey
The closets are much better now. The entire room looks amazing. Do you plan on maybe closing the closet ? Imo, that looks unfinished. I was having rhe same issue with the closet I build, I felt there was not enough room for a door so I used some kind of … no idea what they are called. Not drapes or curtains really. They are long tiny pieces of fabric/rope, sometimes with beads on them. My English stinks today, lol.
Anyway, great job.
Nope, the closet is done. If the new owners want doors, they can add them. 🙂
Love the look of the room, the color scheme, the lighting, just about everything. One question…where are the closet doors? I love the look but I like to hide my stuff in a closet.
I’m not going to add closet doors. If the new owners want them, they can add them. 🙂 I was originally planning on adding curtains, but a few people said that curtains on a closet remind them of a teenager’s room. So when my neighbor — a Baylor student — came over the other day to see my progress, I asked her opinion. She said that she would leave off curtains, but she also said she wouldn’t add doors either. So I’m going with her suggestion on this one. 🙂
Oh my gosh it looks fabulous!!! I can’t wait to see what you do with your own room at the new house!!! Any idea when you’ll be doing that?
I’m really not sure when I’ll tackle that whole project, but I will be doing at least some projects in there in the next few months.
Perfection!
Wow. great job. I hated that fabric on the headboard when you did it, but everything else really tones it down. It certainly looks like a great room for a college student. Is there room anywhere for a desk and chair? That would be the only other thing this room needs for a college kid. They can put a full length mirror on the back of the door, and add a flat screen on a movable mount and they are set. The storage space is great, I think the only other thing I might have done would be to have put the bed frame on risers to give added storage under the bed. You can’t do it now, since the shelves and lights are already there, but something to keep in mind for other bedrooms. I use them on all the beds in my house that just have the bed frames and headboards. It is amazing how much space you can gain. We had a solid cheery bedroom set made by an Amish woodcrafter years ago. One of the things we did was have the bed made high enough so that he cold build two large boxes with three drawers in each for either side of the bed. There is an armoire and triple dresser so with under bed storage it is more than enough for a married couple. Our youngest son now has it in his master bedroom and more than enough room. You are so right about storage, the more you have will impress buyers. What more do you have to do in the condo? Good luck with it all. Blessings
I considered adding a desk and chair in here, but I didn’t want things to look too crowded when prospective buyers look at it. I do think there’s room for a very small desk on the wall to the left of the original closet.
I still have projects like adding baseboards and shoe moulding, grouting tile, etc., in the other rooms. And the wainscoting in the living room needs quite a bit of work.
That room alone should sell the condo! It looks fantastic. And those naysayers who dissed that headboard fabric can eat their words.
I am eating them now!
Beautiful! Reminds me a lot of my own master bedroom. So peaceful. So relaxing. Love your work and how apparently we think somewhat alike. 🙂
Kristi you have, once again, amazed me! This room is just gorgeous and I am sure that your work will certainly help to sell your condo quickly. I love following along and watching your creative process. Thanks for taking all of us along on the ride.
It’s beautiful, Kristi! You really do some amazing work!
PS: How’s the weight loss going? I ended up doing an HCG round at a clinic after your experience and am very happy with the results. I’ve regained 2 lbs since but am still good. How are you feeling? When do you start another round? I know it’s not relevant to this article but I loved your WL posts and sharing. I think most women need help with their weight these days and hearing someone else’s struggles (and successes) feels less lonely and defeating.
Every day I tell myself I’m going to write a new WL post, and I run out of time! In a nutshell, we finished up our five-week break from HCG, and started round 2 yesterday. During the five week break, we easily managed our weight loss by doing the Autoimmune Protocol version of the Paleo diet. I didn’t gain any weight back, and actually kept it off quite easily. This time we’ll be doing a shorter 23-day round of HCG, followed by a three week break.
Looks amazing! Very nice.
Do you have tutorial on how to make a beskirt? I need one and have experieced how cheap and not tailored most bedskirts look. I actually need one that’s shorter than normal as we purchased a slimmer boxspring foundation so the bed wouldn’t be so incredibly high. 🙂 I find your tutorial really easy to follow and good as the “for dummies” version. Some tutorials others do you have to be a pretty accomplished seamstress to follow in the first place!
Unfortunately I don’t have a tutorial for a bedskirt. 🙁 I do have one more bedroom to stage at the condo, and it will need a bedskirt. I’m not really wanting to purchase another cheap (cheaply made) bedskirt, so I might just make a point of making one so that I can have a quality bedskirt AND have a tutorial for you and others who want one.
By chance do you have cabinet specs or dimensions? This is exactly what I’ve been wanting to do! It looks awesome.
I think my finished closets were 25w x 24d x 95h. You can find the project here: https://www.addicted2decorating.com/diy-cabinet-style-bedside-closets-part-1.html
Love it! I especially love the little shelves and lamps — your own little bed nook! So cozy! Beautiful!
Well, it’s obvious what your new job should be….staging homes for real estate agents! What a fantastic job!
Are you going to sell it furnish d? Or just have ab ute garage sale?
Whoever buys it will definitely have the option of purchasing it furnished. I don’t want any of this stuff, and garage sales are such a hassle for relatively little payoff.
What did you use to cover the cords on the bedside lamps?
Everything looks wonderful!
They’re actually cord covers that I purchased at Home Depot. They’re plastic, and semi-circular in shape. The flat back comes with sticky tape, so you just remove the protective paper, and stick the cord cover anywhere you want. It comes with three long cord covers in a package, as well as 90-degree connector elbows and a few other connectors. I couldn’t find the product on their website or I would have linked to it. I found it in the store in the electrical section, and they come in white and ivory. If you ask an employee where the t.v. cord covers are, they will be in that same section.
Thanks for the information!
I absolutely LOVE this room ! I wish I had your vision and creativity! I have a master I am still trying to finish and haven’t been able to get it together. You are so inspiring!
Great job! Always impressed with the level of upgrade achieved for minimal cost.
Oh my….YOU are my favorite designer! WOW!!!!
The bedroom is simply beautiful! The narrow closets look so much better than the wider ones. Great job….i was wondering, is there an outlet close enough for a clock/radio to be placed on a shelf by the bed?
Congrats Kristi on another amazing redo. If you were staying in this condo…I could see some kind of door on a track … For the closet.. You know.. Like Your nifty plumbing pipe track that you made for your house? ..with a simple door. But the room already looks amazing….. And up cycling items is brilliant.
Merry Christmas Krisiti and everyone!
I just love the two small shelves, the brackets under them (so cute) and the light fixtures. They are all just little details that make a huge difference in the room. Well done, Kristi!
P.S. Did you run the light cords up electrical conduit to hide them. Did you also have to notch the shelves to do it? Just wondering. 🙂
It’s not electrical conduit. They’re actually plastic cord covers that come with sticky tape on the back. You just peel the protective paper off of the sticky tape, and stick the cord cover wherever you want it. I did have to notch out the shelves to fit around the cord covers. I just used my jigsaw for that.
Just beautiful. And you will get your money returned when you sell. So excited for you! You are almost ready to list!
You did a fabulous job on this make over!!!…I,love the colors you chose, everything looks amazing!…This will sell in no time!
beautiful – love it
Once again you knocked this project out of the park and on a limited budget. Well done!
Now that I can see the whole room, that picture is just “made” for this room!
Beautiful job. I adore the closet with the drawers.
Another beautiful creation.
Wow! Outstanding – as always. Love the bedside shelves – love it all! Thanks for sharing with us & for the new inspiration/ideas for my guest room/office! The room is odd size (8.5’x19′) and the *closet* isn’t deep enough to hang clothes in so I originally turned it into a vanity area but I’m getting ready to repaint the room and I like your closet layout much better so I will be paying tribute to your clever decorating sense by borrowing/adapting some of your ideas. Kristi, you just rock! I’m confident you’re going to sell this condo as soon as it hits the market!
How do you not have a TV show???!!! Amazing!
Bravo!
This. Is. Amazing. Fantastic job! I absolutely love this room!
The bedroom is absolutely lovely, and I’m sure your staging will help sell it more quickly. I think the buyer might want to purchase it as is, headboard and all! You have good reason to be proud of it. There’s only one thing I believe might present a problem, and it’s something that the new owner could change fairly easily: If a person has any kind of wardrobe at all, there’s simply not enough space for hanging clothes in those little closets. I’m afraid things will be crammed in so tightly that every piece of clothing will have to be pressed before wearing. I would have left the closet for hanging clothes (I’m assuming it originally had doors), and you still could have had shelf space above. I would have used the little closets for shelves. Then, if even more storage was needed, the space where the bookcase is located could accommodate a chest of drawers. However, if the room ends up being occupied by a male college student who mostly wears jeans, then…no problem! 🙂
The new closets have a total of 68 inches of hanging storage. The old closet only had 56 inches of hanging storage. 🙂
It’s beautiful!
Good grief…that room looks perfect! And it goes so well with the rest of the condo. Very impressive. Congratulations on another job, beautifully done!
wow this is gorgeous. If I was a prospective buyer I would make an offer that includes furniture. You did a fantastic job! I don’t think this will be on the market for long.
Hmmm, what I’m beginning to think is that staging turned out to be a great idea – even forgetting the “seeling the condo” part! It makes a great addition to your blog/job AND it seems to be very fulfilling for you. I bet you’ll go back to your home rejuvenated after this. Especially since I expect you’ll send the condo in two days tops! Congratulations on a job well done!
wow. What a great job. I love it.
Wow, this is stunning! I love seeing how your vision comes together at the end of the project! The open closet is perfect…….it actually makes the room seem larger than it is. Good job.
I LOVE what you did in this room! You are such an inspiration. I am pretty hopeless at most type of “hands on/DIR work but you inspire me to stop assuming that I can’t, and to try SOMETHING, anything.
Kristi, I thought you amazed me before….but you just triple dog amazed me! The room is lovely. Perfectly lovely. I love the little shelves. You are exceptionally gifted. Take a bow girl! You deserve it!!!
Looks great. I hope you get it on the market soon, for the buyers who are looking for a place at the end of the year (many spend their holiday time off house hunting). Your higher price is justified. Someone is going to love this condo!
FANTASTIC…. as always…!! I love your color choices. I think any college student would also love it… I’m sure it will sell the first day on the market…!!!! GREAT JOB KRISTI…!!!!
Wow, Kristi, the room is just beautiful. I’m planning to help my granddaughter redo her room, and I’m going to use a LOT of the ideas in this room. She loves turquoise and navy, and your color scheme is close enough to perfect. What is the name of the fabric you used for the headboard?
Kudos on another fabulous job. Well done!
This is the fabric:
http://hancockfabrics.com/breeze-monaco-decorator-fabric-3353034.html
It looks like you painted your light switch covers and outlets. Do you advise doing that?
I advise it only if you buy the kind that is meant to be painted. If you purchase the shiny white plastic ones, I don’t recommend painting those. The paint won’t stick for very long. I buy these outlet covers that cover everything except for the slots for the plug, but they’re much cheaper at Home Depot.
http://www.amazon.com/Taymac-2000W-Paintable-Outlet-1-Gang/dp/B000SL2C9I
Great job! I’m excited for this condo to sell.
It looks fantastic! Will you rent/sell it with all the furnishings/décor? I bet you could charge more if it came furnished!
I’m definitely open to selling it furnished/decorated. I don’t have any need for any of it.
This is a fabulous room. I bet you sell in one day! One thing that I noticed is that if the new owner does not want to use this as a bedroom it would easily translate into a home office or craft/sewing area. Just putting a shelf across from closet to closet and make a desk! A great 2nd option if 1 student buys your condo. Good job!
Perfectly fabulous!! LOVE it!
You did a wonderful job. Best of luck in selling your condo.
stunning!
Kristi, be proud of this room! I wish my own bedroom were this beautiful & vibrant! I love it.!
I think it’s beautiful. Well done!
The room turned out beautiful Kristi!!! On a side note, I agree with someone above about a tutorial on bed skirts. It never dawned on me to make my own. I can’t find one that is the right height for our bed.
Also, we met with our contractor yesterday since we area about to start our addition and he was trying to talk me out of painting/dressing up our cabinets and buy new ones. I showed him what you did and told him buying new ones was not an option. I think he doubts me but your blog has inspired me to do it on my own. I can’t wait to do it and prove him wrong! My poor husband is keeping quiet on this one but he knows I am not backing down.
Wow! I love it. I can’t help but be amazed by all you do. Great job and I see this condo selling quickly.
I love it; I was really worried the headboard fabric would be too much (I even commented about that:-(); but after seeing it all pulled together, boy …..was I wrong!!!! my apologies. It’s fabulous!!!.
So amazing looks magazine staged! Better than TV!!!
Wow–you hit it out of the ballpark, Kristi! It is gorgeous–and probably will sell fast now!
By the way–Just to let you know–I have been having trouble using your website for awhile now–but just thought I’d finally say something in case others are having similar issues so you would know. It seems to take FOREVER to download, and then when I start to read and scroll down, it keeps moving up and down. I tried switching fro Internet Explorer to Google chrome and still the same thing. Any suggestions? (I have a very fast, quad core i7 processor on a newer laptop that can handle a 3-D computer drafting program without a problem, so I don’t think the speed of my computer is a problem. I am suspecting it is related to all the ads popping up (I know you have to have ads to support your blog and your “decorating addiction”, LOL). But you don’t want them to cause the download of your web pages to become frustratingly slow to your readers. Maybe it is just me, though..Anyone else experiencing this?
Phyllis (your friendly porch architect—I noticed that there is at least one other Phyllis that posts on this blog, too,)
Phyllis, just commenting to say that I don’t have problems with the website. I check it from home sometimes -Windows 7 and work sometimes – Windows 8 and never have issues. I use chrome.
I was having a lot of trouble with my new computer with multiple ads. I went to google and put in, “how to stop unwanted ads.” It gave me a page of sites to visit. I tried AdBlock and it worked like a charm. I haven’t had the ad problem again. I have one that comes on for a survey, I think it is called arcade yum or something like that. Anyway I can tolerate that once in a while. The AdBlock starts counting the number of blocks and I had over 100 one time when I was playing a lot of games. Hope this helps.
After researching into another computer issue (my open windows were suddenly constantly minimizing for no apparent reason), I just uninstalled the Comcast “Fast Connect” (the newer version of their “Constant Guard”), and thought I’d test out trying to view this web site again. Sure enough, the problem seems to have been solved.
So if anyone has issues like these, go into your control panel and under “programs” uninstall the “Fast Connect” (or Constant Guard).
Hope this helps someone,
Phyllis
so pretty and serene!
I love your bedroom, especially the colors. I look forward to your blog every day. I would love to see pictures of the rest of your condo. A very Merry Christmas and happy new year to you and your family.
Wow!!!!!!! Great Job! I love this room. and like how you tell how everything is made and how much you spent.
Wow!!!!!Great Job!!! I love this room. I like how you tell how you made it and how much you spent doing this room. Merry Christmas and Happy New Year!!!!
Wow! This room turned out beautifully! I wish I had your talent and eye for color and decoration. Keep it up, but most of all, have fun!
So many likes. I don’t know where to start. I adore the little shelves against those robes. I recognised the corbels right away. Okay I think I am getting addicted.
I adore the little bookcase and now I want to go and paint my bedside lampshades which are currently a rather insipid beige. Probably one of the few things we can do in a rental.
If the design is any indication this condo should sell well. It’s gorgeous.
I especially like the little shelves by the bedside. Pretty and functional. I would expect some college girl will love having that room!
Love it, especially the wall color. If only I’d seen this room and wall color before I painted my dining room Valdpar Zen last month!
This is so beautiful! You’ve made it so well! It was indeed a good choice to just make those closets narrower. With the shelves, it just looks so great! Overall, good job on the bedroom!
I love the whole look and love the striped throw pillow! Do you add fabric medium to paint when you paint on fabrics? Any advice you may have would be helpful.
I didn’t add fabric medium to the paint for that pillow. It’s definitely a good idea to use the fabric medium, especially if you want to be able to wash the fabric. The medium just helps the paint hold onto the fabric better, and makes it softer. However, I didn’t use fabric medium when I painted the hallway curtains that cover the washer/dryer closet, and I washed those curtains the other day. I didn’t dry them. Instead, I hung them to dry. They came out just fine. None of the paint came off. I’m not sure how many washings they would hold up to, though. But I do recommend the fabric medium if you’re planning to keep the painted fabric item long term, and you want to be able to wash it regularly.
Stunning ! I bet your condo sells in a less than a week. Missing closet doors are fine.. future owners will figure it out. Plus college kids don’t care – they are so flexible. Every time I have visited my son’s apartment – his closet doors are wide open.
Curious – What size is the room?
I know it’s 10 feet wide, and I think it’s about 11 feet long.
If the new owner wants doors on the big closet, they might consider French doors with glass panes. It will keep the room a little more open, yet sort of hide what’s inside.
Kristi, this is quite a feat! Love this little room. When can I more in???
How can we help get you your own TV show?. You are much better than anyone on TV, because you can produce beautiful rooms at a very reasonable cost,. Anyone can do a great room if they have deep pockets! Your fabulous rooms are done on a budget, which face it – most people live on a budget. Yours is the best decorating blog for the “average joe.” Kudos to you.
The t.v. show idea is interesting, but I don’t really think what I do is conducive to t.v. I’d love to do YouTube videos, though!
Your color combo for that room is dynamo. It all coordinates so well. I hope it’s not wasted on a guy- a young lady would really appreciate your style! The closets make the bed space so cozy. I could curl up there and read or study all day! 🙂
I’m sure you won’t have any trouble once the condo goes on the market. The closet looks much better as is, great decision. So fresh and clean and happy looking!
J’ai découvert votre blog depuis peu et je l’adore. Très belle chambre que vous avez transformée. Bravo!
Move, the word is MOVE.
I love the closet as-is without doors. Closet doors are a pain in the butt.
So, which of these elements are included with the house? I assume the shelves and lamp fixtures next to the bed are included, but that all of the furniture is not, correct?
I’m willing to leave all of it for the right price. 🙂 I have no need for any of it at the house.
GORGEOUS!
I know nothing about selling homes or staging or the value thereof. But I do know that when I look at your first photograph that I want to climb onto that bed and nestle in with a good book. So if that’s the effect you’re going for, you’ve achieved it! I always mean to tell you that I like your use of wall lights/sconces (both in your current house’s kitchen and here in the bed nook). Nice.
oh my~~~ !! I LOVE this bedroom!!!! It’s so cute, love the colors and the closets and the headboard! Great job!
I was worried at first when I saw the headboard after you made it. I thought the pattern was overwhelming for a headboard, but now that the pillows are on it and covering up a section of it, it gives a nice little pop of color and pattern at the top and it fits beautifully.
WOW I love the look of this room! The two cabinets on either side of the bed are amazing. You have some talent, that’s for sure.
As far as you are the queen of trim, why don’t you carve the edge countertops in your diy projects? Smth like this (sorry couldn’t find the exact translating to search in google) t takes minimum time and you can make any trim design by yourself. Sorry for pure English)))Love you and all your ideas)))
I found)))
http://www.ebay.com/itm/5-Bit-Casing-Base-Molding-Router-Bit-Set-1-2-Shank-Yonico-16501/221651210786?_trksid=p2047675.c100009.m1982&_trkparms=aid%3D777000%26algo%3DABA.MBE%26ao%3D1%26asc%3D20131227121020%26meid%3Dd21a9ccc21de4ee0ad6f724472be2a13%26pid%3D100009%26prg%3D20131227121020%26rk%3D1%26rkt%3D4%26
Whoa!!! What an incredible transformation! Were the closets inspired by the Lettered Cottage?
I’m just finding out marvelous you are! I saw a comment about painting concrete floors not holding up. If your floors are bare, you may want to consider using a chemical that will react with the lime in the concrete and dye the floors beautifully! Then a sealer.
Hello, this is beautiful! I found you while looking for a new bedroom color. This color and the accents are striking. I currently have my room painted in behr’s mermaid net, I love it but it’s been too dark and depressing (even with a fair amount of white accents). I was wondering, how does the color of this room feel in person? Light and airy ? I thinki might want to give it a try.
Good work!
Yes, it’s light and airy — a really beautiful and refreshing color.
Hi! Love the room! I tried to find the fabric through your link but it is not available through Hancock’s anymore. Do you happen to know the name of the fabric so I can try to find it that way? Thanks!! ☺
I apologize if this question had been previously asked…..
Here it is:
https://www.fabric.com/buy/uj-231/magnolia-home-fashions-monaco-breeze
Amazing job – beautiful and frugal. You are amazing!!!! please share how to paint in the curtains.
That tutorial is here: https://www.addicted2decorating.com/easy-inexpensive-curtain-panels.html
Please could you name the paint colors? I’ve looked through the questions and I can’t seem to find that particular one. Thank-you
Wall color is Marina Isle by Behr, trim/cabinet color is Polar Bear by Behr.
Congratulations!!! Very successful transformation! You have hands of gold and wonderful ideas! I have a long bedroom and I like this idea, I think it fits! I want to add a bank at the end of the bed with storage role. Bed with drawers want to make it. Thank you for sharing yourself with us and be blessed!
I know this is an old post, but was curious about the doors on the built in closets on either side of the bed. Do you have the doors custom built by a cabinet company or did you build those as well?
I made the doors as well. You can find the closet project here: https://www.addicted2decorating.com/diy-cabinet-style-bedside-closets-finished.html