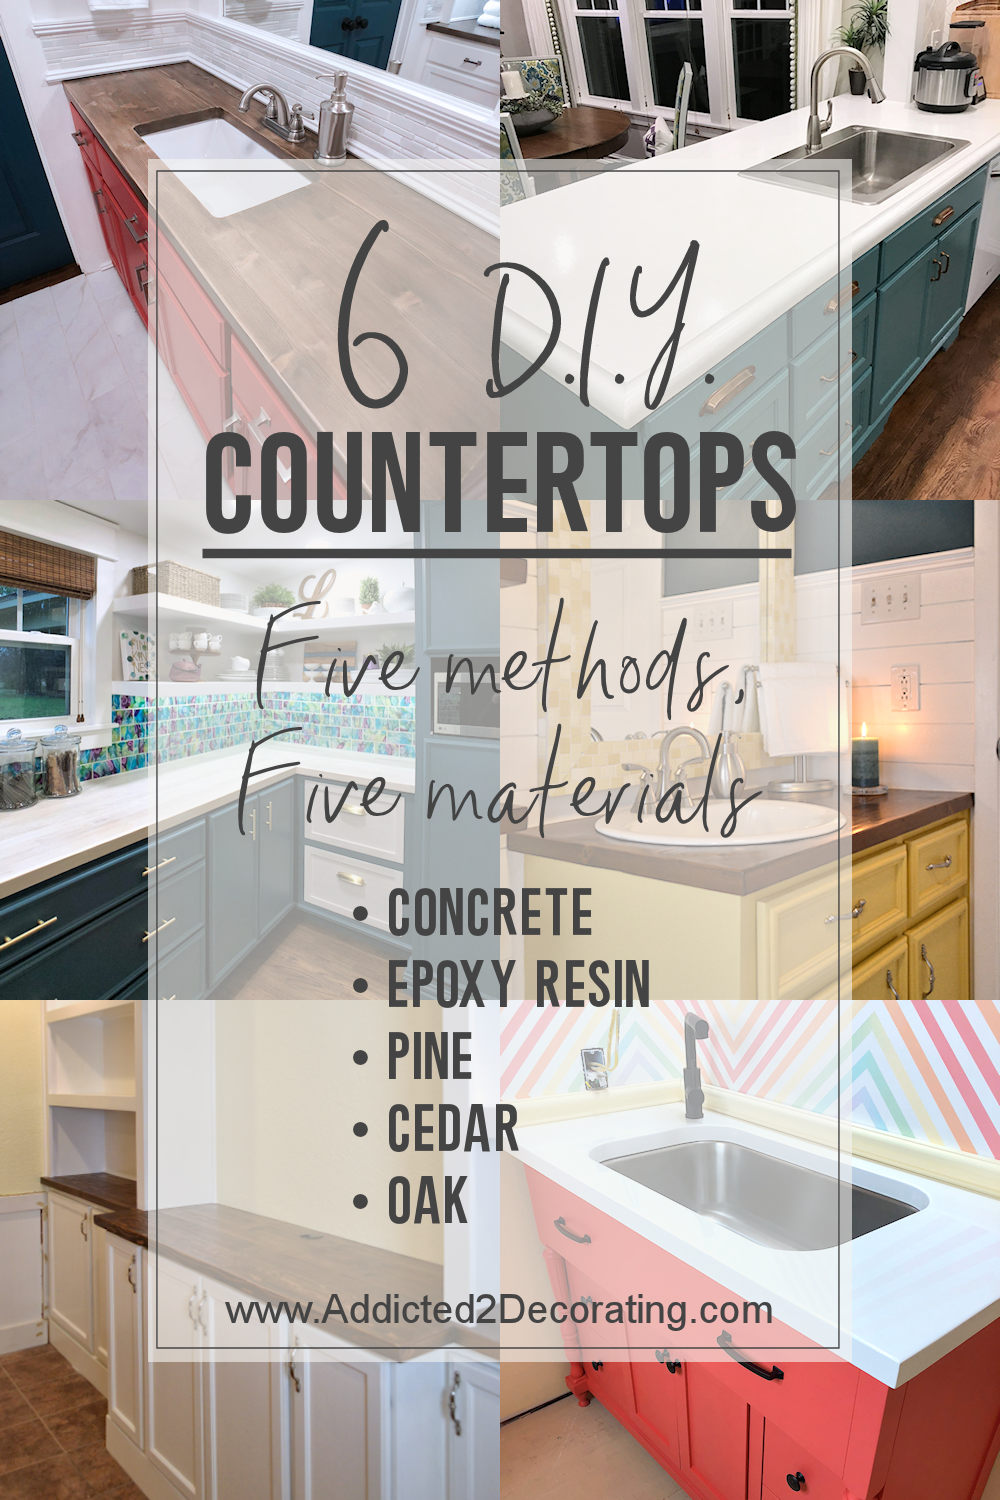
My Six DIY Countertops (Pros and Cons Of Each, and How They Rank For Kitchen Countertops)
Over the last several years, I’ve made six different types of DIY countertops. (Edit August 2023: I recently made a seventh type of countertop which has been added to the end of this post.) Most of them have been made of various types of wood, but I’ve also poured concrete countertops for the kitchen in our current home.
I get questions about all of these countertops on a fairly regular basis, and the most-often question is, “Can I use this in my kitchen?” People are always on the lookout for inexpensive options for durable kitchen countertops.
So I want to recap the various countertops I’ve made over the years, and also give a quick rundown of the pros and cons of each one.
1. DIY Countertop Made From Cedar Fence Boards
This countertop was my first test run with making my own wood countertop, and I used cedar fence boards. You can find the details here…
Cedar fence boards are incredibly rough, so it required a lot of sanding. I also didn’t own a table saw at the time, and I’ve never owned a jointer or a planer, so it was impossible for me to get the edges of the fence boards perfectly straight. That affected how they fit together, and I ended up with lots of cracks that had to be filled with wood filler.
Overall, it was a good project for me to dip my toe into the DIY countertop pool, and you can’t beat the price. And as long as you sand the boards down until they’re smooth, make sure all of the cracks between the boards are filled really well with wood filler (waterproof wood filler is preferable) and sanded smooth, and the countertop has several coats of a clear polyurethane, it should hold up quite well. But if you can find a little more money in your budget for a countertop, I’ve made others that I would recommend over this one.
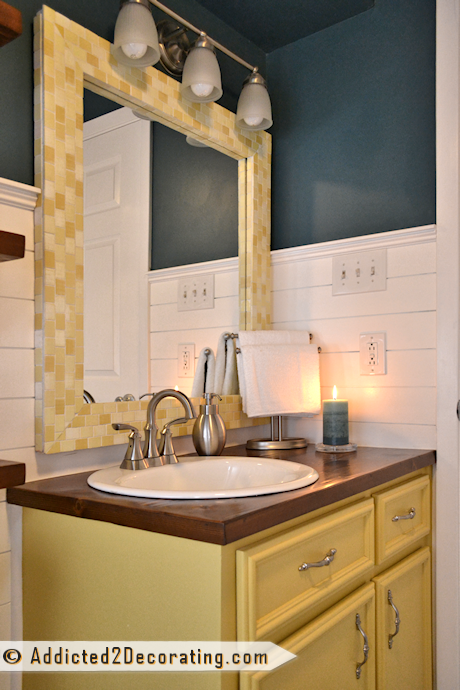
2. DIY Solid Cedar Countertop
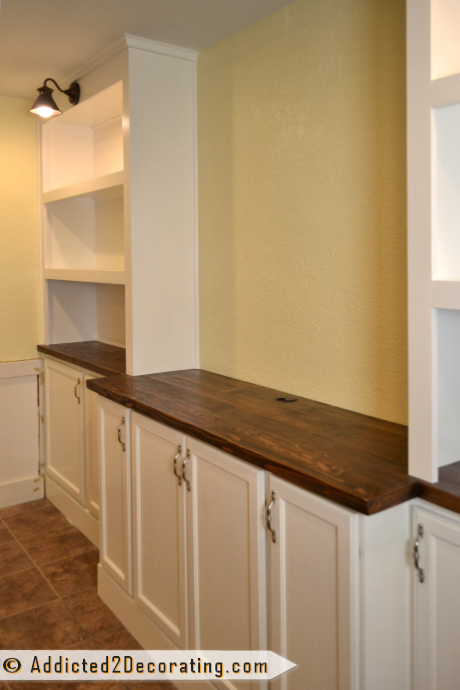
This is the countertop I made to go on the built-in cabinets in the condo living room, and it’s made out of cedar 2″ x 4″ lumber. You can find the whole process in the following posts…
I loved this countertop. It was thick and substantial, and really pretty. Although, if I were to do it now, I’d use some other methods for finishing it rather than just using dark Minwax stain right out of the can. I’ve learned a lot about staining and finishing wood since then, so I’d use a method (probably involving wood bleach and/or whitewash stain) to minimize the wood grain.
There are two keys to making this countertop:
- Make sure that your cedar 2″ x 4″ lumber is thoroughly dry. I used boards that I had had on hand and had been sitting outside in the Texas heat for at least a couple of months before making the countertop, so there was no moisture left in the boards at all.
- Cedar 2×4 boards are very rough and require a whole lot of sanding. Start with something like an 80-grit paper on a belt sander, and work your way to the finer grits for a really smooth finish.
The good thing about cedar lumber is that the edges are VERY square, and not rounded like the edges of pine lumber generally are. That made it so much easier to fit them together edge-to-edge without needing a table saw.
So can this be used as a kitchen countertop? Technically, yes. But if you’re going to use it in a kitchen, I suggest doing a really good job on gluing the boards together (a much more thorough job than I did on mine). Make sure that the glue is applied thoroughly on the edge of each board before gluing it to the next board, and clamp them together if you have long clamps. Since this countertop is made with solid wood, it could also be used with an undermount sink. However, cedar is a soft wood, so you need to manage your expectations before using it in a kitchen because it can, and probably will, easily scratch and dent.
3. DIY Pour-In-Place Concrete Countertops
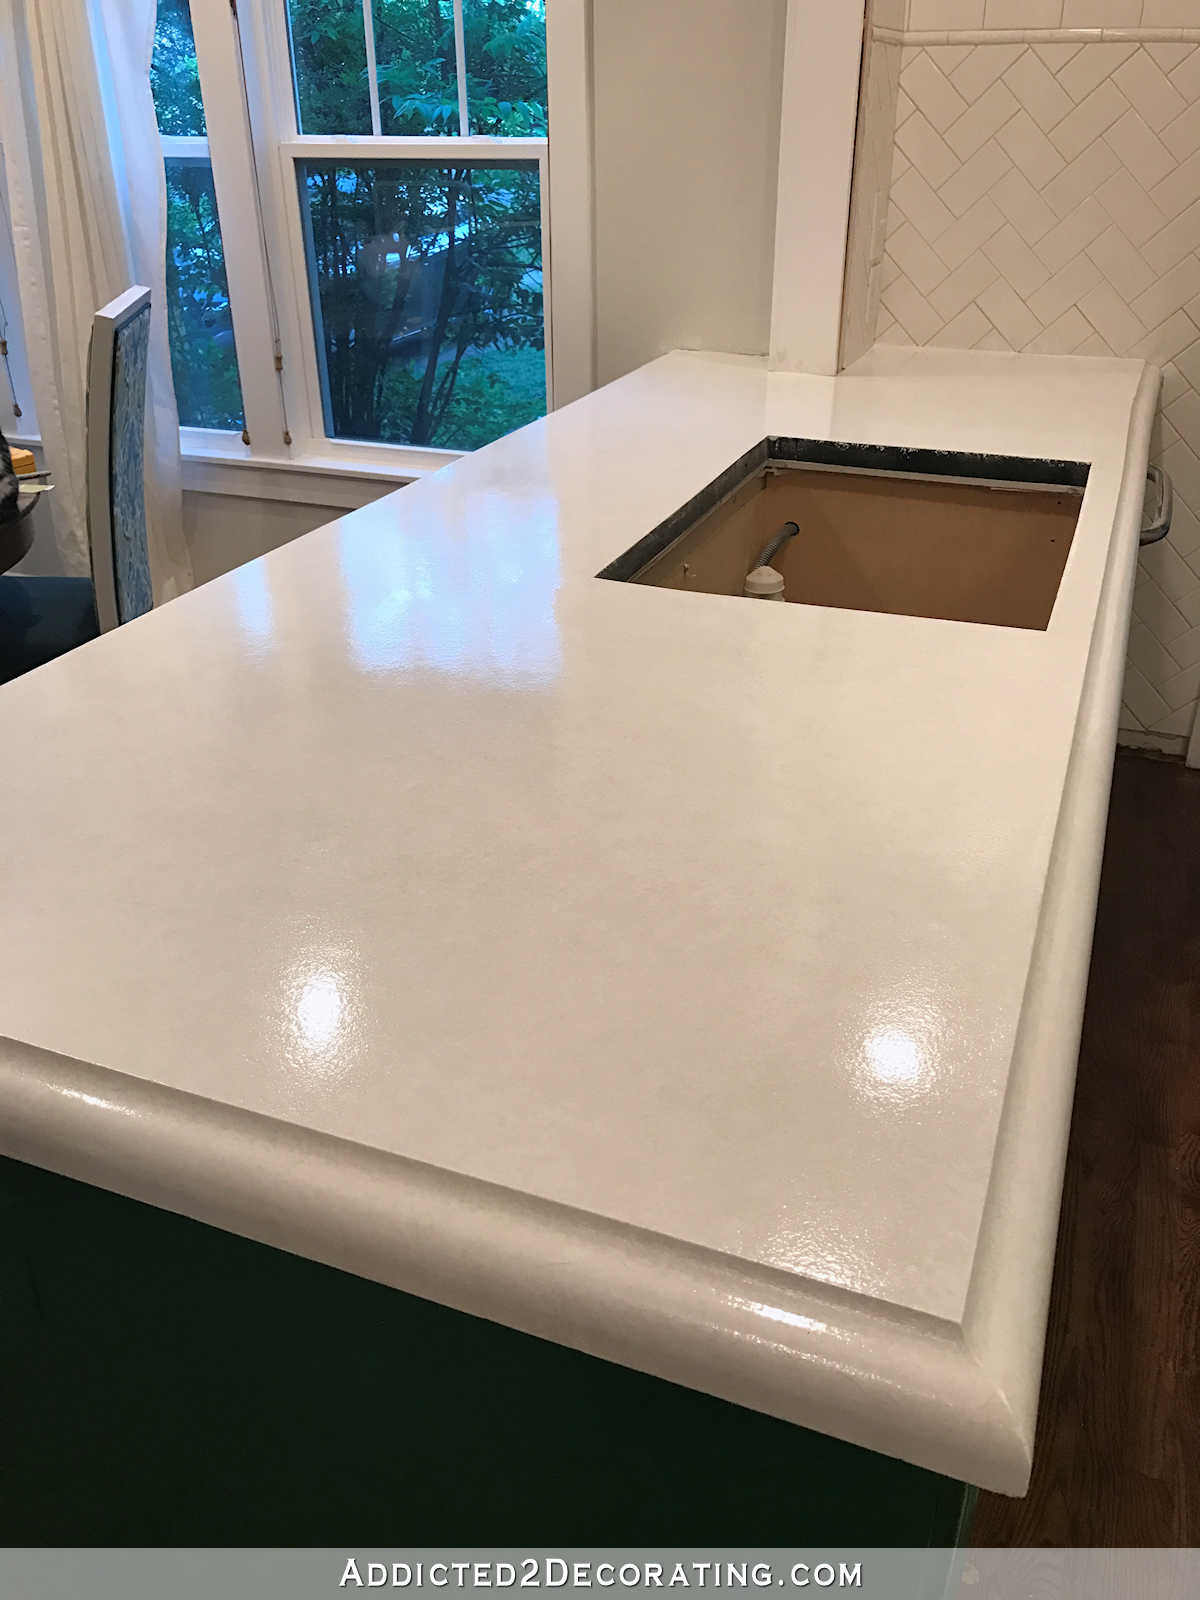
My concrete kitchen countertops are by far the most labor-intensive DIY countertop I’ve ever done. But as you can imagine, because they’re concrete and not wood, they’re also the most durable. You can find the entire process in the following posts…
As long as you use a durable sealer from the start (I recommend polyurea, which is used by companies that refinish concrete garage floors), the countertops will hold up to just about anything. Sadly, I didn’t use a good sealer from the start, so my white concrete countertops got badly stained after a couple of years.
At that point, they required refinishing, but I ended up with beautiful and bright countertops with an almost indestructible finish. You can read about the refinishing process here…
Unfortunately, last week I found the one substance that will shrivel a polyurea finish like a raisin — isopropyl alcohol. I use isopropyl alcohol to clean items that have resin, alcohol ink and paint on them, and last week I accidentally spilled an entire bottle of isopropyl alcohol on the countertop. I thought I cleaned it all up, but sadly, some of it ran underneath an item that I always have sitting on the countertop and I didn’t realize it until 48 hours later. By that time, the alcohol had completely shriveled the polyurea finish. So now I’ve got a little repair to do.
But for two years now, that finish has been virtually indestructible. It has stood up to every other chemical I’ve dropped on it, from paint to turpentine to paint thinner to mineral spirits and everything else. And it would have been fine with the isopropyl alcohol had I noticed it immediately and wiped it up, or had I spilled it out in the open where it would have evaporated quickly, rather than letting it run underneath an item on the countertop where it couldn’t evaporate and sat there for 48 hours.
Overall, as far as DIY kitchen countertops go, the concrete is the most durable by far, and are also the most appropriate for kitchens. They’re also the most expensive of the DIY countertops that I’ve made. But if you’re looking for a long term DIY countertop for a kitchen, I believe this is the best option available. Concrete countertops sealed with polyrea are incredibly durable and will hold up beautifully to normal, everyday kitchen use.
4. DIY Solid Pine Countertop With Undermount Sink
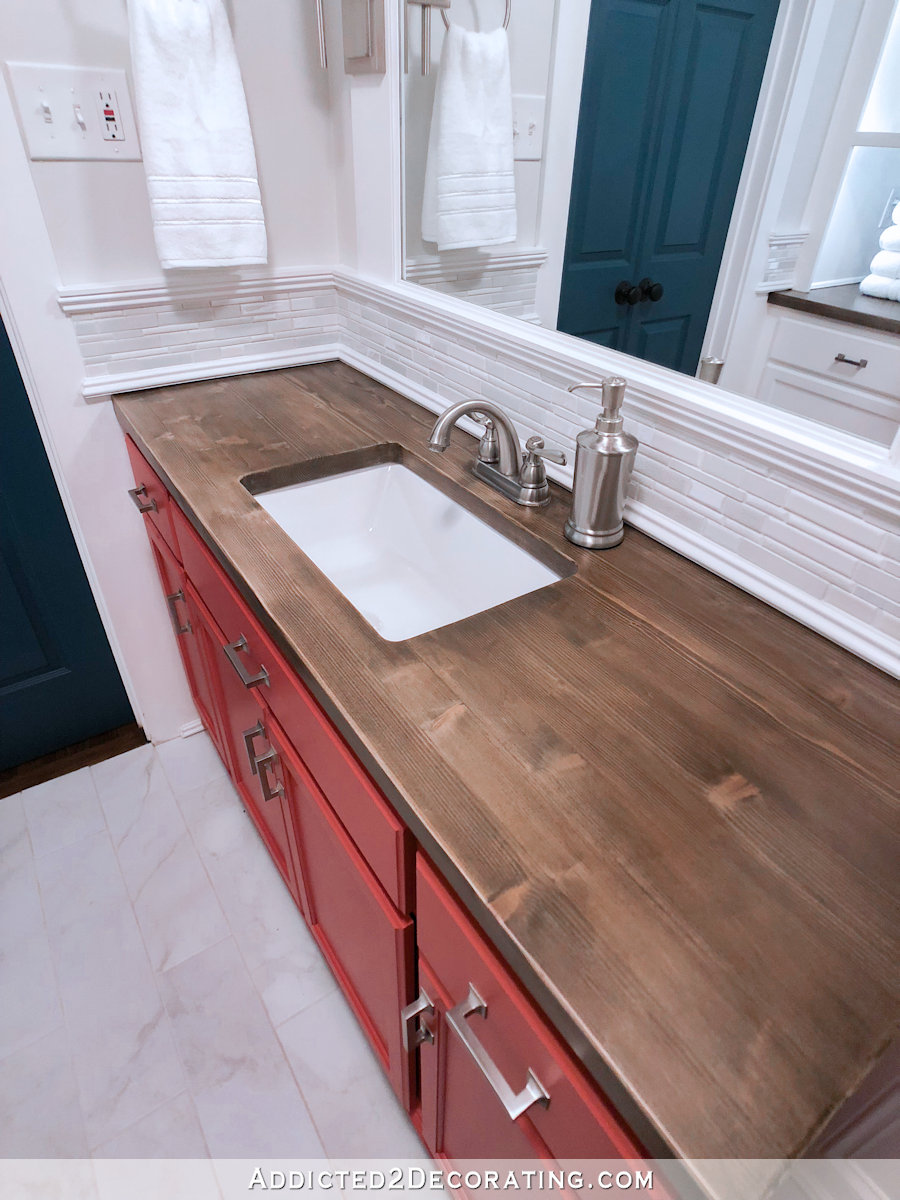
When I got to the countertop in my hallway bathroom remodel, I decided to use the same process I used on the cedar 2×4 living room countertop in the condo, but this time I used pine 2″ x 3″ lumber instead of cedar lumber. You can find the process in these posts…
I really love this countertop, and even more so now that I finally learned how to finish pine so that the grain is minimized and doesn’t turn yellow and orange. I shared that process here…
And since it’s solid wood, it can be used with an undermount sink. (Edit August 2023: I’ve had this countertop in my hallway bathroom for a little over eight years now, and it still looks perfect. I’m about to replace it with quartz, not because there’s anything wrong with the countertop, but just because after eight years, I’m ready for a new look. But I’ve been absolutely amazed and impressed with how well this countertop has held up, especially in the main and most often used bathroom in our house, and with an undermount sink.)
This countertop has held up incredibly well in our bathroom, and it’s the main bathroom in our house. But would it make good kitchen countertops? I’m on the fence with that one. Pine is an incredibly soft wood, so as long as you seal it really well with several coats of clear poly, and you’re prepared to endure scratches and dents, then it might work for you.
Pine would simply never be my choice for a kitchen countertop, but that’s not because it’s a soft wood. It’s because of the color. New pine, in my opinion, just isn’t a pretty wood. And unless you take several steps to finish it to remove the orange color and the harsh grain, it also doesn’t take stain well. So in order to get it looking really pretty, it requires a rather lengthy staining and finishing process.
I’d be afraid to use something like that in a kitchen that requires hard-wearing surfaces. It would be much better to use a wood for kitchen countertops that’s naturally pretty without the need for stain, and especially without the need for some lengthy staining and finishing process to make it look pretty, like walnut. Cuts, scratches and dents would be virtually impossible to repair on wood that has undergone such a lengthy staining and finishing process.
5. DIY Butcherblock-Style Countertop Made From Red Oak Hardwood Flooring
Of all of the wood countertops that I’ve made, the countertop that I made for our walk-in pantry, which I made out of unfinished red oak hardwood flooring, is my favorite. You can find the process here…
If I were going to choose of the DIY countertops that I’ve made to use in a kitchen, this would be it for two reasons. (1) Oak is a hard wood, and is often used for making butcherblock countertops. It’s durability would minimize the dents and scratches that you would get with pine or cedar. And (2) of the three woods that I’ve used, oak is the prettiest left natural and without a stain. And if you can find unfinished white oak flooring, it would be even better!
From my own experience with wood kitchen countertops in the condo kitchen, I found that the easiest way to keep them looking pretty is to forgo any stain or clear sealer, and just use plain mineral oil to seal them. That way you can sand out any dents, scratches, or stains, and then simply re-oil the wood, and they look as good as new.
So if you have your heart set on a DIY wood countertop for a kitchen, this is the one I would go with. However, I would add one additional step and seal the plywood base with several coats of a clear finish (like General Finishes topcoat) before attaching the red oak hardwood flooring boards.
Also, keep in mind that since this countertop isn’t solid wood (i.e., it’s oak boards attached to a plywood base), it can’t really be used with an undermount sink because you’d see the plywood edges around the sink hole.
6. DIY MDF Countertop For An Undermount Sink
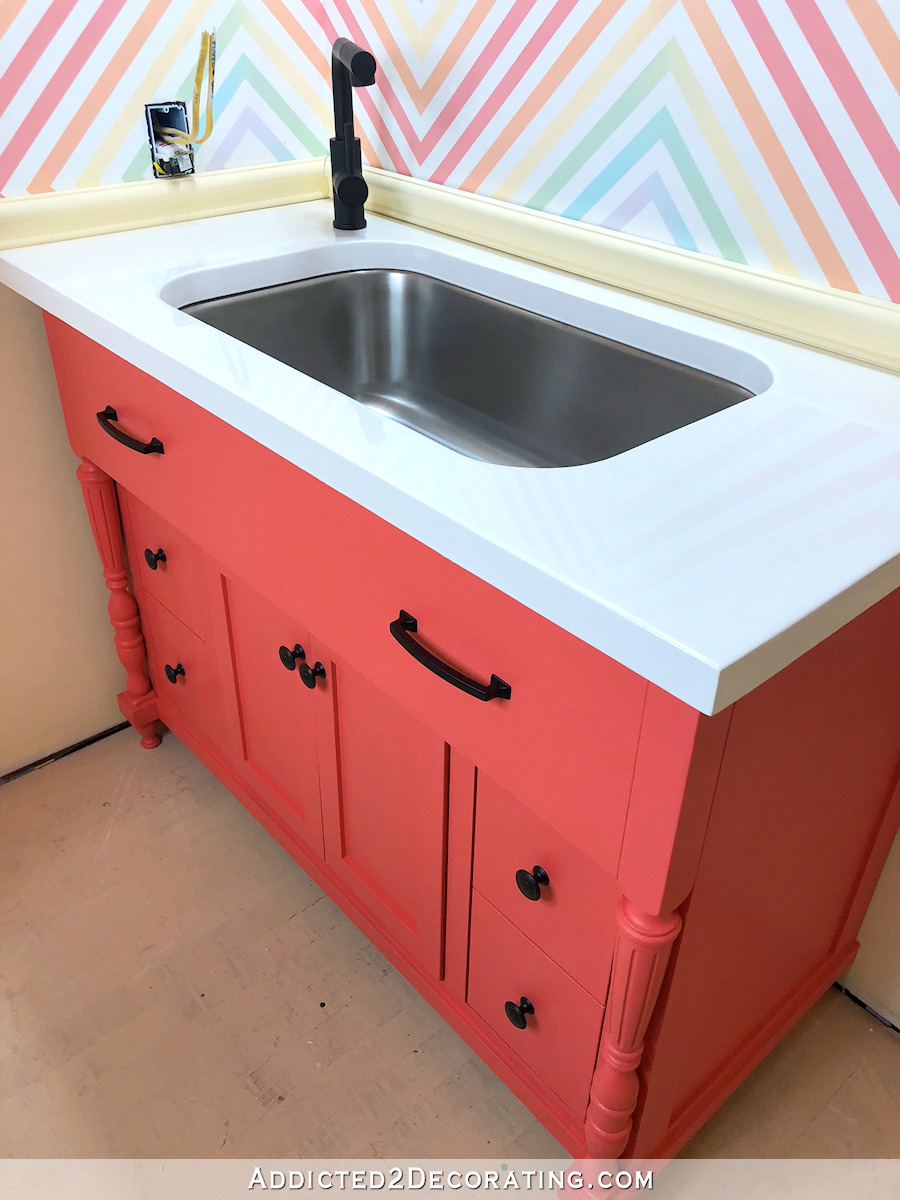
This is my most recent DIY countertop, and it went into my studio bathroom. It’s two layers of MDF that I painted and covered in clear epoxy resin. You can find the whole process here…
Since this countertop is new to me, I can’t really speak about personal experience with durability, or give my opinion about how it would hold up as a kitchen countertop. However, my one suggestion would be that if you do want to use this as a kitchen countertop, be sure that you use an epoxy resin coating that’s actually made for countertops. I’ll be trying Stone Coat Countertops resin this week, so I’ll keep y’all updated on my thoughts and experience with their product in future posts.
Update: I ended up not using this epoxy resin countertop after all because the color yellowed considerably. I’m not sure exactly why that happened, but there are three possibilities:
- While I was working on this bathroom, I left the countertop in a room without air conditioning over a very hot Texas summer. Perhaps the extreme heat made the resin yellow.
- Before painting and pouring the resin, I primed the MDF with oil-based primer (my favorite Zinsser Cover Stain that I use on virtually all unfinished wood before painting). Perhaps the oil-based primer reacted with the epoxy and caused it to yellow.
- I used two different types of resin. First, I used ArtResin on the countertop. But since that’s made specifically for coating artwork, I decided to do a follow-up coat with a brand of resin that’s actually made for countertops. Perhaps the two different types of resin created a chemical reaction that yellowed the color.
Those are my three best guesses because I’ve seen others do epoxy resin countertops with wonderful results and no yellowing. But just be aware that epoxy resin scratches. So I personally would hesitate to use them in a kitchen.
August 2023 update: I’ve just completed a seventh type of DIY countertop, and I wanted to include it in this post:
7. DIY Countertop Made With Laminate Flooring
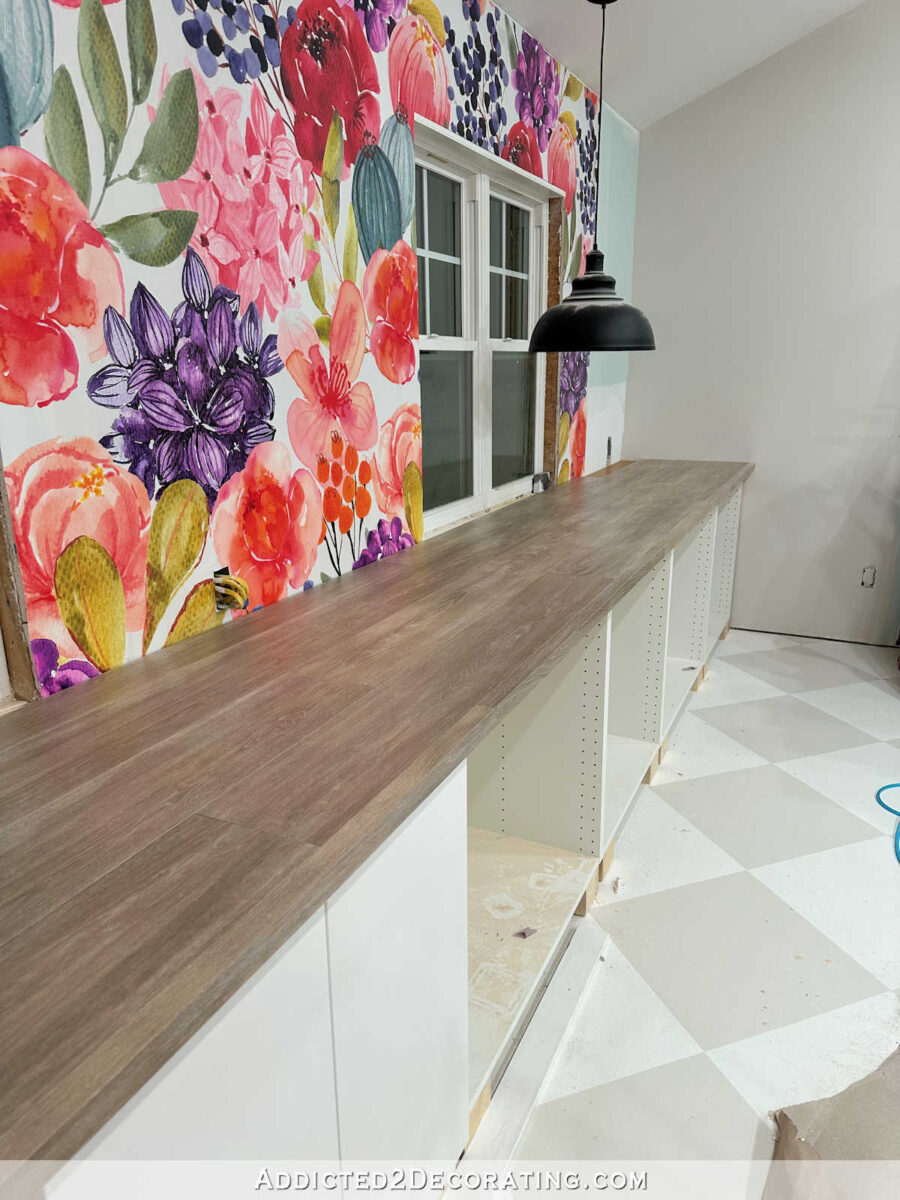
For my studio, I needed a 20-foot-long countertop, and I didn’t want to pay a lot of money for it. So after considering all of my options, I decided to do something like the countertop in our walk-in pantry…with a twist. Instead of using unfinished wood flooring for the countertop, I decided to use laminate flooring instead. You can see how I made this countertop here…
So what about using this countertop for a kitchen? I wouldn’t recommend it. First, because it has an MDF (or plywood) base, it can’t be used with an undermount sink. And unfortunately, I don’t think this would be durable at all for a kitchen. But it sure is pretty in my studio!
So there you have it! Those are my six seven types of DIY countertops that I’ve made over the last several years. I hope you can find one to meet your need and your budget!

Addicted 2 Decorating is where I share my DIY and decorating journey as I remodel and decorate the 1948 fixer upper that my husband, Matt, and I bought in 2013. Matt has M.S. and is unable to do physical work, so I do the majority of the work on the house by myself. You can learn more about me here.

I loved the countertop you made for your condo built ins. They were perfect for the shelving and were substantial enough to hold any kind of weighted items.
Every one that you’ve made have been really nice. You love to use wood and you’ve mastered the art of it in many ways.
We made our countertops a couple of years ago from unfinished maple hardwood flooring. I like blond wood, so I didn’t stain them at all, and finished them with hardwax oil. They’ve held up pretty well, though I think that in a couple of years I’m going to sand them all down and refinish with either a clear coat, or resin. I just wanted to point out that any type of solid hardwood flooring will work well as a countertop.
Did you change your mind about the tile backsplash in your studio bathroom?
In case you missed yesterday’s post, she did some tiles she’s using for backsplash. You should go find that post, it’s really good.
I did see the post, but I thought the tiles went directly above the counter, not over the trim. That was probably just to show us what it would look like in a general sort of way.
Yes, she just stood the tiles up to show us what they’d look like. The trim piece was just lying on counter top.
You are so hard working and creative! Thanks for sharing all of this.
Kristi, I can’t tell you how much I appreciate your blog. You give me courage, ideas and information for my own diy projects. For example, I think the epoxy countertop is the perfect solution for an odd bathroom vanity I’ve struggled with. Thank you.
This is off topic but I remember when you made that bathroom mirror frame. Didn’t you use something like wood shims or paint sticks? What a great project, hope your buyer is enjoying it!
What an informative post! Thank you Kristi.
Thanks for the repost I got the answers I was looking for, now I’m torn between it and concrete ..
Wow, Kristi, just reading this post really spotlights all the hard work you’ve done in your home over the years. I can see your heart and soul in every photo and it’s truly impressive. You are well on your way to a beautiful, custom, functional home, and I will continue to enjoy the journey with you. You GEAUX, girl!
You are SO generous to share ALL your projects. The countertop info alone is invaluable, esp to someone trying to get “the look” without breaking the piggy bank.
Awful to hear about your concrete counter/alcohol damage. My daughter spilled a bottle of polish remover on our dining room table back in the ’80’s, and didn’t tell me. She tried to wipe it up but it was already damaged. I know how you feel! I love the “look” of wood counters, but I’m way too lazy to maintain them, so I’ll stick with expensive quartz with a factory seal.
I made my kitchen island countertop out of 1×2’s sandwiched between MDF and coated with SCC. Everyone who sees it can’t believe I made it out of wood. It’s held up great after 5 months but I still hesitate to put hot coffee mugs or pans on top of it.
I am so ready for a walk through video home tour!