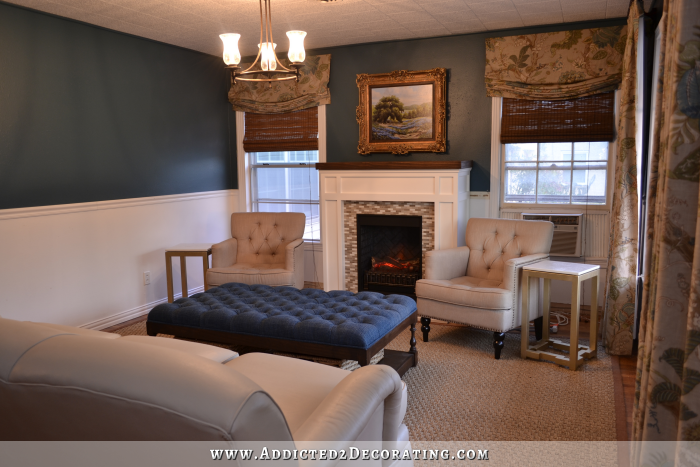
My Living Room — All Of The Big Projects Finished! (Full Room View)
It feels like it’s taken me forever to get to this point, but as of last night when I hung that second drapery panel, I finally have all of the big projects finished for this “Phase 1” of decorating my living room. Of course, there are plenty of big projects left for the final phase of this room (more on that in a bit for those of you who are new around here). But for now, my goal was simply to get this room looking presentable, pretty, and cozy. So for this stage of the process, all I have left to do is a bit of trim work (no, I still haven’t replaced the trim on the fireplace wall) and some accessorizing.
Here’s how the room looks as of this morning…

This room reminds me why I love to make things and do things myself. There’s such a sense of pride in looking around in a room and being able to say, “I made that! And that! And I painted that! And I built that from scratch! And I sewed those!” I wouldn’t exchange that for anything.
Here’s how to room looks from the front door…
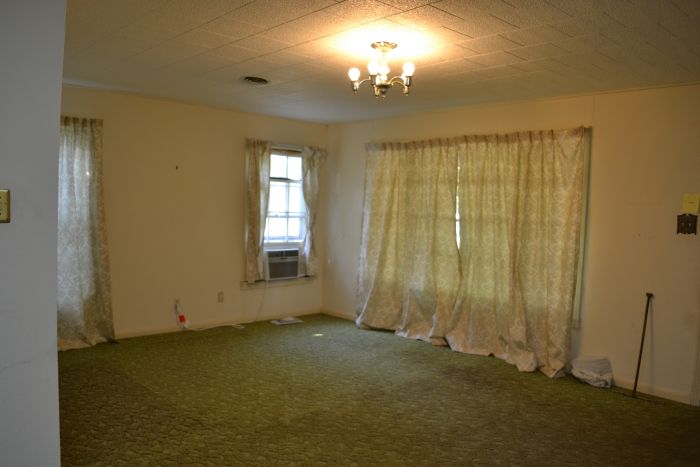
And here’s a look at how it started out from this view…

It’s come a long way! 😀
The big projects I’ve tackled in here are
- removing the green carpet and refinishing the hardwood floor,
- making fabric Roman shades,
- building a coffee table ottoman,
- making Greek key side tables,
- painting the walls and installing trim,
- building the fireplace,
- finding my main artwork and adapting an antique frame to fit,
- making lined drapery panels,
- and painting the sofa.
I still need to add some trim to the fireplace wall, work on my window air conditioner camouflage plan, and then it’s on to accessories — pillows, throws, a tray for the ottoman, etc.
The final phase of this room will be dealing more with the structure (the bones) of the room:
- removing the polystyrene ceiling tiles and repairing/replacing the drywall on the ceiling,
- adding wainscoting to the walls (where it’s just painted white right now),
- building an overmantel for the fireplace,
- adding crown moulding,
- building a separator wall/large open doorway between the living room/entryway and the original dining room area,
- repairing, reglazing, stripping, and repainting the wood windows,
- replacing the one aluminum window with a wood window to match the originals,
- moving existing lighting and adding recessed lighting.
Also, before the end of the year, we hope to get a central HVAC system so that they window units can be gone completely. The plan is to have that in place before next winter so that we don’t have to use the old furnace for another winter. That thing still scares me, and I’d like to retire it ASAP.
That’s the list that I find a bit overwhelming. 🙂 But it’ll be a fun challenge, and I’m definitely planning on having help with the big things.
But I don’t have to think about those right now. Those things can wait.
So I’ll leave you with one more “before” and “now” view of the room. Just hover your mouse pointer over the picture to see it change.

Addicted 2 Decorating is where I share my DIY and decorating journey as I remodel and decorate the 1948 fixer upper that my husband, Matt, and I bought in 2013. Matt has M.S. and is unable to do physical work, so I do the majority of the work on the house by myself. You can learn more about me here.


I love when you do the mouse overs of the before and now images! It is so cool to see the transformation in one big leap instead of the little daily doses we see on the blog. It look amazing and I know there were tons of tips I can use in my own home from this makeover. Thanks for doing what you do and being so honest about the ups and downs of working and blogging in front of us!
I agree with Angela. Anytime you feel overwhelmed, just go back to these pictures and “mouse away”. The transformation is amazing and reflects just how talented you are! YOU did that and I am so inspired.
How wonderful. It’s great to see you reach this point–I’m sure you’ve given yourself a moment to reflect on how much you’ve accomplished. Congratulations!
Absolutely astounding job!
I am in awe of this room. It is absolutely stunning!!! Thank you for all the tutorials! You really are an inspiration…you make it seem like I CAN do this! I LOVE this room and I just can’t wait to see the kitchen next!! It’s like watching an episode of your favorite show, and you just can’t wait for the next one…that’s how I feel about your blog posts! heehee
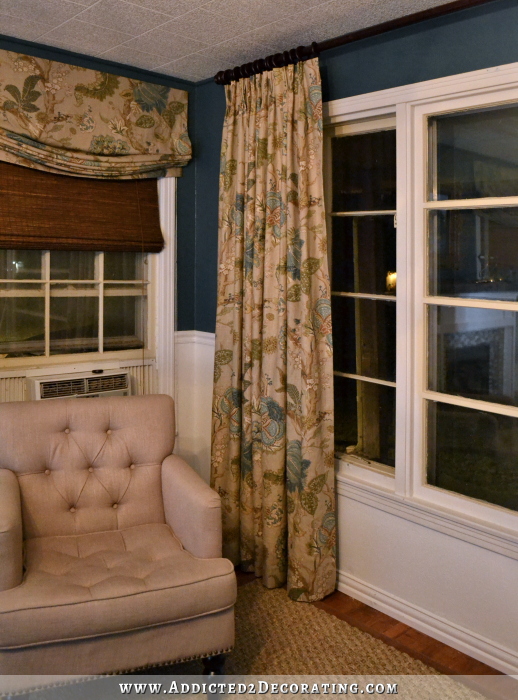
Kristie, it looks amazing and so inspirational. I do have more confidence that I can undertake big projects and do them without wasting a large purchase of wood etc. I do have one question. When I look at the room from the front door I see a large blue wall. Once you have the wall finished, will you have accessories on it as well? I have this need to fill in empty spaces and I wonder if it’s necessary or just my OCD kicking in.
I’m actually not sure about that long blue wall, Trina. To be honest, I go back and forth on that decision myself. On one hand, I’m not one of these people who feels that every surface needs decorating. I’m okay with a blank wall here and there. Plus, I can’t help but think that anything I put there might start looking busy and will compete with the fireplace wall, which is the true focal wall of the room.
But then on the other hand, it is a bit, looong blank wall. And it just looks soooo long and blank.
So I have no idea. For now, I think I’ll leave it blank, and finish up my accessorizing. Once I get floor lamps, maybe some plants, throws, decorative pillows, and other things, maybe the eye won’t be drawn over to that blank wall quite so much.
I agree that the big blue wall needs something without adding clutter–how about a big mirror to reflect your gorgeous drapes, the outdoors and add light to the room? Just a thought!
Are you open to place the couch in front of that wall, the two chairs across in front of the large window with one occasional table between them? Then that fireplace will be more focal? Either way, this room is a ten, Kristi. Just so nice and comfortable.
Once you have the wainscoting installed, I believe that will draw attention. If you put anything on that wall, it would have to be something way too big, or it will be dwarfed. I wouldn’t make that decision until the wainscoting is done, and then I believe I would leave it blank so the fireplace wall immediately draws your attention.
Try softening the white so the contrast not so drastic. You might apply a faux finish or glaze. I don’t envision a mirror but perhaps a collection of smaller articles which would contrast the large window
This post was from two years ago. The room looks nothing like this today. 🙂 –> https://www.addicted2decorating.com/dining-room-entryway-progress.html
I once read “the eye needs a place to rest” which is what thie long wall provides. It’s gorgeous and so peaceful in your “new room!” Thank you out for sharing your journey, both the thought processes and the real work you go through to get there on a more realistic budget for most of us, I wish I’d had the benefit of your teaching 30-40 years ago when I was just starting out. Awesome, Kristi! Just awesome!
Wow!! what an accomplishment.
I love your room! I love everything about it… but I missed the beautiful lamps you made.. my favorite part (beside the fireplace, toss up) of the makeover!! I know they are on a wall we can’t see in this photo but couldn’t you have put them on the tables just for this pic?? I absolutely adored those 🙂 Great work !!
I actually did try them on the side tables, but sadly, the herringbone “tiles” on the lamps looks really busy with the mosaic tiles on the fireplace. 🙁
I’m still on the lookout for the perfect lamps that I can use over there. And I’ll just leave the herringbone lamps on the console table in the entryway. With them on the opposite wall from the fireplace, they work out just great. And when you’re actually standing in the room, you can’t miss them. 🙂
Can you please come to my house. I so could use your help! Love everything that you do.
Kristi
This room is my absolute favorite. I know that you were fighting the “traditional” look there for a while, but this room just looks phenomenal. It must feel so rewarding to get to this point despite all of the road blocks and design sidestreets.
Each and every piece you have done that didn’t make it in here for the long haul (my FAVORITE-the credenza) will be the superstar somewhere else in your home.
I really can’t wait to see the overmantle and the a/c camoflauge.
You inspire me, and your energy is contagious.
Thank you for that
I agree with Melissa. this room looks wonderful and you should feel so proud of your hard work. I look forward to seeing more of your ideas come to life. I admire your tenacity.
I love it SO MUCH. The color scheme is divine. And the chair does go a long way towards hiding the a/c for now!
Please come live with me. 🙂
Pure awesome! You should be very proud of this accomplishment 🙂
Your living room is absolutely beautiful! Looks so warm and cozy. You have done an amazing job on it. I love the “mouse over” so we can get the full impact of the makeover.
It’s lovely. You should be very proud of it!!!
Your room is so beautiful! I can’t tell you how much I look forward to reading your blog & seeing your progress every day. You are amazing! Can’t wait to see what you do next!
I have so enjoyed keeping up with you on all your projects, you have done a amazing job transforming this living room!!!…I have been a DIY. kinda girl myself…I have redone several homes, and having the vision is always the beginning…I have always love to decorate!, But that’s the fun part!…Great job Kristie!!!…Can’t wait to see your kitchen done…Thank you for sharing all your progress on your home.
Oh Kristi! You are truly an inspiration. I am completely addicted to reading your blog and gathering the courage to try to DIY something for my home. I hope every time you enter or pass thru this room you can’t help but smile. With pride!
Kristi, to reach this stage of completion is quite the journey! I look at that second photo of the room now (the way it originally looked) and am absolutely stunned by your sense of color and style. You do know, don’t you, that most of the population does not have that gift? That’s why I visit here–for inspiration from someone who does the hard work of renovating and comes out on the other side with such enthusiasm. I can almost hear the wheels of your brain turning to the next project!
Thank you for sharing such great pictures and the step-by-step details of the journey. Sure has been fun!
Amazing transformation!!! You have done so well!
Blessings,
J
All your projects have been beautifully accomplished. You are very talented.
You have accomplished so much in such a short time. Your resourcefulness is amazing and I love everything you’ve done. I was also wondering what you were going to do with the stretch of blue wall- how you were going to accessorize it- a gallery wall perhaps? Also, you said you have polystyrene ceiling tiles and I know you’re going to eventually do some structural work… so have you considered putting up paintable beadboard wallpaper on the ceiling as a quick fix for those tiles? I think it would be a great short-term solution ala Little House Big Heart did (http://littlehousebigheart.com/2013/08/12/hitting-the-ceiling/) if you could figure out how to end it (maybe just the livingroom and hallway) if you didn’t want to cover every ceiling in the entire house?
Great job- you continue to amaze me! 🙂
I think my preferred solution for the ceiling right now is to ignore it completely. 😀
I just pretend that it doesn’t even exist. Ha! Actually at one point, I did consider putting something over it, like the planks that I did at the condo, or a beadboard something. But when it comes down to it, I don’t think I want to spend any money or time on it, because I really am hoping that I can start tearing it off in the next few months. I’ve already started removing it in the kitchen, bathroom, and hallway, and the drywall doesn’t look too bad. This area is just a tad bit overwhelming, though, because it’s so big — the living room, entryway, and original dining room are all one continuous ceiling. But one of these days — hopefully soon — I’ll gather the courage to rip into it. 🙂
I just love it. You do such a great job. I looks so comfortable. I don’t know how you can leave the roon to get anything done. I would sit there all day admiring my work! LOL. Thanks again for sharing with us.
Sheila F.
Oh Kristi! What a difference! Its so pretty and makes me just want to bring my book, a cup of coffee and just sit and relax. I love it!
Kristi, it’s really lovely. Great job!
What an amazing transformation! You should be so proud. It looks fabulous!
I love the transformation. Give yourself a big pat on the back. It seems there is nothing you can not do.
I am staring at my material and praying I can follow your directions for Roman Shades.
So Inspired!!!
You can do it!! And send me a picture when you’re finished. 😉
This room looks great. I wouldn’t waste any time disguising the window unit. Anything you do will decrease its effectiveness, no matter how porous it is. And for the short time you have to look at it just isn’t worth the trouble.
I agree with Sheri. You have come to feel you must disguise it because of some very rude comments that should not have been made, but you really don’t. Ignore it for now, just like the ceiling tiles. Use your creativity and energy on more long term projects. The chair almost hides it anyway.
I agree. You can barely see the unit and it will be gone in a year. Don’t waste your time or engery. There are bigger fish to fry:-) This room is truely amazing and realistically, considering you did everything, it came together really fast. I save your blog and read it last every night..it is kind of like desert…I save the best for last. Have a good weekend, I am looking forward to seeing what you tackle next.
I love, love, love all the work you do. The room looks fabulous. I am still not a fan of the ‘slouchy’ roman shades, especially with the casual brown ones under, but that is just a difference in style tastes. Wonderful job. Looks fantastic.
I think those relaxed Roman shades are one of the nicest treatments for the windows. I love them much more than the dark matchstick shades. I would love to see more of the fabric Roman shades.
Kristi,
This is the BEST DIY blog on the internet, hands down.
Wow, that’s quite a compliment! Thank you, Adrienne! 🙂
Adrienne, I’m with you. My fav blog, hands down. Thanks, Kristi, for all your inspiration.
This is THE ONLY blog I follow.
me, too!
I know it’s one of your easier projects, but I think painting the sofa is a miraculous tranformation!
Looks amazing! You should be feeling pretty proud – I’d be shouting from the roof tops and inviting the neighbors in!!!
what an amazing transformation!!! Absolutely lovely. Did I miss where you ended up hanging the flower sculpture you made?
For now, it’s above the console table in the entryway, with the herringbone lamps. 🙂
I haven’t decided for sure if that’s where it’s going to stay. I might end up using it over the credenza in the hallway.
It really needs to stay over the console table, even if the lamp shades are in slightly overlapping it. That is such a beautiful, ingenious wall, and shows your great talent.
Absolutely amazing!! You are such an inspiration!!
You have much to be proud of…BEAUTIFUL transformation!
What a difference! I love it and I loved your pinch pleat tutorials. I read in the many comments here and there about your long blue wall. I would hang three mirrors to brighten the space up. While I love the blue, I think it’s too dark. You have a lot of lovely natural light coming in, but I keep going back to the blue just being too dark. Mirrors would break it up. I love your blog so I hope this doesn’t offend. 🙂
Doesn’t offend me at all! 🙂
I might try that idea. The good thing about mirrors is that they wouldn’t necessarily demand attention like artwork wood, and they would help to balance the big huge window opposite the big blue wall. Definitely an option!
Here’s just one idea for hanging some inexpensive mirrors horizontally: http://www.lifewithoutexpectations.com/wp-content/uploads/2011/10/Horizontal-mirrors.jpg
and another: http://media-cache-ec0.pinimg.com/originals/ce/0b/e0/ce0be02cda0277fe1b9236daa3c0a937.jpg
It looks absolutely gorgeous! You have done an amazing job and I look forward to reading your blog everyday to see what project is next! 🙂
until I saw the “after” I didnt realize I had the same window issue. Two smaller windows on either side of the fireplace and a big picture window.
Wow!
You have done a wonderful job- something to be proud of for sure! You are an inspiration to us all! I am curious how your painted sofa is holding up? I have two chairs that could really use that treatment but I am scared to death to do it! Now that you have lived with it, would you recommend it? Thank you for all you do!!!
simply put “STUNNING”. Following you on this room makeover has been a very gravitating experience for me, and I only watched. I am so proud for you. It is just amazing what you have achieved in this room.
It is WONDERFUL! The fireplace you made really makes it a cozy room!
Looks great! The room looks soooo much larger too!
You probably already know this, but before you replace the hvac system look into rebates that may be available in your area. I live in Ohio and I was able to take advantage of several programs to help pay for my replacement system (replacing a very old inefficient system)
Yes- do check into that! We, too, received a rebate when we installed a more efficient heat pump.
Not sure where you get a rebate from unless it’s your power supplier. Kristi, most of the major things you do to the house can be counted off your income tax, such as the plumbing, replacing the sewer line, HVAC system, leveling the foundation, etc.
Also, your homeowners insurance should lower their premium when you report these improvements to them.
Kristi, it is simply lovely even though you have the accessorizing and a few details to complete. I hope you enjoyed the journey as much as your readers have. You are truly an inspiration!
Are you kidding, Kristi??? Taken forever??? So, how many years have you been in your house…oh, it’s only been a few months?? Seriously, you are way hard on yourself. You’ve accomplished a ton in the amount of time you’ve been in your new place. Pat yourself on the back and take a rest. Your room looks amazing, btw. Love your blog. You make everything seem possible. 🙂
Stunning – absolutely stunning! If I were
you, I would not worry about a cover for the window a/c unit, especially since you plan to have central heat and air so soon (before next winter). Unless you can use the cover for something else after the central hvac, it would be a waste of your time and money when you could be dazzling us with something else fabulous!!
You truly have “vision.” If I’d been house hunting, I think I might simply have shut the door and moved on. Your living room is warm and smart. I love the bold color on the wall and the way you’ve honored your Mom’s painting. Can’t wait to see what’s next. Brava!
From nothing to everything!! Fabulous!! I always look forward to seeing your blog in my inbox!
My gosh Kristi, it is lovely – all looks terrific but the biggest plus in my eye is your fireplace build.
Kristi,
It looks wonderful!!! You should be very proud!!
You have accomplished amazing things in this room. It is certainly somewhere I would love to just sit and relax! As far as table lamps, what about a couple of big glass bottle lamps in a green or blue? They would bring some shine in without being heavy.
I like that idea, too!
the cats like to sit on the tables; might not be a good idea to have glass lamps!
Spectacular!
Beautiful transformation, Kristi, especially in such a short amount of time! I agree with some of the others about the air conditioner. I wouldn’t waste any time or money on concealing it. It’s so interesting that before it kind of stuck out like a sore thumb and now it’s not obvious at all to me. I guess I’d just make sure any old dust, dirt, etc was washed off, which you’ve no doubt already done, and focus on something bigger. It’s an amazing room that deserves a big dose of pride as you show it off.
I agree.
Also – I really miss seeing the credenza. Such a work of art and so hard won!
{contented sigh} I’ve been looking forward to this day (not *quite* as much as you have, I suppose
Hmm, my comment seems to have gotten cut off. As I was saying…
I’ve been looking forward to seeing it all come together. Everything is lovely — The colors are great, I love the ottoman, the sofa looks amazing, the curtains are gorgeous! I can’t wait for the mosaic lamps and the lotus mirror to make a return appearance! I hope that you and your husband enjoy many happy hours in the wonderful room that you have created!
Looks great, Now accessorize with pillows, candles and plants and your own personal touches to bring your personality in to the room. Love It , Kevin
Absolutely amazing! You had a beautiful vision and created it right before our very eyes.
W-O-W! Interesting you mentioned the ceiling tiles as they have just seemed to disappear and from our viewpoint and aren’t even an issue. The long blue wall won’t be an issue with the wainscoting completed. Thanks for the inspiration!
I just have one word for you – Aaaaa.May.Zing!! That’s it. 🙂
Wow, amazing, what a transformation. I admire all you have done. I am not at all a DIY person but maybe I should start. I’m impressed when I spray paint something or change a lightbulb. R u shaking your head right now. Really, really enjoy reading this blog and following along with your home. Congratulations. You must be
proud. Don’t know how you can do all of this plus you must work.
Kristi, the mouse over easily shows what a miracle you have performed. Your ability to visualize is a wonderful gift. I think the most important thing in this room (I love everything except the matchstick roman shades, by the way) is your mom’s painting. It really makes the room. I’m not sure I would check on facebook often except for your blog. I love it and I love you. For your next project choose a room that requires much less work before you start on another difficult room. Maybe your bedroom. You have so much of it done already, and before you get to dreading making drapes again. I love watching every single post.
I love to see you creating and making things so beautiful. I am afraid to do the things you have accomplished but I am seriously considering painting fabric on my dining room chairs but still trying to convince my husband. I am praying he will come on board. I love your blog! Joy
Amazing job! Everything looks wonderful. Can’t wait to see what you do with the rest of the house.
What a beautiful room! You are so talented! Your drapes are lovely and make a beautiful frame for your window.
I’m looking forward to the next phase. I can’t wait to read about your process when you accessorize this room. Accessorizing is the hardest part for me. How do you achieve that balance between an aesthetically beautiful (impersonal) space and add in the personality of your family without creating a cluttered mess? Or maybe its just that my family’s personality is “cluttered mess!” LOL
LOVELY!
Congratulations! The room is beautiful. I follow you and several other blogs on Feedly and yours is always the first one I read because every single day you have such great projects to see and learn. Your blog is the best in the “blog world”. I honestly don’t know how you have such great posts everyday. Where does your energy come from? Are you the Energizer Bunny? You have inspired me to get back to task on my long DIY list. Enjoy your beautiful room.
I don’t usually comment, but OMG! You have created a room that is both beautiful and full of personality. I think it looks like a place anyone would want to sit and enjoy friends and family. The painting is the icing on the cake. You inspire me!
Just plain incredible transformation!
Awesome job! You have done so much and it hasn’t even been a year! Pat yourself on the back for many jobs all well done!
All I can say is WOW, I am impressed!!!!
I seem to always leave the same comment over and over- you are amazing! I can’t seem to stop hovering off and on that last pic- just unbelievable! I wish you were closer and could help me envision such possibilities if/when we move again. ♥
*bows down “I’m not worthy” style* I’m sitting here with the biggest grin on my face, living vicariously through your amazing accomplishment! Well done, girl! It’s such a beautiful room now. You are the one person who can go in and make the absolute MOST of a room, that is for sure. Everything turned out so well, and I’m still in awe that you PAINTED your sofa and it looks like a new leather piece! Pat yourself on the back, this was a job done well.
Wow. Truly amazing. You should be proud. You rock!
Absolutely amazing! I would love to cozy up with a book in your living room.
And when you need a change of venue, let me give you my address:) Love it, love it!
Absolutely , positively gorgeous!!!!!!!
Kristi, It looks absolutely fabulous!!! I think back to the brown walls and I am so happy you changed it up with the dark blue. I love it. And I agree with some of the others about using mirrors on the long blue wall. They won’t compete with the fireplace and will reflect all that great light. I can’t wait to see it accessorized.
I was thrilled to see the “finished” room today. Thank you for sharing this journey with us all. By the way, are you anything like me? When you finished a room do you go sit in there and just stare at it? Then leave and come back in over and over to just stare and smile????
So pretty! Great job!
It looks fantastic. What a great job !!!!
Kristi, the room is beautiful!
After reading all the other comments, all I can say is WOW. What a transformation. And to think that you DID IT YOURSELF!!!! Refinished the wood floors, built the end tables and ottoman, painted the walls, sewed the roman shades and draperies, PAINTED THE SOFA!!!!, built the fireplace, built lamps and the console (not shown in the picture). I am just shaking my head in amazement. I too LOVE your blog and look forward each day to a new project, an instructive tutorial, or just a review of your thought processes as you design and build your dream room. sigh. My heart is content. Thanks for sharing your formidable talents with us!
Your room is amazing! I love your new window treatments best of all (of course). That is the biggest change from the beginning picture I’ve seen in a while. I hope you and your family enjoy your new room for many years. 🙂
I noticed this furniture arrangement in one of the pictures you used as an illustration for Andrea’s windows. Now that your sofa is the same color as the wainscoting, therefore taking up less visual weight, what do you think of the idea of placing it in front of the window, as per this photo? http://www.houzz.com/photos/352890/Enviable-Designs-Inc–traditional-living-room-vancouver
or on the wall opposite the big window?
Bravo Kristie! All of that time planning and pondering, changing and rearranging, building, sewing, painting, repainting – it’s all paid off! The room looks fabulous! I think that the previous owners would pass out if they saw how beautiful this room now looks! I love the future plans for the ceiling, wainscoting and lighting but for now, just sit back and enjoy the fruits of your labor of love! Spectacular! Thank you for sharing this journey and I can’t wait for the next room! Congrats! Hugs, Leena
Stunning Girl!!!! You never cease to amaze me.
I am beyond words!! Your imagination and talent seems unlimited! I am in total respect and awe of you. The room is absolutely beautiful! You are an inspiration to those of us who want to try DIY projects!
Would love to see a photo of you relaxing in your new room with your feet up and drinking an ice tea! You deserve it.
Magazine worthy! Not just the before and after but the after is so beautiful. What a wonderful job!!
It looks wonderful! You did a fantastic job! Congrats on a job well done.
Kristi, Could you remove the air conditioner from the window and cut a hole in the wall ‘under’ the window for it and then build a typical radiator type cover over it?
Absolutely stunning! You are such an inspiration to me. I’m so glad I found your blog!
I love all your projects you are amazingly talented and YOU inspire me! You are doing a great job. The room is beautiful! You are an inspiration to those of us who want to try DIY projects! Keep it up.