20-Day Small Bathroom Makeover – Before and After
My small bathroom makeover is finished, and I made my goal of getting it finished in 20 days!! (That’s 20 working days, not 20 calendar days.) And I packed this bathroom full of small bathroom design ideas, all done on a budget.
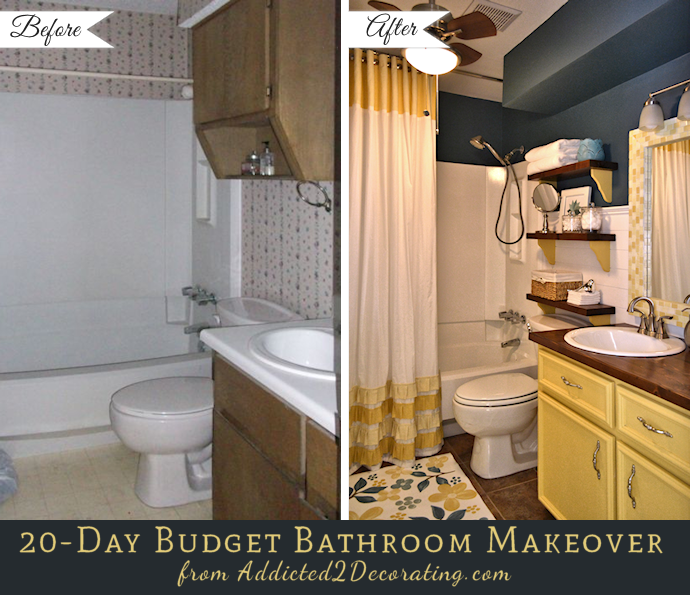
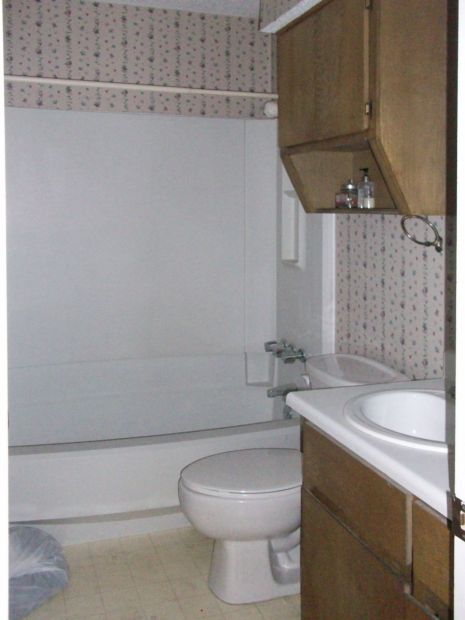
The “before” bathroom was full of apartment-grade…well…everything — the cheap laminate countertop with the 4-inch backsplash, the basic builder plate glass mirror, the ugly 1970’s vanity light, the cheap vinyl flooring, the obviously-bought-in-bulk berry wallpaper, and the cheap fiberglass tub and tub surround. (Are you noticing a theme here? Cheap! And not in a good way. 🙂 )
But now all most of that cheap, apartment-grade stuff is a thing of the past. (There are still a few remnants, like the fiberglass tub and tub surround that I painted, but hopefully the upgraded finishes and pretty stuff disguise those remnants now.)
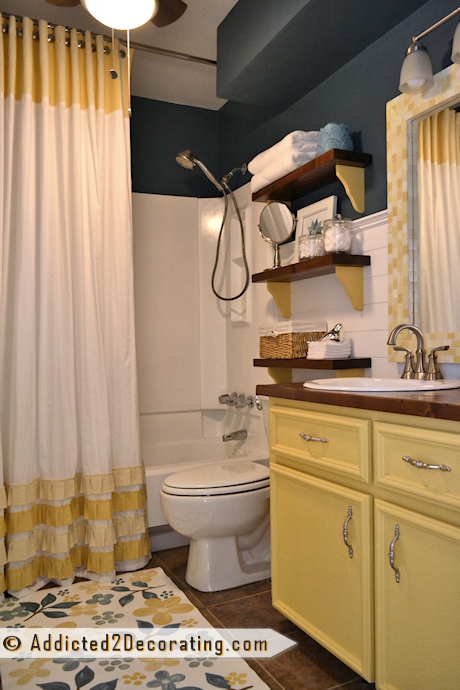
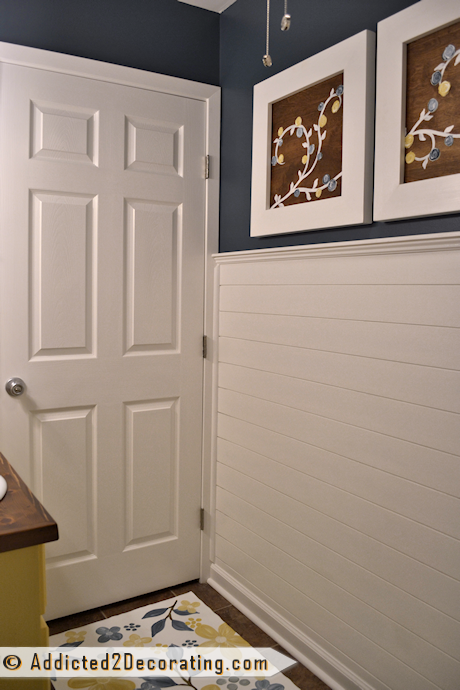
Of course, the backdrop to the whole new look is the faux wood slat wall treatment, painted in a bright, clean white, and then the upper walls painted in a dark teal color called Mystic Forest by Behr. (Sometimes it looks more blue, other times it looks more green.) And I painted right over the wallpaper, after doing some prep work so that the seams wouldn’t show through.
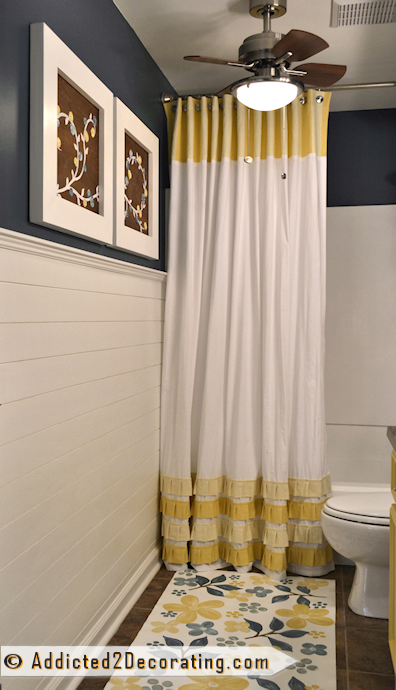
The shower curtain with the pleated ruffles was made from a queen size bed sheet, and accented with yellow striped fabric that was provided by Fabric Warehouse Direct. And since I would never have been able to find a patterned rug with the perfect colors in it, I opted to make another painted floor cloth, this time with flowers and leaves rather than my go-to stripes that I seem to use on everything. 🙂 (You can find directions for making a painted floor cloth here.)
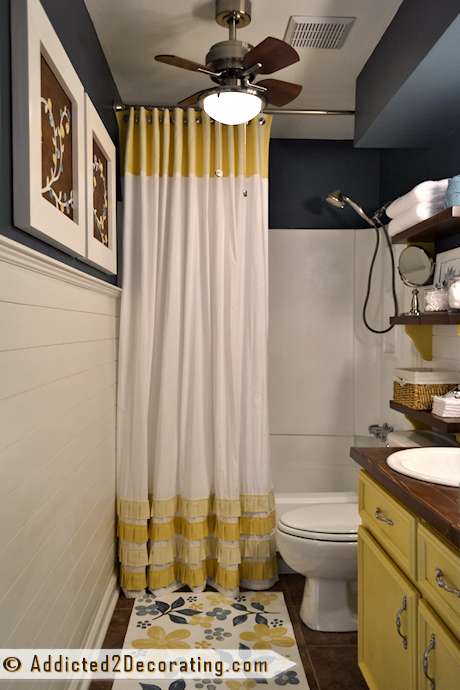
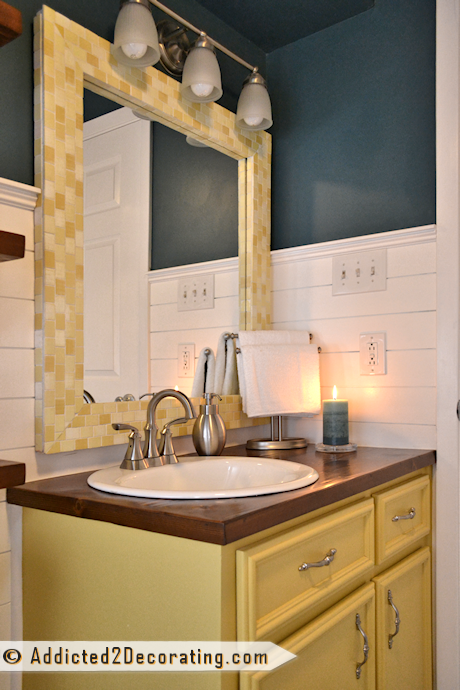
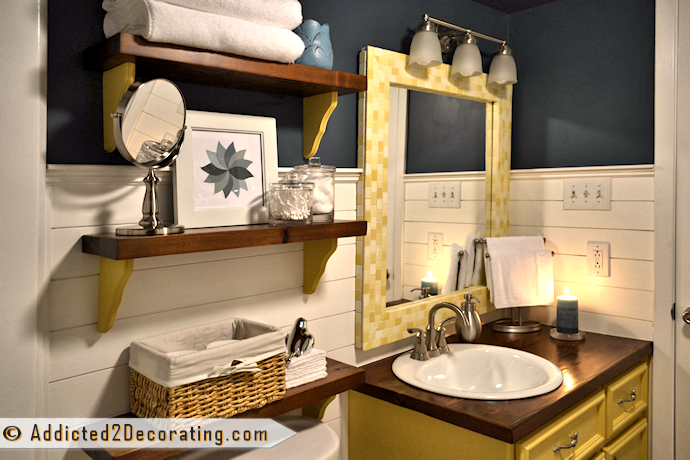
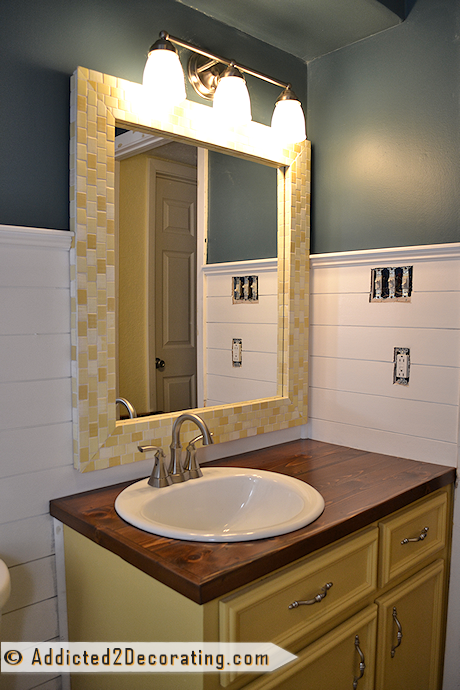
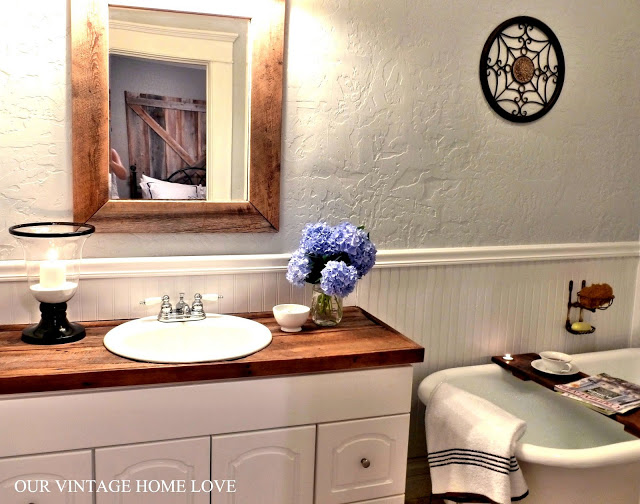
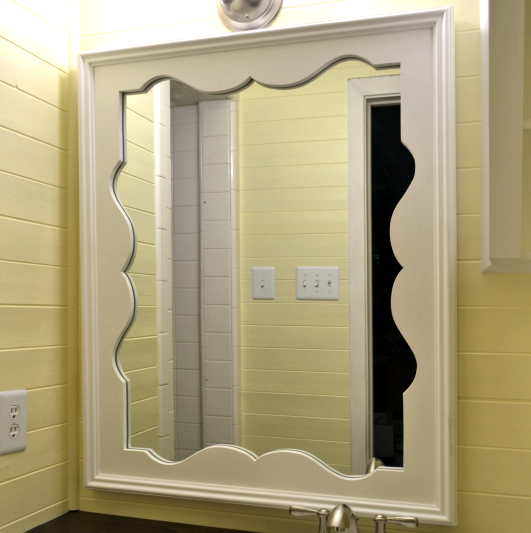
The vanity area needed a great deal of work. The outdated light was replaced by an inexpensive “special buy” light from Home Depot, and the basic builder plate glass mirror was replaced with a custom mosaic tile mirror that I made out of wood yardsticks — the most labor-intensive project in this whole bathroom that took up 3 of my 20 work days!!

The old laminate countertop was replaced with a $35 wood countertop that I made from cedar fence pickets, and rather than trying to dress up the old doors and drawer fronts, I decided to make new cabinet doors and drawer fronts from scratch. I found a way to make them using no special cabinet-making tools! A new sink, faucet, and cabinet hardware finished off the vanity area.
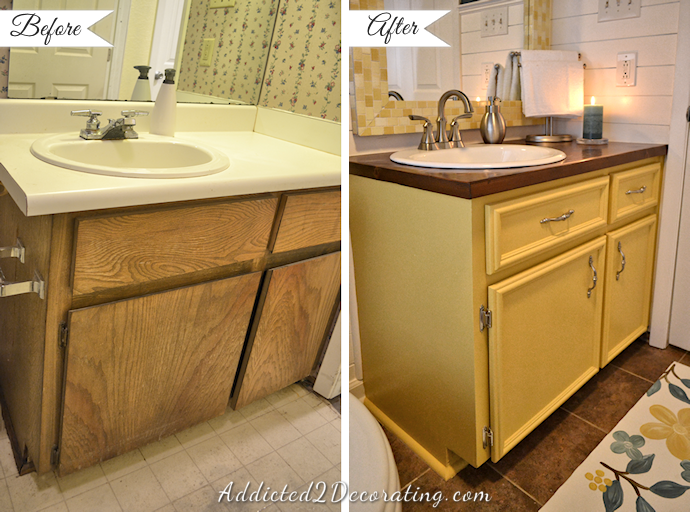
Several people asked why I didn’t just “dress up” the existing doors and drawer fronts. I explained that here. 🙂
Above the toilet, the old, massive cabinet is now gone, and I now have shelves that I made from scrap wood and very inexpensive brackets.
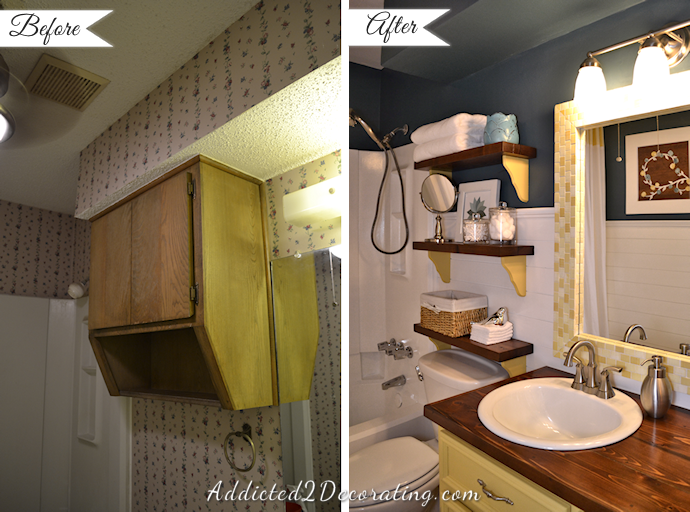
I’m generally not a fan of replacing closed storage with open shelving in such a small living space, but that wall cabinet was just way too big and bulky for this room. Replacing it with open shelving really opened up the room and made it feel more spacious.
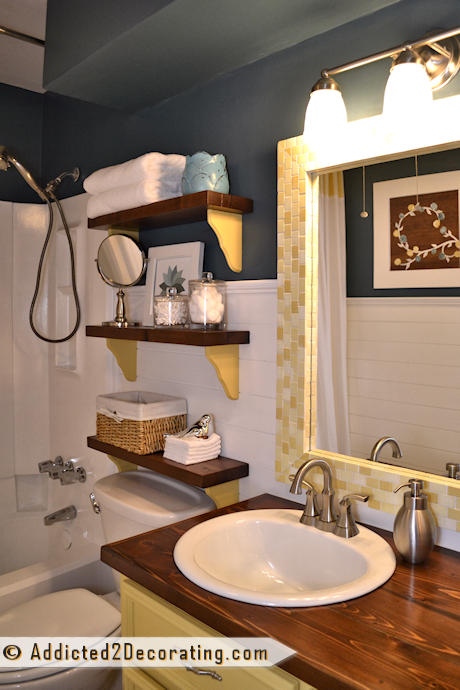
I filled the shelves with useful items, combined with a few items just to give some sparkle and color. The paint chip flower artwork is one of a set of four that I had originally made for my breakfast room, but I ended up replacing it with something else. The blue/teal flower worked perfectly in the bathroom, especially since one of the colors in the flower is the exact color that I used on the bathroom walls!
And then on the other side of the bathroom is the vine and flower artwork that I made using drywall mud.
And that’s the tour! I’m so pleased with how this bathroom turned out! And I’m even more pleased with the fact that I made my 20-day goal. I’d estimate that I worked an average of 5 to 6 hours each of those 20 days, and I did all of the work myself, so that’s an estimated 100 to 120 hours of work that went into this bathroom transformation.
If you’re looking for any of the projects that went into this bathroom, you should be able to find them here:
Sources & Costs
Groutable Vinyl Floor –
- TrafficMaster vinyl tiles from Home Depot, color Shasta: $36
- Pre-mixed grout from Home Depot, color Sandstone: $25
- Klean-Strip Adhesive Remover: $27
Bathtub Refinishing –
- Rust-Oleum Tub & Tile Refinishing Kit provided by Rust-Oleum
- Additional supplies: $55
- Waterpik shower head from Bed, Bath & Beyond: $29
Mosaic Tile Mirror –
- Supplies for frame: $55
- Replacement mirror: $55 (I could have avoided this cost had I not broken the original mirror that I had planned on reusing)
Vanity Makeover –
- Sink from Home Depot: $69
- Faucet from Home Depot, $79
- DIY wood countertop, $35
- DIY doors and drawer fronts, $40
- Cabinet hardware from Home Depot, $12
- Paint (Arizona Tan by Behr) from Home Depot: $16
Scrap Wood Shelves –
- Wood brackets from Home Depot: $10.50
Shower Curtain –
- Main fabric, queen size sheet: on hand
- Accent fabric: provided by Fabric Warehouse Direct
- Extra large eyelets from JoAnn Fabrics: $9.50
- Extra long 86″ shower curtain liner from Bed, Bath & Beyond: $29.99
- Shower curtain rod from Bed, Bath & Beyond: $29.99
Painted Floor Cloth –
- Vinyl floor remnant from Home Depot: $24.97
- Clear sealer: on hand
Flower and Vine Artwork –
- All supplies: on hand
Walls –
- Wood and trim from Home Depot: $45
- White paint, Polar Bear by Behr, Home Depot: $29
- Dark teal paint, Mystic Forest by Behr, Home Depot: $29
- Premixed drywall mud from Home Depot: $13
- Zinsser Oil-based Cover Stain primer from Home Depot: $18
Lighting –
- Vanity light from Home Depot: $39
- Replacement glass shades from Home Depot: $12.00 (The original shades didn’t allow enough clearance between the shades and the wall for the mirror frame to fit.)
- Tiny Hampton Bay ceiling fan from Home Depot: $60
Accessories –
- Soap pump from Bed, Bath & Beyond: $9.99
- Candle and candle holder from Bed, Bath & Beyond: $14
- Basket from Hobby Lobby: $14.99
Miscellaneous:
- Includes caulk, wood glue, construction adhesive, nails, etc.: $75
TOTAL MAKEOVER COST: $996.93

Addicted 2 Decorating is where I share my DIY and decorating journey as I remodel and decorate the 1948 fixer upper that my husband, Matt, and I bought in 2013. Matt has M.S. and is unable to do physical work, so I do the majority of the work on the house by myself. You can learn more about me here.
Truly excellent! I knew that I’d like the final product even though it was hard seeing the vision when it was part way through! I really love that you shared this project all the way through so that we could see the general rehab chaos as well was the before and after. It made it so much more real!
I don’t remember seeing the ceiling fan mentioned along the way. I would never have thought to put one in a bathroom but I really like it. I like the style you chose and the diminutive size! Neat!
Anyway, no surprise but the after should turn heads when you get ready to sell in a way the before wouldn’t have! LOL
Kristi put that fan in about a year ago or so for me since I have heat in tolerance due to MS. It is a huge help.
It coordinates so well with everything else in the room, I would have totally thought it was a recent purchase to go with everything else. Anyway, it is a nice fan and glad it is so beneficial to you!
I’d love to know more about HOW the ceiling fan was installed! My bathroom has no air circulation, I think it would be perfect.
Gwyn
Hi,
I can’t find yet where I can send an email. Basically I want to say that I LOVE your blog and so much of what you show is encouraging and doable. I just moved in to a very small condo after living for years in bigger houses. I love my condo but it is not great for storage (I do have a basement.) I am so encouraged by your creativity! Thanks for the ideas.
Awesome! What a fabulous job!
Wow, it’s GORGEOUS!!!! Love the ceiling fan (instead of those ugly bathroom fans), love the artwork, love the countertop (and thinking about doing the same in our bathrooms), love the colors, love the rug. Stunning! Thanks for sharing everything!
Great redo. I’ve been trying to get ahold of you to do some work on my blog. Are you not doing that anymore? If so contact me 910-986-0289. [email protected] Thanks
SWOON!! I am so in love with yellow and navy (my wedding colors). I have been trying to convince my fiance to let me paint navy walls somewhere in our house, but he has been against it….maybe if I show him how fabulous this bathroom looks, he will agree. You did a great job!
So awesome. Come and do our little mini bathroom!
WOW! I am a new reader and I am officially blown away. Your ideas and what you do for such a small amount of money is pretty much mind blowing. Can’t wait to keep reading about your projects!
You need a round of applause!! What an amazing transformation.
This is a wonderful way to do a reveal with photos and links to the projects at the bottom of your post. I love it.
Absolutely love it!!!
Absolutely fabulous–I love it all!
It looks beautiful! You did an amazing job and I love your creativity!! Just curious how much you would say you spent on the bathroom redo?
Hi Tami~
I updated the post with the sources, paint colors, costs, and the total cost of the makeover.
–Kristi
I believe the first buyers to view this house will probably want to sign a contract. It is so beautiful, and I’m pretty sure there are no other units as fab as yours. Kristi, I can’t wait for you to get your new home and start working on it. That is going to be FUN (at least for me-HA).
I love blue and yellow together. This bathroom is awesome now. You did an amazing job. And I love how you documented each step (esp for someone like me whose biggest remodel so far has been paint!!) Love everything about it…. the mirror, the counter, the shower curtain, the shelves over the toilet. You rock!!
Love the after. What a wonderful job!!!! Was wondering what length shower curtain liner you used since you did the floor to ceiling length and where did you find it?
I bought an extra long shower curtain liner (I think it’s 70 inches X 86 inches) from Bed, Bath & Beyond.
Amazing what a creative spirit with a “can do”and fearless attitude can accomplish in 20 days!
It looks fabulous! and that mirror… wow! it looks amazing, and I can’t believe all the work you put into it to make your tiles for it… It’s all just great! Little Bit from http://www.DecorateWithaLittleBit.com
I have truly enjoyed “watching” you makeover your bathroom. You did a fantastic job and I feel so proud of you, which I know is weird since I don’t know you, but still…
What are you making over next? I’m ready for your next makeover! (You don’t need sleep, right?) 🙂
I’m tackling the living room next. And sleep is way overrated. 😉
Kristi, this looks absolutely amazing! I can’t believe your ingenuity! Who would ever come up with a mosaic yard stick mirror? It’s absolutely fabulous. You have also inspired me with your home made vanity doors which look great. I have been contemplating making my own cupboard doors for the bathroom for years. My hesitation comes from my fear that if they aren’t laminated, will they one day warp in all the hot steam in there? You’ll have to let me know how they age. Once again, AMAZING job.
Beautiful bathroom…makes me want to start updating mine. I can’t wait to see your next project.
Applause!!! thank you for sharing all these little projects summing one fabulous bathroom.
Wow! The finished product is beautiful! Following your makeover has been exciting, entertaining, and inspiring. I can’t wait for the next chapter:-)
Wonderful job! It looks so bright and cheery now!
Congrats!
It looks amazing, now when are you coming to Colorado to help me with mine…lol, i would never have that vision!
Kristi, looks really good! Love the color palette you chose and all the things you made..It all makes the room!
Amazing job!!!! I love the blue and yellow color scheme.
Love it! It looks beautiful! I love the colors.
Looks amazing! I don’t know if you did this for all your other finished rooms, but I really liked following you on the 20 day process! You have such a unique taste in design that matches mine quite well (complicated… can’t do simple). I find it so amazing the things you come up with, and this was no exception! The mirror frame is my favorite part. I love the countertop, too. So… bedroom now?! lol
I actually think I’m going to do the living room next. But right now, I get tired just thinking about it. I might need a few days off before I start on it. 🙂
Omg that looks amazing and I love the colors and the shower curtain. I have painted over wall paper too! In fact my husband just got through prepping the seams.
I LOVE what you did to your bathroom! It is so refreshing to see color used in a room. It seems so many are just using white, off white or gray. I need to live with color and this combination is great! My favorite things in the room are the mirror and shower curtain….yellow is one of my favorites and I love the color gradation. Perfect! Can’ wait to see what you do with the next room…….master or living room? Looking forward to your next project.
I’m planning on doing the living room next…then the bedroom. 🙂
Absolutely beautiful Kristi and I can’t wait to follow your next project!!!
Amazing….as usual!! I really adore the shower curtain, you are so creative.
Love, Love, LOVE it, and extra love for the ceiling fan! I’ve never thought of a ceiling fan in the bath, don’t know why, I have one in every other room (must have item for the TX summers).
My favourite part is the whole vanity area! It looks sooooo much more fresh & cheerful!
oh, this is absolutely LOVELY!!!! I don’t see how any future buyer wouldn’t love everything in here! This is really an amazing transformation. You have such a good sense for what works in a room. Congrat’s on another wonderful room transformation!
You are truely talented!! Your bathroom is absolutely gorgeous! I love your website & posts, keep inspiring us by doing what you love!
It looks great, Kristi!!! Great job on everything. 🙂
AMAZING RE-DO!
Kristi,
Simply Ahhhhhmazing!
WOW!!! What a great job !!! I so want to do something with mine but we nt and don’t want to put in a lot of money and sweat and not be able to take it with us.
Kristi – are the shelves stained the same color as the vanity top? Entire room looks great!
Yes, they’re the same. Both the shelves and the vanity countertop are cedar, and I sanded the wood and then applied one coat of Minwax Early American stain, and the one coat of Minwax Special Walnut stain.
I love the colors. I always loved harvest gold , Now it’s making a come back. As dose everything. It looks rich with the teal/turquoise. My favorite is the mirror project you did. It brings a high end look to the bath. Ruffles to are back but glad to see the modern pressed style of them. So clean looking. By using rich color you have made the space interesting so the eye pauses though out the room. It just goes to show you small spaces look great & spacious without going to white ,white, white such a common misconception. All for under a $1000. WOW
Looks Great!
Fantastic improvements! But, one question: Where is the toilet paper or tp holder?
Haha! I was wondering if anyone would notice that. 🙂 The basket on the shelf is for extra toilet paper, and…well…as far as a toilet paper holder goes? I completely forgot. 🙂 I didn’t realize it until I was taking pictures. I’ll have to get one, and probably install it on the side of the vanity, where the old one was. Or maybe I’ll just stick with the basket and let the next owners worry about the TP holder. 😉
Thanks for clearing that up, Kristi! Haha! I thought you might have some sort of secret way of hiding it in a pretty way I couldn’t see! Looks so nice without that boring but necessary item, doesn’t it. Your new bathroom is really stunning.
WOOHOOO! It turned out so beautiful! It’s so fresh but also warm looking. You shouldn’t have any problem selling your place by the time you’re done with it. You are so creative Kristi, you continue to amaze me after two years of following your blog! 🙂 Sharon
I love the look and all the work you did. I was just wondering where you are going to hang your wet towels?
Ummm….yeah….that’s another thing (along with the lack of toilet paper holder) that you weren’t supposed to notice. 😀 I think for now, I’ll just drape it over the side of the tub. I really don’t want to put up a towel rack on the wall, and the only other thing I can think of is to install some sort of hook actually on the tub surround, so that it’s hidden behind the shower curtain. That’s not ideal, but I just don’t want a towel rack cluttering up the wall. So maybe I’ll let the next owners decide. 😉
Yeah, tp holders just seem to get in the way and/or fall off just when you need them!
We love hooks for towels in our house though. Apparently hanging a towel over a bar
is a lost art….sigh.
My husband and I use hook racks that hang over the back of the door for our towels. Might be a good solution for you!
That is truly a beautiful transformation!
Your bathroom looks amazing, Kristi!! Can’t believe you did it in 20 days and for under $1000 too. was the $1000 budget a goal too?
I actually didn’t have a specific budget in mind when I started. My goal was just to do each project as inexpensively as possible. 🙂
What an awesome transformation Kristi!! You should be very proud. 🙂
Oh Kristi, this is gorgeous! Lots of work in that little baby, too. I’m so glad you did this before and after special post-the pics are amazing! Great job!
Love the entire thing! The tiny ceiling fan is adorbs! I have a good question for your blogging help section. I have not a clue how to properly grab a button that actually links to the site! I end up copying and pasting the image and then putting in a link to the site right under. I would love to know the proper way to do that.
Kristi, I am blown away with how well the entire bathroom turned out! It’s like one of those breathtaking B&E decorating reveals they do on T.V.! But for the layout of the space, there’s no way to tell it’s even the same space, the change is so total and remarkable. I am duly impressed, and bow down to your DIY refurb mojo! Removing that bulky above-toilet cabinet was totally the way to go, it opens the space up dramatically. Everything about the new space is perfect, I wouldn’t change a single thing. And I must say, I am in love with your teeny tiny little ceiling fan, it’s the cutest thing ever. Also, thank you for providing such an organized accounting of what was replaced and cost, and also for quick links to your various projects. You have one of the most “together” well done DIY/Decor blogs in blogland!
**Oh for Pete’s sake, I mean “B&A decorating reveals” (as in, before and AFTER), jeez, guess I’m just brain dead from work today!**
Amazing! I need you to come do my whole house! (Right after you get my blog built, LOL)
Great makeover, Kristi! You are an amazing person for your determination and creativity. Thanks for taking us along for the ride.
simply wonderful!!!!
You did an amazing job, truly amazing – what an updated and FRESH bathroom. While every little feature might not be for me or my personal bathroom, this makeover really shows your terrific design ideas and DYI talents. I especially love the fan, the blue painted wall bump-out (to hide it and make it just a part of the ceiling) and the colors. I’m a huge fan of a homes colors coordinating from room to room and you have certainly done this in your overall condo makeover. Can’t wait to see/hear how long the painted shower stall holds up (what a terrific economy option!!)
Small House / Big Sky Donna / White Oak Studio Designs / SW Michigan
Hand-Painted Vintage Furniture Transformations
Blog: http://smallhouseunderabigsky.wordpress.com
Facebook: [email protected] (for portfolio of chalk painted work)
Small House / Big Sky Donna / White Oak Studio Designs / SW Michigan
Hand-Painted Vintage Furniture Transformations
Blog: http://smallhouseunderabigsky.wordpress.com
Facebook: [email protected] (for portfolio of chalk painted work)
AWESOME job, Kristi. It looks wonderful. Thanks for sharing.
This bathroom redo looks terrific! I really like everything you’ve done. I noticed in the ‘before and after’ how much bigger the bathroom appears when the big cabinet was removed. Wowzers! Isn’t it funny how one thing can make such a huge difference? This should help increase the value of your home and bring in the buyers. Great job!
Soooo incredible! you are an inspiration and you should be very proud of all the HARD work you put into this bathroom. Your house should sell in no time as you have totally made your house unique and set apart from the rest! Can’t wait to see the next room you tackle!
Absolutely beautiful.
You did an amazing job! Love the transformation! The planked wall is amazing!
Wow wow wow!! It looks amazing!! I bet you feel so proud of yourself and you totally should!!! Congratulations and great job!!! You should take a nice, relaxing break and then come help me with my bathroom! Haha – just kidding. =] Great job though!!
I love the light you have introduced. I am not sure how removing cupboards and replacing them with open shelves reduces the apparent clutter but it certainly does. Good job.
Could you remove the link at the end of my post please? I have no idea how I added it and it goes to a non-page anyway.
Sorry for the trouble.
Looks wonderful!!!! Shows what one can do with a small budget and a lot of creativity. You should be very proud. 🙂
Wow…It turned out beautiful! Very inspiring!
I loved watching this transformation from the very beginning to the end. I love how the finished product looks! You really are an inspiration in the DIY world. After watching you, I believe that I really could jump in and do it myself. We are working on our bathroom now but can’t afford to do an entire transformation. Thank you for sharing your projects!!!
Wow, this is amazing. You took a plain ordinary bath and turned it into a eye-catcher. Great job.
I love your bathroom! It’s such a bright space now. This makeover is FANTASTIC! It has been fun to watch and learn “how to” on so many DIY things.
You’re bathroom looks amazing. I am really love your choices! Good job!
Your bathroom is beautiful! Thank you for sharing it for all to see & be inspired. I hope to be a hardcore d.i.y. like yourself!
Beautiful job! You have brought such life into this bathroom. I am amazed at how talented you are..sewing, painting, tiling, plumbing, carpentry and electrical!! My gosh..is there anything you can’t do? I am inspired every time I read your blog!
Its beautiful. You did an awesome job. Thanks for the inspiration.
A.MA.ZING. All of your hard work really paid off. I think the mirror is my favorite thing in the room. The whole room is so fresh looking!
Looks fabulous! My very very favourite parts are the paneling and the tile mirror you made! That mirror truly makes the room! Congrats on your beautiful new bathroom!
Krista
Massive improvement! And I am amazed you did it in 20 days (and I watched), it would have taken me 20 months at least.
You should be very proud. I could never do all those tool tasks! Looks professional.
Hi Kristi, I love your blog and your decorating taste and think you are awesome. For you there is nothing you can’t reach. You make wonders. God bless you.
Marti from Hungary, Europe
p.s.: I’m looking forward to see you tackling the living room. Can I see a before pic somewhere?
Congrats for making your goal! It’s been fun watching the process!
Your bathroom looks fabulous!! Thank you for sharing all your creative talent. I still think you should do a video painting technique tutorial for the flowers you did on the floor mat because that’s my favorite part of this room 🙂 Congratulations and you should feel very proud of all your hard work.
Fantastic. You are definately on the grind girl. I can’t wait to see what you do with a house. I may die from shock.
Fantastic, you are definitely on the grind girl. I can’t wait to see what you do with a house. I may die of shock.
Excellent job. You are on the grind girl. I can’t wait to see what you do with a house.
Fabulous job and certainly worth the effort:)
Maude
Kristi – Your bathroom looks phenomenal! I’ve really enjoyed watching your progress along the way. One question – how well does the small ceiling fan work? Does it provide good airflow? We have a tiny beach condo with a tiny bathroom that could really use a ceiling fan as opposed to the portable fan that we keep set up in there. BTW – I loved your post the other day about whether a not a home has to be neutral everything in order to attract buyers. I totally agree with your take on things! Thank you!
Suzy, the ceiling fan works really well. Of course, it’s tiny, so it won’t move as much air as those giant fans. But that’s to be expected with these tiny, stubby arms on this fan. But even so, I was quite surprised at how much air it moved. I highly recommend them for small rooms like bathrooms or even laundry rooms.
Oh my goodness Kristi, your bathroom looks amazing! The dark teal with the yellow and white is a stunning combo. I’m kind of obsessed with dark blue colors right now, and I’d love to feature this on my paint color blog. You wouldn’t have to do a thing, just let me know if you’re interested! BTW – I can’t WAIT to see what you come up with for your living room!
Kristi!!! You are absolutely AMAZING!! You have totally inspired me! 20 days are you KIDDING me! You are like a DIY Queen! Btw… did I tell you how absolutely adorable your bathroom is??
Blessings to you, darling!
Lori 🙂
I CANNOT TELL YOU HOW MUCH OF A BLESSING YOU ARE TO ME….My color “delights” are almost the same as yours…(such great taste)…I have a 1300 sqft home and I am TOTALLY inspired by your pics and determined/worthy ways…Just please share with me how you turn your inspiriations into reality without being afraid……I love color, but I also know that sometimes you can get crazy with it (not in a good way)…so help me, oh knowledgeable one….HELP ME!!!!!
Thanks! Leigh
Okay Kristi! First of all, you should have your own cable tv show!!! You are so talented!and secondly, I suppose your addiction to decorating is the only healthy addiction!
I really enjoy your blog,
Lisa
Totally AMAZING!
Your bathroom makeover looks terrific!
I pinned this to The Home Depot’s Bathroom Design Ideas & Inspiration board on Pinterest.
Thanks!
-Craig, from The Home Depot
Great job!
As I am looking to refresh a bathroom on a budget, how is the refinished tub holding up? I have read some complaints about that product peeling after a few weeks and was curious about your experience.
Thanks and congrats on your new bathroom!
Fantastic! I was browsing and looking on designs on how to redo our bathroom and this is wonderful. I am glad if you can tell me the size of your new bathroom makeover. I am from Philippines and we do have a small space bathroom and even our own house is quite a little bit just for a 4 person I really want to renovate it and now i have the idea on how. thanks to you for sharing this blog…
Hi, you’ve done an outstanding job on the entire room. I’m most impressed with the counter top, as I’ve been searching for an affordable double vanity with top that won’t bust my budget, and I think you’ve solved my problem. Again it’s all very nice!
JoAnn @ SweetPepperRose
Gorgeous! But how did you put up that wainscoting on the walls for 45 dollars? I hate to bring a room with that much though down to one detail but to me the wall treatment makes the room look expensive and over the top. I love it. I can’t figure out how you did it but I have seen you pull a rabbit out of a hat a few time so I am very curious. I have looked and looked at the walls but can’t figure out what you have done to make them look like wood panels- wainscoting – which is expensive.
Hi Kathy~
Did you find it? You can see the details here:
https://www.addicted2decorating.com/bathroom-makeover-day-7-faux-wood-plank-walls-part-1.html
https://www.addicted2decorating.com/bathroom-makeover-day-8-faux-wood-plank-walls-part-2.html
I basically used a really cheap plywood-type stuff called hardboard, which only costs around $14 per sheet. I used two sheets, and had a guy at Home Depot cut them into 4-inch strips for me.
Once I had a carpenter install a built-in bed/reading area and around it he installed a short band of “real wainscoting” (that is what he proudly called it to me) and that is pretty much how he did it too but the slats were hung vertically. He didn’t charge me extra (it was a pride thing- he wanted it to look good) but when I think back on it, he said that the real expense is in the labor of having all those strips of wood fitted together. Beautiful job. It looks like a million bucks. Thank you for the link and answer. 🙂
Geez!, I would never have the patience for all that work!, it looks so good!< good job!.
Your posts prove that small changes make a gigantic difference. I *love* that you chose yellow for this bathroom, Kristi! So cheerful and really brings a whole new feeling to the space. You inspire me!
Man, your “Before” bathroom looks like mine! I was just telling my husband last night that I’m getting the “itch” to start the bathroom redo. I had a wood counter-top in mind. Thanks for the inspiration, girl! Erin @ UpcycledUgly
Wow, what a beautiful re-do, looks amazing! the before def looks like most of our washrooms. :p
Angie P.
Kristi –
You are amazing! I was wondering if you talked more about the flooring in this room. Did you put your flooring on top of the existing vinyl? I saw where you layer it on concrete. Did you do anything different here.
Laurie
Wow!! Luv the bathroom colors an everything you did…gorgeous! ! I used to b the diy diva when I was in better health now the hubs does it for me..lol…great job!! 🙂
It’s a pity you don’t have a donate button! I’d most certainly donate to this superb blog!
I suppose for now i’ll settle for book-marking and adding your RSS feed to
my Google account. I look forward to brand new updates and will talk about this blog with my Facebook group.
Chat soon!
Love this bathroom!! Wish I was creative. Where did you get the glass jars from? I have been looking every where for jars like this and can’t seem to find them anywhere.
Hiya:)
I was wondering about the countertop – I want to do this on a larger scale in the kitchen. It is by no means a HUGE countertop, but i have a lot of cedar planks left over from the fencing job I did a few years ago and think it would look awesome. This may be a dumb question, but is there a reason why you just didn’t just glue the cedar planks straight on the old countertop. I will have a larger two basin porcelain drop in sink, and think that the old countertop will provide a little more support? Or should I rip out the old countertop as you did and get a thick plywood and then glue the cedar planks to the plywood and follow your steps form there??
I look forward to your response
– New to the whole DIY house projects and need all the advice I can get:)
Beautiful transformation Kristi!
I’m curious, do you do significant and concrete planning before you tackle your projects? Or are you more of a big picture, take it as it comes kind of person?
You are amazing! I admire your resourcefulness and your can-do attitude. I have a very small bathroom that I use regularly, too and storage is such an issue. I’ve been putting off putting in open shelving, but you’ve inspired me! Thank you. I love your blog!
You are amazing. I love every project. Thank you for your easily understandable instructions and supplies list. You definitely are a Super Hero for all you do!!💜